Fuser Auto-Scaling
PhotoMesh offers two options to scale project production up and down based on resource needs:
§ Amazon Web Services (AWS) Fusers – AWS fuser instances can be dynamically launched whenever there are unassigned pending fuser tasks, to further accelerate model creation.
§ Fusers Pool – Fusers can be shared between several PhotoMesh Build Managers in your organization, to dynamically allocate and free fusers based on each project’s resource needs.
These options can be used together or separately. When either option is used, PhotoMesh Build Manager continuously monitors the fusers’ progress and status and the processing requirements and allocates or frees fusers as required.
Using Amazon Web Services (AWS) Fusers
PhotoMesh can work with Amazon Web Services to scale project production up and down based on resource needs. AWS fuser instances can be dynamically launched whenever there are unassigned pending fuser tasks, to further accelerate model creation. PhotoMesh Build Manager continuously monitors the fusers’ progress and status and the processing requirements of the current step, adding and terminating AWS fusers as required. See "Getting Started with AWS" for more information.
To use AWS fusers:
1. In the Build Manager, toggle on Use AWS Instances. You can also access these settings from the Tools tab (AWS Instance Settings command) and from the Start page's Automation Dashboard.
Note: The Automatically use new available fusers check box must also be selected, so that PhotoMesh will use the AWS fuser instances after they are launched.
2. If PhotoMesh Build Manager is running on a local computer, and this is the first time connecting to the AWS fusers, the AWS Security dialog is displayed. Enter your AWS security information, and click OK.
Note: IfPhotoMesh Build Manager is running on an AWS instance with an IAM (Identity and Access Management role), security credentials are not required. See "Creating an IAM User for Running PhotoMesh Project Using an On-Premises Master" in the "Getting started with AWS" chapter for information.
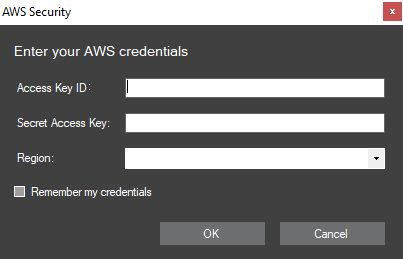
AWS Security Dialog
|
Access Key ID |
Token that allows PhotoMesh to communicate with your AWS account. Note: You can find your Secret Access Key on the My Security Credentials link in the AWS Management Console. |
|
Secret Access Key |
Token that allows PhotoMesh to communicate with your AWS account. Note: You can find your Secret Access Key on the My Security Credentials link in the AWS Management Console. |
|
Region |
Select an AWS region. |
|
Remember my credentials |
Select this option to save the password. The password will be saved and will be displayed using asterisks the next time the dialog is opened. |
3. In the Auto-Scaling Fusers Settings dialog, select the Use AWS Instances check box, and then enter the following information:
|
Maximum Price per Spot Instance |
Set the maximum price you want to pay for an EC2 fuser spot instance. |
|
Maximum Instances |
Set the maximum number of fuser instances to launch. |
|
Set the maximum number of fuser instances to launch per minute, e.g. if Maximum Instances was set to 200, and the Launch Rate to 50, the Build Manager will spread the launch of the fusers over 4 minutes. This prevents a potential bottleneck that could be caused by a large number of fusers attempting to read the build data at the same time. |
|
|
Terminate AWS instances when build finished |
Select the check box if you want to terminate AWS fuser instances when the build is complete. |
|
Select fuser instance launch parameters |
|
|
Region |
The region the master is running in, or the region set in the AWS Security dialog (Read-only). |
|
Configuration Name |
Name of the JSON configuration file PhotoMesh should use. The JSON file contains an ordered array of fuser instance types based on preferability. During production, PhotoMesh iterates over the elements of the array, beginning with the first instance type, until it finds an available instance. Priority is given to the instances within the subnets listed in the Subnet ID (below), before moving to the next machine type. To modify the configuration, click Edit or open the file in a text editor See "Recommendations Based on PhotoMesh Step" in the "Getting Started with AWS" chapter for information. Additional JSON configuration files can be created and placed under ../photomesh/AWSConfigurations where the two example JSON files are also saved. Each instance object in the JSON file's array has four properties: § ami - ID of the Amazon Machine Image (AMI). § instanceType - Defines the hardware of the host computer used for your instance. Each instance type offers different compute, memory, and storage capabilities. § demandType - Determines the pricing arrangement: "onDemand" or "spot." § fusersCount - Number of PhotoMesh fusers to run on each instance. More powerful instances have the capability to run multiple fusers simultaneously, thereby enhancing cost efficiency. Example: { "configurations": [ { "ami": "ami-12345", "instanceType": "g4ad.4xlarge", "demandType": "spot", "fusersCount": 4 }, { "ami": "ami-12345", "instanceType": "g4ad.2xlarge", "demandType": "spot", "fusersCount": 2 }, { "ami": "ami-12345", "instanceType": "g4dn.4xlarge", "demandType": "spot", "fusersCount": 4 }, { "ami": "ami-12345", "instanceType": "g4dn.2xlarge", "demandType": "spot", "fusersCount": 2 } ], "Name": "GPU" } |
|
Build Priority |
Select either Choose all listed options, to use all machine types listed in the JSON file, with priority based on the order they are listed in the file, or select a specific machine. |
|
Security Group ID |
Select the instance’s security group ID. Security groups control inbound and outbound traffic using rules. |
|
Subnet ID |
Select the subnet of the virtual private cloud (VPC) dedicated to your AWS account, into which to launch your fuser instances. If you want to use additional subnets, click Additional Subnets, and type a list of all the subnet ID's you want to use. See "Building a PhotoMesh Project Using the Master Instance" in the "Getting Started with AWS" chapter for more information. |
|
Key Pair Name |
The name of the Key Pair used to configure the PhotoMesh AWS fuser Amazon Machine Images (AMI's). Key Pairs are used to encrypt and decrypt login information. |
|
Additional Per Project Fuser Instance Tags Add tags to help you easily identify a fuser instance in the Amazon EC2 console after it is launched. These tags are saved in the JSON configuration file. |
|
|
Customer |
Name of customer who commissioned the project. |
|
Description |
Free text describing the project. |
|
Shutdown inactive fuser instance… |
Select one of the options for shutting down inactive fuser instances: § Shut down inactive fuser instances before the next billing hour § Shut down inactive fuser instances after XX minutes |
4. If you want to use another account, click Use another AWS account, and enter the AWS security information (see step 2 for more information).
5. If you also want to use pool fusers, toggle on the Use Fusers Pool link, and enter the required information. See "Using a Fusers Pool" in this chapter for information.
6. Click OK.
Fuser Pools
A fuser pool is a shared group of fusers that can be used by multiple PhotoMesh master computers within an organization. Each master computer’s Build Manager independently requests fusers from the pool as needed and releases them when no longer in use. This distributed management approach allows each Build Manager to handle its own fuser requirements.
Fusers are allocated on a first-come, first-served basis, i.e., the first Build Manager to request a fuser receives it, if available. The Smart Fuser Assignment mechanism can be enabled to auto-assign fusers to jobs based on hardware requirements and job priorities, thereby ensuring efficient resource utilization across distributed builds. See "Smart Fuser Assignment" in this chapter for more information.
If no fusers are free, the manager continues checking the pool until one is returned, at which point it assigns the fuser to its project’s working folder. Fusers can also be manually assigned to specific computers when needed.
The Pool Manager provides centralized tools for monitoring and managing all aspects of the fuser pool. It can be accessed from the Build Manager dialog or the Tools tab. The Pool Manager is divided into four pages, accessible from the side panel on the left:
§ Fusers – View all available fusers, monitor their status and activity, manually assign them to projects, and add comments.
§ Projects – Manage pool usage at the project level, adjust project priorities, and set fuser limits.
§ Pool Settings – Configure machine-specific settings such as the number of fusers per machine and idle timeouts.
§ IT Operations – Scan the network for available machines, add or remove them from the pool, and run administrative scripts remotely.
Setting Up and Managing a Fusers Pool
The fuser pool folder serves as the central location for pool management and holds the working folders that will be created automatically for each of the projects using the fusers pool. The folder must be on a drive with read and write access for both the PhotoMesh master and all fuser machines.
Note: If you are also using local fusers for a project, the working folder must be the one automatically created in the pool directory. It is recommended to create the working folder on a fast drive that is different from the one used for the project data, most preferably on a solid-state drive (SSD) that is shared with the master machine and other fuser machines.
Preparing the Shared PhotoMesh Environment
To ensure all machines use the same PhotoMesh version, the application must run from a shared network location:
1. Copy the PhotoMesh application files from the PhotoMesh master computer to a shared network drive that is accessible to the master and all fuser computers
2. On the master computer, run PhotoMesh from this shared network path.
3. On each of the fuser machines in the pool, run PMFuserService.exe from the shared path. This service is responsible for running the required fuser (PhotoMeshFuser.exe) version for the requesting manager and assigning it to the manager’s working folder, enabling different PhotoMesh versions to use the same fuser pool. It is recommended to run the fuser service on startup using auto-logon. See "Running Fusers Upon Login" in this chapter for information.
Note: PMFuserService can also be run from the fuser folder under the installation folder (.\Application Files\Fuser\PhotoMeshFuser.exe).
Creating a Pool
To create a fusers pool:
1. From the Start page, open the Automation Dashboard and in the Fusers Pool section, click View Pool. See "Automation Dashboard" in the "Basic Concepts" chapter for information. The Pool Manager is displayed, showing the Configure pool folder dialog.
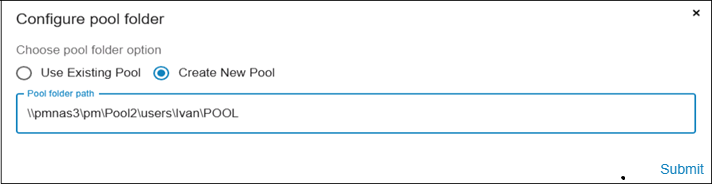
Configure Pool Folder Dialog
2. Select Create New Pool to create a new pool. If you want to connect to an existing pool instead, select Use Existing Pool.
3. Type the Pool folder path, and click Submit.
Scanning a Network for Computers
Use the network scan to detect available machines that are not yet on the network list.
To scan a network for computers that aren't yet on the network list:
1. From the Pool Management menu, select IT Operations.
2. Click Scan.
3. In the panel that is displayed, enter the first three octets of the IP address of the network that you want to scan (i.e., the first three numbers, such as 192.168.1) and the range for the fourth octet (e.g., 1–100).
4. Click Scan. The system scans the specified range and displays information on the number of machines found.
5. Click OK to add the computers to the network list.
The network list displays the following information for each computer:
§ Computer name and IP address
§ Online status
§ Whether the computer is already in the pool
§ Whether the Fuser service is ready. See "Running the Fuser Service" in this chapter for information.
§ Whether the machine is ready for remote scripting
§ Service version
§ Number of fusers per machine
§ Last running script and script success
§ Number of CPU cores (with current usage percentage)
§ GPU information
§ Amount of available and total RAM
§ Operating system (OS)
§ Idle timeout setting
Adding Network Computers
Any computer on the network list that is running the Fuser Service (and not yet in the pool) can be added to the fuser pool. See "Running the Fuser Service" in this chapter for more information.
To add a computer to the pool:
1. From the Pool Management menu, select IT Operations.
2. Select the required computer(s) and click Add to pool ![]() . If you want to scan the network for additional computers, click Scan. See "Scanning a Network for Computers" in this chapter for information.
. If you want to scan the network for additional computers, click Scan. See "Scanning a Network for Computers" in this chapter for information.
3. In the panel that is displayed, click Add.
Removing Computers
Removing a computer detaches it from the pool but retains it in the list of network machines, allowing you to re-add it later if needed.
To remove a computer from the pool:
1. From the Pool Management menu, select IT Operations.
2. Select the required computer(s) and click Remove from pool ![]() .
.
3. In the panel that is displayed, click Remove. The computer is no longer part of the active fuser pool but remains listed in the network.
Deleting Computers
If a computer should no longer be listed at all, you can delete it from the network list.
To delete a computer from the list:
1. From the Pool Management menu, select IT Operations.
2. Select the required computer(s) and click Delete  .
.
3. In the panel that is displayed, click Delete. The computer is removed from the network list and will no longer be available for pool operations unless re-scanned.
Using a Fusers Pool
To use a fuser pool, PhotoMesh master must be run from a shared network drive that is accessible to all fuser computers, to enable the Fuser Service to launch the correct fuser version.
To enable pool usage:
1. On the PhotoMesh master computer, in the Build Manager, toggle on Use Fusers Pool. Click Change to open the Auto Scaling Fusers Settings dialog. You can also access these settings from the Tools tab (Fuser Pool Settings command).
Note: The Automatically use new available fusers check box must also be selected, so that PhotoMesh will use the pool fusers when they become available.
2. Select the Use Fusers Pool check box, and enter the following information:
|
Fusers Pool Folder |
Click Change to browse to the location of the pool folder. See "Creating a Fusers Pool" in this chapter for more information. Note: If you are also using local fusers for a project, the working folder for the entire project, i.e. for both the local and pool fusers must be located in the pool directory. |
|
Fuser Folder |
Click Change to browse to the location of the fuser folder. This folder is set, by default, to the UNC path of the folder from where PhotoMesh is running so that the Fuser service launches the fuser version required by the master. Make sure that this path is accessible to all the fusers, e.g., by running PhotoMesh from a file share or network drive that is accessible to all fuser computers. |
|
Return inactive fuser to pool after |
Set the number of seconds after which inactive fusers should be returned to the pool. |
|
Maximum Fusers |
Type the maximum number of fusers to run. If fusers are available in the pool, PhotoMesh Build Manager adds pool fusers up to the maximum number set. Note: Make sure your pool limit does not exceed your license fuser limit, to avoid rejection of your fuser request by the pool. |
|
Priority |
Select the priority level of this project. |
|
Select this check box to auto-assign fusers to jobs based on hardware requirements and job priorities. PhotoMesh uses a JSON configuration file (FusersHWRequirements.json) to define the minimum and optimal hardware specifications (CPU cores, memory, GPU requirements, etc.) for each build step. See "FusersHWRequirements Configuration" in this chapter for more information. You can customize requirements by modifying this file. Note: Smart Fuser Assignment is not supported when rebuilding projects that were originally processed using gigapixel credits. See "Applying Gigapixel Credits" in the "Building" chapter. |
|
|
Load requirements from |
Select the source for the hardware requirements JSON file: § Pool – Load the FusersHWRequirements.json file saved in the fuser pool folder. § Custom – Load a custom FusersHWRequirements.json file from the path specified below. |
|
Custom Priority Path |
Path of the custom FusersHWRequirements.json file. |
4. If you also want to use AWS fusers, select the Use AWS Instances check box, and then enter the required information. See "Using Amazon Web Services (AWS) Fusers" in this chapter for information.
5. Click OK.
6. If you want to monitor and manage all pool fusers, e.g., assign fusers to specific projects’ working folders and prevent their being restored to the pool, in the Build Manager dialog, click the Pool Manager link. See "Managing a Fusers Pool" in this chapter for information. You can also access the Pool Manager from the Tools tab.
Smart Fuser Assignment - FusersHWRequirements Configuration
When working with a fuser pool, PhotoMesh can automatically assign fusers to build tasks based on hardware capabilities and project priorities. This behavior is controlled by a JSON configuration file, FusersHWRequirements.json, which defines minimal (minRequirements) and optimal (optimalRequirements) hardware requirements - such as CPU cores, memory, and GPU resources - for each step (processGroups) of the build process.
A fuser can also be assigned exclusively to a step, using the requiresExclusive parameter, so that the machine will not run other tasks concurrently while executing that step. PhotoMesh uses these values to evaluate available machines and assign tasks to the most suitable fusers. You can customize the hardware requirements by modifying the JSON file.
This configuration file is only required when Smart Fuser Assignment is enabled. It is recommended to save the file in the fuser pool folder. See "Setting Up and Managing a Fusers Pool" in this chapter for information.
To enable smart fuser assignment:
1. On the PhotoMesh master computer, in the Build Manager, toggle on Use Fusers Pool. Click Change to open the Auto Scaling Fusers Settings dialog. You can also access these settings from the Tools tab (Fuser Pool Settings command).
Note: The Automatically use new available fusers check box must also be selected, so that PhotoMesh will use the pool fusers when they become available.
2. Select the Use Fusers Pool check box, and then select the Smart Fuser Assignment check box
Note: Smart Fuser Assignment is not supported when rebuilding projects that were originally processed using gigapixel credits. See "Applying Gigapixel Credits" in the "Building" chapter.
3. Click OK.
FusersHWRequirements.json Example
The following example shows how hardware requirements can be defined for different build stages.
{
"version": "1.0",
"processGroups": {
"dataPreparation": {
"minRequirements": {
"cores": 999,
"memoryGb": 16,
"gpuMemoryGb": null,
"networkMbps": null,
"requiresExclusive": false
},
"optimalRequirements": {
"cores": 8,
"memoryGb": 16,
"gpuMemoryGb": null,
"networkMbps": null
}
},
"aerotriangulation": {
"minRequirements": {
"cores": 8,
"memoryGb": 64,
"gpuMemoryGb": null,
"networkMbps": null,
"requiresExclusive": true
},
"optimalRequirements": {
"cores": 16,
"memoryGb": 128,
"gpuMemoryGb": null,
"networkMbps": null
}
},
"pointCloud": {
"minRequirements": {
"cores": 8,
"memoryGb": 16,
"gpuMemoryGb": null,
"networkMbps": null,
"requiresExclusive": false
},
"optimalRequirements": {
"cores": 8,
"memoryGb": 16,
"gpuMemoryGb": null,
"networkMbps": null
}
},
"model": {
"minRequirements": {
"cores": 99,
"memoryGb": 16,
"gpuMemoryGb": null,
"networkMbps": null,
"requiresExclusive": false
},
"optimalRequirements": {
"cores": 8,
"memoryGb": 16,
"gpuMemoryGb": null,
"networkMbps": null
}
},
"texture": {
"minRequirements": {
"cores": 8,
"memoryGb": 16,
"gpuMemoryGb": 4,
"networkMbps": null,
"requiresExclusive": false
},
"optimalRequirements": {
"cores": 8,
"memoryGb": 16,
"gpuMemoryGb": 8,
"networkMbps": null
}
},
"output": {
"minRequirements": {
"cores": 8,
"memoryGb": 16,
"gpuMemoryGb": 4,
"networkMbps": null,
"requiresExclusive": false
},
"optimalRequirements": {
"cores": 8,
"memoryGb": 16,
"gpuMemoryGb": 8,
"networkMbps": null
}
}
}
}
Managing a Fusers Pool
Fusers are allocated on a first come first served basis, i.e., to the first PhotoMesh Build Manager that requests fusers from the pool. If a subsequent manager submits a request for a user, but no fusers are currently available in the pool, the manager continually checks the fusers pool for a fuser that was returned to the pool, at which point it assigns the fuser to its project’s working folder. If you want to manually assign fusers, you can do so from the Pool Management - Fusers page. From this page, you can monitor and manage all the fusers in the pool, e.g., assign fusers to specific projects’ working folders and prevent their being returned to the pool.
The Fusers page offers a comprehensive view and control over all fusers in the pool. The Pool Summary Bar at the top of the page displays summary totals, including the count of online, offline, and active fusers, as well as the number of projects in production and in queue. The Fusers table displays key details including:
§ Fuser name and IP address
§ Status (Available, Offline, Working, Private)
§ Manager and project assigned to each fuser
§ Current step that the fuser is executing and percentage of the step that has been completed
§ Hardware of machine used by fuser (cores, GPU, RAM)
§ Number of fusers running on each machine
§ Comments (editable text)
To make it easy to identify machines with potential performance or availability issues, the Fusers table highlights fusers in red if they have either high RAM usage or low disk space:
§ RAM usage exceeds 95% (e.g., 12.12 GB used out of 15.88 GB total)
§ Free disk space falls below 10% (e.g., only 3.5% of disk space remaining)
Manually Assigning Fusers to Projects and Adding Comments
Fusers are allocated on a first come first served basis, i.e., to the first PhotoMesh Build Manager that requests fusers from the pool. If a subsequent manager submits a request for a user, but no fusers are currently available in the pool, the manager continually checks the fusers pool for a fuser that was returned to the pool, at which point it assigns the fuser to its project’s working folder. If you want to manually assign fusers, you can do so from the Pool Management - Fusers page.
To assign fusers to a manager:
1. From the Pool Management menu, select Fusers.
2. Select the required fuser(s) and click Assign ![]() .
.
3. In the panel that is displayed, do the following:
a. Select a manager from the dropdown list.
b. If you want to prevent these fusers from being restored to the pool after completing their current tasks, select the Keep private check box..
4. Click Assign to confirm the assignment.
To add comments for specific fusers:
1. From the Pool Management menu, select Fusers.
2. Select the required fuser(s) and click Add Comment ![]() .
.
3. In the panel that is displayed, type the comment, and click Add Comment.
a. Select a manager from the dropdown list.
b. If you want to prevent these fusers from being restored to the pool after completing their current tasks, select the Keep private check box..
4. Click Assign to confirm the assignment.
Prioritizing Projects
The Projects page allows management of the pool at the project level. All active or queued projects that have had at least one working pool fuser are listed. The Projects table includes the following information:
§ Project name and name of Build Manager’s computer
§ IP address of computer
§ Project status (Running, Queued)
§ Project’s priority (High, Medium, Low)
§ Current project phase (e.g., AT, Image Processing)
§ Allocated and working fusers
§ Maximum allowed fusers (local and AWS)
To adjust project priority or fuser limits:
1. From the Pool Management menu, select Projects.
2. Select the required project(s) and click Properties ![]() .
.
3. In the panel that is displayed, do the following:
a. Set Priority to High / Medium / Low. Higher-priority projects can preempt fusers from lower-priority ones.
b. Set Maximum Fusers and AWS Max Fusers.
4. Click Save.
Editing a Computer's Configuration
The Pool Settings page displays details of each of the computers in the pool:
§ Computer name and IP address
§ Online/offline status
§ Number of fuser instances per machine
§ Computer hardware (cores, GPU, RAM)
§ Computer operating system
§ Idle timeout (before computer’s fuser is returned to pool)
To edit a computer’s configuration:
1. From the Pool Management menu, select Pool Settings.
2. Select the required computer(s) and then click Properties ![]() .
.
3. In the panel that is displayed, do the following:
§ Set number of Fusers per Machine
§ Set the Idle Timeout (in minutes) - number of seconds after which inactive fusers should be returned to the pool.
4. Click Set.
Running Scripts on Remote Machines
To run administrative scripts (e.g., install fuser service or apply Windows updates):
1. In IT Operations, select one or more machines.
2. Click Run Script ![]() .
.
3. Choose a built-in or custom script from the dropdown.
4. If required, enter administrative credentials.
5. Click Run.
Custom scripts must be saved in the Scripts folder under the main pool directory.