Importing and Exporting Models
After a 3D mesh model is created in Skyline PhotoMesh, certain tiles may require editing, e.g. to remove a particular building that is being torn down, flatten surfaces and correct certain imperfections such as bumps or irregular surfaces, or edit textures. These edits, whether they involve mesh or texture retouching, can be performed in external software, such as Autodesk® MeshMixer, by exporting the required OBJ models and then reimporting them to PhotoMesh in order to rebuild the project. When edits are complete, you can reimport precisely the data you want, all in one step:
§ Only textures, using the models generated by PhotoMesh before the edits
§ Only models (in which case retexturing is required in PhotoMesh)
§ Both models and textures
You can import a single model or a folder with multiple model files, in which case each model file is read into its respective tile as long as its original file name is maintained.
Exporting a Point Cloud
To export a point cloud:
1. Select the tile whose point cloud you want to export. See "Selecting Tiles" in the "Reviewing Your Build" chapter. The Tile tab is displayed.
2. On the Tile tab, in the Export group, click Point Cloud. The Export Point Cloud dialog is displayed.
3. Browse to the required location, and click Save. The point cloud is exported in Polygon File Format (PLY).
Exporting a Model
To export a model:
1. Select the tile whose model you want to export. See "Selecting Tiles" in the "Reviewing Your Build" chapter. The Tile tab is displayed.
2. On the Tile tab, in the Export group, clickModel. The Export Model Folder dialog is displayed.
3. Browse to the required location, and click Save. The model is exported in OBJ format.
Note: When reimporting an exported model file after editing in external software, the model file must have the original file name with which it was exported to enable PhotoMesh to update the respective tile based on the edited model.
Importing a Model
To import a single model:
1. Select the tile for which you want to import a model. See "Selecting Tiles" in the "Reviewing Your Build" chapter. The Tile tab is displayed.
2. On the Tile tab, in the Import group, click Model. The Import Model dialog is displayed.
3. Browse to the required model and click Open. The Import Model dialog is displayed.
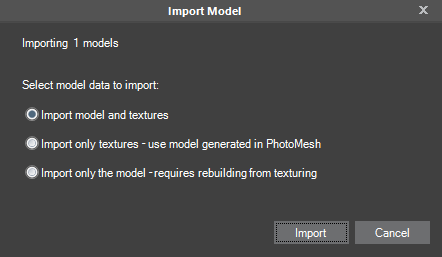
Import Model Dialog
4. Select the model data to import and then click Import:
§ Import model and textures
§ Import only textures – use model generated in PhotoMesh
§ Import only the model – requires rebuilding from texturing
5. After reimporting, rebuild using the "Build" command starting from "Auto", to have PhotoMesh automatically determine what processing must be performed to complete the project. See "Rebuilding" in the "Building" chapter for information.
To import a folder with multiple models:
1. On the Home tab, in the Add group, click the arrow under Retouch and select Import Models. The Import Model Folder dialog is displayed.
2. Browse to the folder that contains the edited models and click Select Folder. The Import Model dialog is displayed.
Note: The model files must have the original file names with which they were exported to enable PhotoMesh to update the respective tiles based on the edited models.
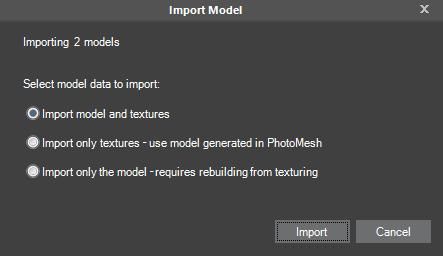
Import Model Dialog
3. Select the model data to import and then click Import:
§ Import model and textures
§ Import only textures – use model generated in PhotoMesh
§ Import only the model – requires rebuilding from texturing
4. After reimporting, rebuild using the "Build" command starting from "Auto" and building until "Output", to have PhotoMesh automatically determine what processing must be performed to complete the project. See "Rebuilding" in the "Building" chapter for information.