Working with Presets
Build parameter presets make it easy to automatically set the required parameters to generate the optimum output for the project’s data as well as to share user-defined build settings between projects. New presets can easily be created by saving your build settings to a preset file. You have the flexibility to save all settings to the preset, or only selected ones. Presets only include changes from the default settings. This allows multiple presets to be selected for a build, each of which defines settings for a different subset of the build steps. If selected preset files have conflicting properties or flags, the value from the last file on the list is applied. Presets are managed (e.g., loaded, deleted, edited, and set as the default) from the Preset Manager.
Selecting Presets
To select presets for your build:
1. On the Home tab, in the Process group, click Build. The Build Parameters dialog is displayed.
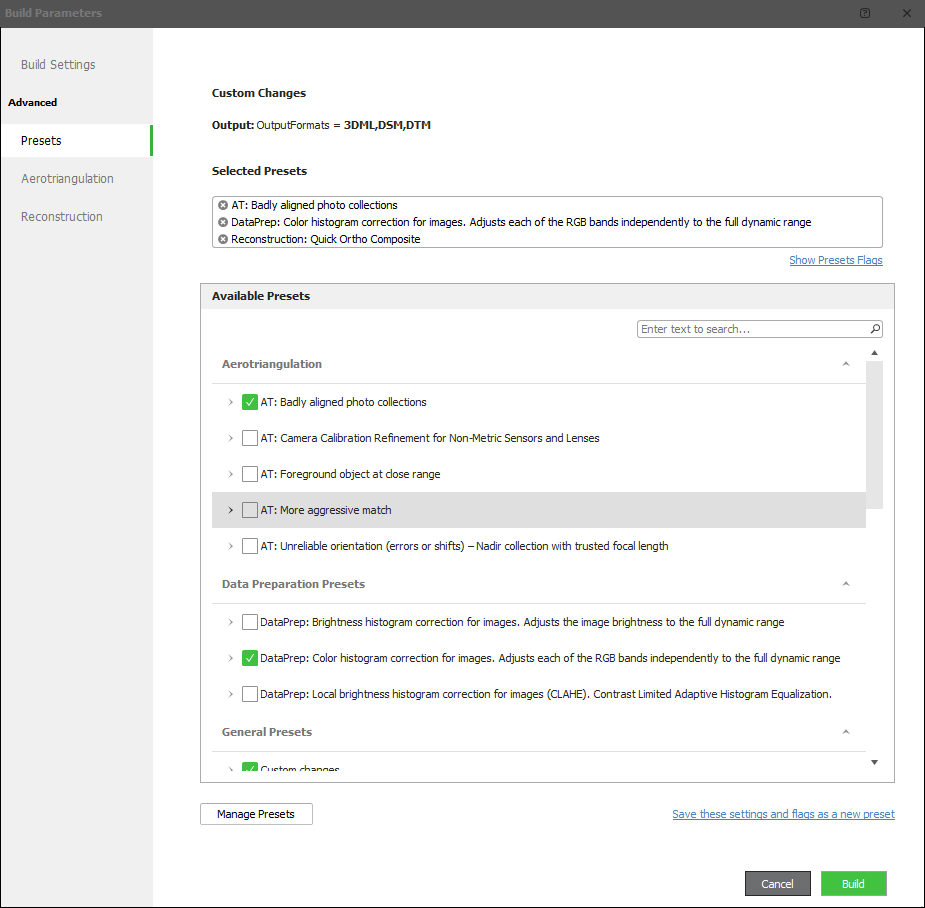
2. In the left pane of the dialog, click Presets. The right pane displays the Presets page with Available Presets grouped by category (e.g., Aerotriangulation, Data Preparation, and General presets) with a search box to filter the list.
Preset Manager
3. In the Available Presets section, expand categories (e.g., Aerotriangulation, Data Preparation Presets, General Presets) and use the search box to filter.
4. Select the check box next to each preset that you want to use. Selected presets appear under Selected Presets at the top of the page. The "Custom Changes" section at the top of the dialog shows all custom changes that were made to AT, reconstruction, and output settings. If multiple selected presets define the same property or flag, the value from the preset you selected later (which is therefore listed later in the Selected Presets list) takes precedence. See “Available Presets” in this chapter for more information on the presets that PhotoMesh offers.
5. Click OK.
Loading a Preset from File
To load a preset from file:
1. On the Home tab, in the Process group, click Build. The Build Parameters dialog is displayed.
2. In the left pane of the dialog, click Presets. The right pane displays the Presets page with Available Presets grouped by category.
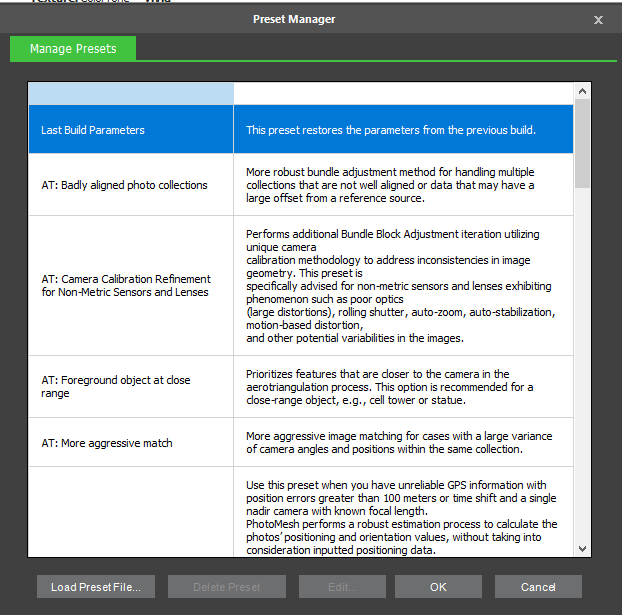
3. Click Manage Presets. The Preset Manager is displayed.
Preset Manager
4. Click Load Preset File. The Load Preset from File dialog is displayed.
5. Browse to the required file, and click Open.
Creating a New Preset
A new preset can be easily created by saving your build settings to a preset file. You can save all your build settings, or only the settings from specific build steps. Only changes to the default settings are saved.
To create a new preset:
1. Set the build parameters as required. See "Setting Build Steps, Parameters, and Outputs" in this chapter for information.
2. In the left pane of the Build Parameters dialog, click Presets. The right pane displays the Presets page with Available Presets grouped by category.
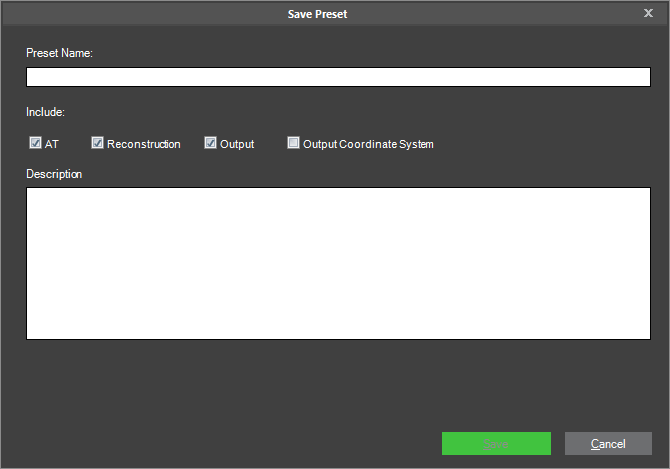
3. Click Save these settings and flags as a new preset. The Save Preset dialog is displayed.
Save Preset Dialog
4. Type a Preset Name for the preset and a free text Description.
5. Select the check boxes of the build steps whose settings you want to save in your preset file.
6. Click Save.
Deleting Presets
To delete a preset file:
1. On the Home tab, in the Process group, click Build. The Build Parameters dialog is displayed.
2. In the left pane of the dialog, click Presets. The right pane displays the Presets page with Available Presets grouped by category.
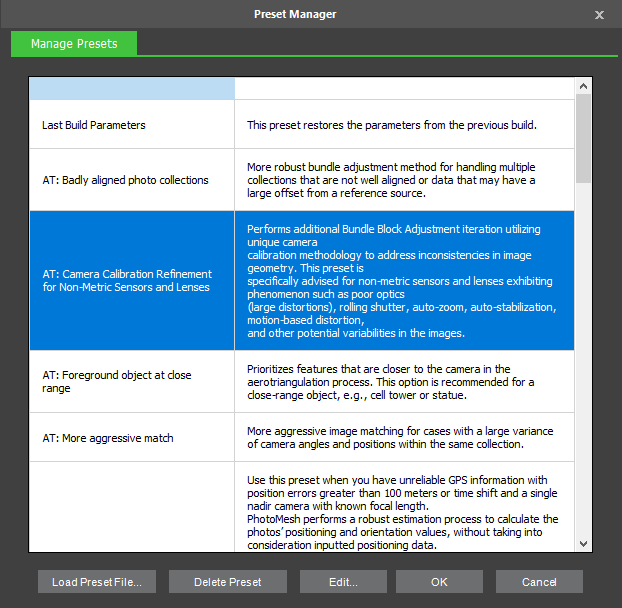
3. Click Manage Presets. The Preset Manager is displayed.
Preset Manager
4. Select the required preset from the list, and click Delete Preset. Built-in presets cannot be deleted.
5. Click OK.
Editing Presets
To edit a preset file:
1. On the Home tab, in the Process group, click Build. The Build Parameters dialog is displayed.
2. In the left pane of the dialog, click Presets. The right pane displays the Presets page with Available Presets grouped by category.
3. Click Manage Presets. The Preset Manager is displayed.
Preset Manager
4. Select the required preset from the list, and click Edit. Built-in presets cannot be edited. The preset XML file is opened in a text editor.
5. Edit the file in the text editor, and save your changes.
6. In the Preset Manager dialog, click OK.
Available Presets
PhotoMesh provides presets for each step of the build process: data preparation, aerotriangulation, and reconstruction:
§ Maximize memory (single fuser per machine)
§ Brightness histogram correction for images - Adjusts the image brightness to the full dynamic range histogram correction for images
§ Color histogram correction for images. Adjusts each of the RGB bands independently to the full dynamic range histogram correction for images
§ Camera Calibration Refinement for Non-Metric Sensors and Lenses
§ Foreground object at close range
§ More aggressive match
§ Unreliable orientation (errors or shifts) - Nadir collection with trusted focal length
§ Aggressive cleaning of spaces within skeletal objects
§ Close range with long lens
§ Enhanced True Orthophoto and DSM
§ Enhance trees
§ Fusion of aerial and terrestrial collections
§ Nadir only dataset
§ Optimize LiDAR integration
§ Draft mode
§ Quick Ortho Composite
§ Suppress floating noise
§ Use all photos for texturing
§ Use all photos in range for texturing
Data Preparation Presets
All these presets requires the deleting of the SMPT (PhotoMesh internal image format) and features (SKFI files) folders for existing projects and starting a new build. Note that previewing photos in PhotoMesh prior to running through the data preparation, will generate SMPT and features without the effect of this preset so those files should be deleted before running the data preparation.
|
Maximize memory (single fuser per machine) |
Maximize Data Preparation memory allocation for best performance. Use this preset only in a single fuser per machine setup. |
|
Brightness histogram correction for images |
Adjusts image brightness to the full dynamic range. |
|
Color histogram correction for images. Adjusts each of the RGB bands independently to the full dynamic range histogram correction for images |
Adjusts each of the RGB bands independently to the full dynamic range. |
Aerotriangulation Presets
|
Camera Calibration Refinement for Non-Metric Sensors and Lenses |
Performs additional bundle block adjustment iteration using unique camera calibration methodology to address inconsistencies in image geometry. This preset is recommended for non-metric sensors and lenses exhibiting phenomenon such as poor optics (large distortions), rolling shutter, auto-zoom, auto-stabilization, motion-based distortion, and other potential variabilities in the images. |
|
Foreground object at close range |
Prioritizes features that are closer to the camera in the aerotriangulation process. This preset is recommended for a close-range object, e.g., cell tower or statue. |
|
More aggressive match |
Performs more aggressive image matching. This preset is recommended for data sets with a large variance of camera angles and positions within the same collection. |
|
Unreliable orientation (errors or shifts) - Nadir collection with trusted focal length |
PhotoMesh performs a robust estimation process to calculate the photos’ positioning and orientation values, without taking into consideration inputted positioning data. All AT tiles are then aligned to each other and then the entire projected is aligned as a single block to the inputted positions. A higher accuracy tolerance is permitted for photos whose positioning information places them at a distance from the project’s other photos (outliers). This option is recommended when the difference between the inputted position and the actual position is greater than 100m. In most cases this is caused by a lag between the acquisition of the GPS information and its association to the photo, or when multiple collections are photographed at different times with inaccurate positioning hardware. |
Reconstruction Presets
|
Aggressive cleaning of spaces within skeletal objects |
This preset results in a cleaner, more visually accurate 3D model. This is particularly effective for objects, like telecommunications towers and other mostly hollow objects, where empty space is a significant aspect of the object's structure. Requires building the tiles from model creation. |
|
Close range object |
Optimized for projects covering an object of interest such as a cell tower or a building at high resolution (<1cm per pixel). This preset is recommended for drone or ground-based photos that are close to the object of interest with photo angles that include horizontal or above the horizon views. |
|
Close range with long lens |
Recommended for projects whose photos were captured using a lens with a long focal length, resulting in a narrow field of view (generally less than 30 degrees). |
|
Enhanced True Orthophoto and DSM |
This preset is only recommended for generation of Orthophoto and Digital Surface Model (DSM) outputs. It uses alternative 3D correlation focusing on horizontal surfaces to improve the representation of vertical structures and complex geometries. To achieve optimal results, it should be used with only nadir collections that have a high degree of overlap. |
|
Enhance trees |
Attempts to enhance trees by densifying the point cloud based on the color green. This preset also uses less aggressive filtering on green colored pixels so some noise may be added. Requires building the tiles from point cloud. |
|
Fusion of aerial and terrestrial collections |
Fusion of aerial and terrestrial collections. This preset is recommended mainly when there is a large variation in collection resolutions. |
|
Nadir only dataset |
Improves edge sharpness and overall orthophoto quality. Recommended for generating outputs from nadir only datasets. This preset should only be used for ortho-only output, since its settings may cause some distortion to the 3D mesh. |
|
Optimize LiDAR integration |
Reduces dependency on image based point cloud, while increasing fidelity of mesh geometry by relying more heavily on the LiDAR points. |
|
Draft mode |
PhotoMesh performs a quick and light reconstruction process that produces low resolution tiles for review and modification, in preparation for full resolution reconstruction. |
|
Quick Ortho Composite |
Recommended for Ortho-only output. Uses terrain data automatically extracted from the AT results to quickly generate (~15 times faster) a terrain-based Ortho Composite, with optimized 2D geometry and texture. |
|
Suppress floating noise |
Minimizes floating noise in the correlated point cloud. This option is recommended for projects that include horizontal photo angles or above the horizon views. |
|
Use all photos for texturing |
Uses all available photos for texturing rather than the default which filters out photos not used in the point cloud reconstruction. Requires building the tiles from texturing. |
|
Use all photos in range for texturing |
Uses all available photos that are in the effective range of the reconstruction tile, for texturing, rather than the default which filters out photos not used in the point cloud reconstruction. Requires building the tiles from texturing. |
General Presets
|
Last Build Parameters |
contains the full settings from your most recent build |
|
PhotoMesh Default |
provides optimal results for the majority of projects. |
|
|
|
|
|
|