Deploying SkylineGlobe Server
SkylineGlobe Server can be deployed in both Windows and Linux environments. If you are upgrading from an earlier version, see "Upgrading SGS to 8.5" for information about database migration and URL compatibility.
§ Deploying SkylineGlobe Server for Windows - Run SGS manually or as a Windows service. This method uses a prepackaged folder with the SkylineGlobeServer.exe binary and requires the .NET Core Hosting Bundle. It provides flexible deployment options for on-premise environments without relying on containers.
§ Deploying SkylineGlobe Server in Containers - Deploy SGS as a Linux container using Docker or Kubernetes.
Key parameters, such as the floating license server URL and database type, can be defined to customize how SGS is deployed and behaves. The way these parameters are set depends on the deployment type:
§ Windows: appsettings.json in the root application folder. Create this file by copying the appsettings.sample.jsonc file provided by Skyline and renaming it to appsettings.json. See "Windows" for more information.
§ Docker: environment section in the Docker Compose YAML
§ Kubernetes: env: section in the Deployment YAML
See "Settings" in this chapter for more information.
Secure Deployment Options (HTTPS via Reverse Proxy or Kestrel)
SkylineGlobe Server (SGS) should be deployed with HTTPS to ensure secure communication and browser compatibility - for TerraExplorer Fusion (TEF), which requires HTTPS for advanced browser features like SharedArrayBuffer. For local development, SGS may run over http://127.0.0.1, but production environments must use HTTPS. You can configure HTTPS using either of the following approaches:
§ External HTTPS Termination (Recommended for Docker/Kubernetes): Use a reverse proxy like NGINX (Docker) or an Ingress controller (Kubernetes) to terminate the TLS connection. This offloads HTTPS handling from SGS and simplifies server configuration. See "Enabling HTTPS with NGINX in a Docker Environment" and "Enabling HTTPS with Ingress in a Kubernetes Environment" in this chapter for information. When using this method, you must provide a TLS certificate and key to the reverse proxy. The certificate can be either:
§ Self-signed (for development or internal testing)
§ CA-issued (recommended for production environments)
§ Internal HTTPS via Kestrel: Configure SGS to serve HTTPS directly using its built-in Kestrel web server. This option requires a .pfx certificate that contains both the server’s certificate and private key in a single file. Kestrel-based HTTPS is supported in Windows deployments. See "Kestrel: TLS Configuration Support" in this chapter for more information.
Note: The examples included in this chapter are based on external HTTPS using a self-signed certificate.
Upgrading SGS to 8.5
Database Upgrade
During the update, SGS 8.5 automatically updates its databases. To successfully upgrade the encrypted passwords, the deployment must run for the first time under the same SGS Application Pool user used by SGS 8.2. Follow these steps:
1. Determine the SGS Application Pool under which the existing SGS application is running:
a. In IIS Manager, go to Sites, select your website and then select the SGS application.
b. From the Actions panel, click Basic Settings. The Application Pool name displayed is the SGS application pool name.
c. In IIS Manager, go to Application Pools, select the application pool name from step 1 above.
d. From the Actions panel, open Advanced Settings. Check the Identity field to see which user the application pool runs under.
2. Back up the existing database:
a. Locate the catalog.db file (e.g., C:\SkylineGlobeServerConfiguration\catalog.db) and make a copy of it. It is optional to also back up statistics.db and messages.db.
b. Generate a database token if one has not already been created: In the SGS Manager Settings page, under the Database Token field, click Generate. This token will override any previously set token.
3. Deploy 8.5 as a Windows Service:
a. Download the SGS 8.5 application files from here.
b. In the NSSM Service Editor, make sure that the service is configured to run under the same user identified earlier for the SGS application pool.
4. Configure SGS 8.5 to use the same database connection that was previously defined. In earlier versions, this connection was configured in web.config. In SGS 8.5, it is configured in appsettings.json. See "Settings" in this chapter for information.
5. Start SGS 8.5: When SGS 8.5 starts, the database schema is upgraded automatically. Once this upgrade occurs, the database cannot be rolled back for use with older versions of SGS. Now, the databases can be used for SGS 8.5 Windows deployments with any user, or in Linux (Container or K8s) deployments.
Configuration File Upgrade
Starting with SGS 8.5, the SG Services Configuration file is now located in the SharedConfigurations directory on all platforms. To continue using your existing configuration from SGS 8.2, copy the SG Services Configuration file from the SGS 8.2 root directory to the SharedConfigurations directory in SGS 8.5. If this step is not performed, SGS 8.5 uses the new default-valued SGServices.json file created automatically in the SharedConfigurations folder, and any previously customized configuration is ignored.
Cache Folder Changes
In SGS 8.5, the cache folder has been moved to the shared configuration directory. To continue using existing cached data, the contents of the previous cache location must be copied to the new cache folder. If this step is not performed, cached content will be regenerated as needed.
URL Compatibility for Existing Projects
In SkylineGlobe Server 8.5, the default URL path no longer includes /sg. E.g., https://<HostName>/sg/<SiteName> is now https://<HostName>/<SiteName>.
To ensure backward compatibility with projects created in earlier versions that may still reference URLs that include /sg, set the OldVirtualPath parameter to "/sg". This allows the server to transparently handle requests that include the legacy path by ignoring it. See "Settings" in this chapter for information.
Deploying SkylineGlobe Server for Windows
SkylineGlobe Server for Windows can be deployed in two different ways. Each method requires the same basic setup and prerequisites, but offers different options for integration, automation, and control:
§ Manual execution as a standalone application
§ Running as a Windows service
Option 1: Manual Running of SGS
To manually run:
1. Download and extract the SGS application files.
2. Copy the license file to the SkylineGlobe Server application files folder.
3. Prepare the configuration file:
a. Copy the appsettings.sample.jsonc file from the \SG folder in the SGS package you downloaded in step 1.
b. Rename the file to appsettings.json and place it in the root of the SkylineGlobe Server application folder.
4. Enable TLS (commonly referred to as SSL) to secure SGS and ensure access to TerraExplorer Fusion, which operates exclusively over HTTPS. See “Secure Deployment Options (HTTPS via Reverse Proxy or Kestrel)" and "Kestrel: TLS Configuration Support" in this chapter for information on enabling HTTPS using the Kestrel web server.
5. Open the appsettings.json file and uncomment and update the parameters you need to configure. See "Settings" in this chapter for more information. Common parameters include:
§ CatalogDBType: The type of database to use. Options: SQLite (default) or PostgreSQL.
§ PublicUrl: The public-facing service URL used in WMS/WFS/WMTS responses.
§ LicenseServerURL: The URL of the floating license server. This parameter is required only when using a floating license. The license file must be placed in the root of the server directory, and this parameter should be set to that location, e.g., "LicenseServerURL": https://cloud.skylineglobe.com/sws/[YOUR_LICENSE_TOKEN]. See "Loading the Skyline Floating License on Each of the SkylineGlobe Servers" in the "Basic Concepts" chapter for information.
6. Double-click SkylineGlobeServer.exe. The server will launch in a console window.
7. Access SGS at: http://localhost:5000, or the port you configured if different. The SkylineGlobe Server Manager Login page is displayed.
8. Enter your user name and password in the respective fields. The default user name and password after deployment are admin and admin (lower-case). The Change default administrator password page is displayed.
9. Enter a new password for the admin user.
10. To stop SGS, close the console window or press Ctrl+C in the command prompt window.
Option 2: Running SGS as a Windows Service
To run as a Windows Service:
1. Download and extract the SGS application files.
2. Place the SkylineGlobe Server application folder and license file on the target machine.
3. Enable TLS (commonly referred to as SSL) to secure SGS and ensure access to TerraExplorer Fusion, which operates exclusively over HTTPS. See “Secure Deployment Options (HTTPS via Reverse Proxy or Kestrel)" and "Kestrel: TLS Configuration Support" in this chapter for information on enabling HTTPS using the Kestrel web server.
4. Open the appsettings.json file and uncomment and update the parameters you need to configure. See "Settings" in this chapter for more information. Common parameters include:
§ CatalogDBType: The type of database to use. Options: SQLite (default) or PostgreSQL.
§ PublicUrl: The public-facing service URL used in WMS/WFS/WMTS responses.
§ LicenseServerURL: The URL of the floating license server. This parameter is required only when using a floating license. The license file must be placed in the root of the server directory, and this parameter should be set to that location, e.g., "LicenseServerURL": https://cloud.skylineglobe.com/sws/[YOUR_LICENSE_TOKEN]. See "Loading the Skyline Floating License on Each of the SkylineGlobe Servers" in the "Basic Concepts" chapter for information.
5. Double-click the StartService.bat file included in the application folder, to install and start SGS as a service. The service will run under the account associated with the entered credentials. This opens the command prompt.
6. Press any key. The script opens the NSSM Service Editor dialog.
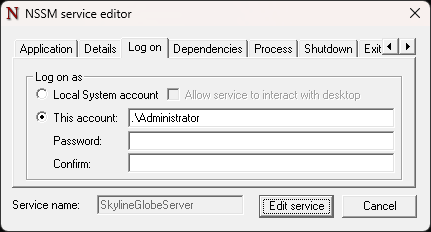
NSSM Service Editor Dialog
7. In the Log on tab, type your Windows user name and password to specify the service account under which SGS should run.
8. Click Edit service to finish setup.
9. To stop and remove the service, use StopService.bat.
Note: NSSM (Non-Sucking Service Manager) is bundled for managing the Windows service.
10. Unless defined otherwise in step 3, access SGS at: http://localhost:5000
Kestrel: TLS Configuration Support (Windows)
SGS supports built-in HTTPS on Windows using the Kestrel web server. This can be configured directly in the appsettings.json file.
To enable HTTPS with Kestrel:
1. Create a single .pfx certificate containing:
§ TLS certificate
§ Private key
§ Full certificate chain from a Certificate Authority (optional)
2. Provide the pfx path and password in the configuration. See "Windows: Configuring with appsettings.json" in this chapter for examples.
Deploying SkylineGlobe Server in Containers (Docker or Kubernetes)
SkylineGlobe Server 8.5 can be deployed as a Linux container using either Docker Compose or Kubernetes (K8s). Make sure you have a container runtime installed for Docker-based deployments and a functional Kubernetes environment for K8s-based deployments (with kubectl configured). A public Docker Hub image is available for all containerized deployments, including both Docker and Kubernetes:
https://hub.docker.com/r/skylineglobe/skylineglobeserver
(Select "latest" from Tag Summary)
Deploying SGS in containers (via Docker or Kubernetes) provides the following advantages:
§ Portability: Ensures consistent behavior across development, testing, and production environments.
§ Isolation: Each SGS instance runs independently, avoiding conflicts with other applications.
§ Scalability: Easily scale instances up or down as needed.
§ Simplified Deployment: Deploy SGS quickly and reliably using prebuilt Docker images.
§ Resource Efficiency: Containers share the host OS kernel, making them more lightweight than virtual machines.
§ Version Control: Use Docker tags to manage, upgrade, or roll back versions.
§ Automation: Use Docker Compose or Kubernetes for orchestrating multi-service deployments.
Docker Compose Deployment
SkylineGlobe Server can be deployed on Linux using Docker Compose to run containerized instances of the application. This method offers a fast, repeatable, and consistent setup, whether you're using a lightweight embedded SQLite database or a scalable external PostgreSQL database. You can expose the service over HTTPS using NGINX and a self-signed certificate.
The following Docker Compose deployment options are available:
§ Basic SQLite setup – A simple deployment using an embedded SQLite database and exposed via HTTP (NodePort). No HTTPS support.
§ SQLite with HTTPS via NGINX – Adds a reverse proxy using NGINX and secures access with a self-signed TLS certificate.
§ PostgreSQL with HTTPS via NGINX – A production-ready setup using an external PostGIS-enabled PostgreSQL database and secure HTTPS routing through NGINX.
Each deployment option includes example YAML files and detailed setup instructions. The examples assume that you organize all supporting files in a single project directory with the following structure:
project-root/
├── config/ # contains SLSkylineGlobeServer.lic
├── data/ # SQLite data
├── postgres_data/ # PostgreSQL volume
└── nginx/
│ ├── nginx.conf # NGINX configuration
│ └── certs/ # TLS certificate and key for SSL setups
│ ├── tls.crt # TLS certificate
│ └── tls.key # TLS private key
Do the following:
1. Download the Docker-Compose.yaml file for your deployment. This file defines how to deploy the SkylineGlobe Server container using Docker Compose including configuration for the image, ports, public URL, environment variables, and volumes. See "Settings" in this chapter for more information.
§ SQLite+NGINX (HTTPS)
§ PostgreSQL+NGINX (HTTPS)
2. Create a new project folder for the Docker Compose project and copy the downloaded docker-compose.yaml into this folder.
md C:\SGS_85_Docker
copy "C:\...\docker-compose.yaml"
cd C:\SGS_85_Docker
3. Create a subfolder named data inside the project folder that will be mounted as a volume inside the container - typically at /app/data to persist data generated or accessed by the SGS application:
md data
4. Create a subfolder named config inside the project folder that will be mounted as a volume inside the container - typically at /app/config to persist data generated or accessed by the SGS application, and place the license file (SLSkylineGlobeServer.lic) inside this subfolder. If you don’t already have the file, download it from your Skyline Store account.
md config
5. Mount the data and config subfolders in the volumes: section of your docker-compose.yaml file:
volumes:
- ./data:/app/data
- ./config:/app/config
6. If you want to apply TerraExplorer Fusion customizations, create the local folders or files that will be mounted inside the container for this purpose and then mount them:
a. Create the subfolder for multiple customization files (md more data) or prepare a single customization file (e.g., my-config.json).
b. Mount the created subfolder (keeps the original /app/tef/custom contents) or single file (adds/replaces one file; :ro = read-only). These custom paths are mounted to /app/tef/custom inside the container, in addition to the main mounts (/app/data and /app/config). See the volumes section in the "YAML dockerExamples" of the "Deploying SkylineGlobe Server" chapter for more information.
volumes: # Mount local folders for data persistence
# Option 1: Mount a subfolder
- ./more-data:/app/tef/custom/more-data
# Option 2: Mount a single file
- ./my-config.json:/app/tef/custom/my-config.json:ro
7. Enable TLS (commonly referred to as SSL) to secure SGS and ensure access to TerraExplorer Fusion, which operates exclusively over HTTPS. See “Secure Deployment Options (HTTPS via Reverse Proxy or Kestrel)" and "Enabling HTTPS with NGINX" in this chapter for information on generating a TLS certificate and setting up NGINX for secure SGS deployment with SQLite or PostgreSQL.
8. Set the configuration parameters in the environment: section of your docker-compose.yaml file. See "Settings" in this chapter for more information. Use the following format:
SGS__ServerConfig__<ParameterName>: <value>
Common parameters include:
§ CatalogDBType: The type of database to use. Options: SQLite (default) or PostgreSQL.
§ PublicUrl: The public-facing service URL used in WMS/WFS/WMTS responses.
§ LicenseServerURL: The URL of the floating license server. This parameter is required only when using a floating license. The license file must be placed in the config subdirectory within the server directory, and this parameter should be set to that location. See "Loading the Skyline Floating License on Each of the SkylineGlobe Servers" in the "Basic Concepts" chapter for information.
9. Start the containers defined in the docker-compose.yaml file:
docker compose up -d
10. Access SGS at the following unless SGS__ServerConfig__PublicUrl was configured differently in your docker-compose.yaml file:
§ Basic SQLite - http://localhost:5000
§ SQLite+NGINX (HTTPS) - https://sgs.localhost:8443
§ PostgreSQL+NGINX (HTTPS) - https://sgs.localhost:8443
11. If a browser security warning appears, click Advanced (or Show details) to reveal the bypass option. Then do the following:
§ Chrome/Edge: Click Continue to sgs.localhost (unsafe).
§ Firefox: Click Accept the Risk and Continue.
Enabling HTTPS with NGINX
To expose SkylineGlobe Server over HTTPS in a Docker environment:
1. Create an nginx folder inside the project folder that will be mounted as a volume inside the container - typically at /app/nginx to hold the nginx.configuration and self-signed certificate (tls.crt) and private key (tls.key) generated below. Then create a certs subfolder inside the nginx folder. In your terminal, run the following commands:
md nginx
md nginx\certs
2. Download the NGINX configuration file (nginx.conf) and place it inside the nginx/ folder in your Docker project. This configuration tells NGINX to do the following:
§ Listen on port 443 for HTTPS traffic
§ Use the self-signed certificate (tls.crt) and key (tls.key)
§ Forward all incoming requests to the SkylineGlobe Server application running inside the container on port 5155
3. Install an OpenSSL Tool to create the self-signed certificate:
§ If you're deploying Docker on Windows: Download and install from https://slproweb.com/products/Win32OpenSSL.html (choose the version that matches your system).
§ Alternatively: Use a terminal environment that includes OpenSSL, such as Git Bash or Windows Subsystem for Linux (WSL).
4. Download the openssl.cfg configuration text file that defines your self-signed certificate settings. Save the file in your Docker project folder (e.g., C:\SGS_85_Docker). This is where you’ll run the OpenSSL command in the next step:
# openssl.cfg
[ req ]
default_bits = 2048
prompt = no
default_md = sha256
distinguished_name = dn
[ dn ]
CN = sgs.localhost
O = Local Dev
5. Run the following OpenSSL command in your terminal to create a self-signed certificate (tls.crt) and private key (tls.key) based on the settings in your openssl.cfg file. The files will be saved to the nginx/certs/ folder in your Docker project and used by NGINX to enable secure HTTPS access to SkylineGlobe Server. The NGINX configuration file (nginx.conf) references these files to establish the TLS connection and proxy incoming HTTPS requests to the SGS application running inside the container:
openssl req -x509 -nodes -days 365 -newkey rsa:2048 -keyout nginx/certs/tls.key -out nginx/certs/tls.crt -config openssl.cfg
6. In your nginx.conf file, the TLS certificate (tls.crt) and key (tls.key) should be referenced under "server":
server {
listen 443 ssl;
server_name sgs.localhost;
ssl_certificate /etc/nginx/certs/tls.crt;
ssl_certificate_key /etc/nginx/certs/tls.key;
Basic Docker Operations
# Start containers (detached)
docker compose up -d
# Stop and remove containers
docker compose down
# Pull latest images for all services
docker compose pull
# Load a new image from a local tar file
docker load -i <path/to/image.tar>
# Tag the loaded image as "latest"
# (Make sure the repository/name matches the image reference in docker-compose.yml)
docker tag <source_image>:<version> <repository>/<image>:latest
Kubernetes Deployment
SkylineGlobe Server can be deployed in Kubernetes using several configurations depending on your database and security requirements. All deployments use containerized infrastructure and can be managed through standard Kubernetes tools.
Kubernetes provides a robust platform for production environments, offering built-in automation for deploying, scaling, and managing containerized applications. Its features, such as self-healing, service discovery, load balancing, and secure secret management, make it well-suited for maintaining high availability and reliability at scale.
To deploy using Kubernetes:
1. Install kubectl, the command-line tool for interacting with Kubernetes clusters. Download from: https://kubernetes.io/docs/tasks/tools/install-kubectl/
2. Install a running Kubernetes cluster – For local development, you can use either of the following:
§ Docker Desktop (with Kubernetes enabled):
· Install Docker Desktop: https://www.docker.com/products/docker-desktop
· Enable Kubernetes in Settings > Kubernetes.
§ Minikube (lightweight local cluster):
· Install Minikube: https://minikube.sigs.k8s.io/docs/start/
· Start the cluster:
minikube start
3. Download the YAML files. The deployment.yaml defines various settings including the catalog database type (SQLite or PostgreSQL) and the public URL. See "Settings" in this chapter for more information.'
|
Basic SQLite (HTTP) |
SQLite + Ingress (HTTPS) |
PostgreSQL + Ingress (HTTPS) |
4. Create a new project folder (e.g., SGS_Project_Folder) and place the downloaded files in it.
5. Add two subfolders inside the project folder:
-
config (for the SLSkylineGlobeServer.lic file)
-
data (for storing application data)
6. In the deployment.yaml file, update the hostPath volume path to match the specific location of your project folder. When running Kubernetes on Windows, the path should begin with /run/desktop/mnt/host/.
volumes:
- name: config-volume
hostPath:
path: "/run/desktop/mnt/host/c/sgs/config"
- name: data-volume
hostPath:
path: "/run/desktop/mnt/host/c/sgs/data"
7. Mount the data-volume and config-volume subfolders in the volumeMounts: section of your deployment.yaml file:
containers:
volumeMounts:
- name: config-volume
mountPath: /app/config
- name: data-volume
mountPath: /app/data
8. If you want to apply TerraExplorer Fusion customizations, create the local folders or files that will be mounted inside the container for this purpose (Optional). You can do either of the following:
§ Create a subfolder for multiple customization files:
md C:\sgs\more-data
§ Or prepare a single customization file (e.g., my-config.json).
Next, add these to the volumeMounts: section of your deployment.yaml to specify where the custom files or folders will appear inside the container, and define the full path to your local customization folder or file in the corresponding hostPath entry under volumes: to specify their source on the host system. See the volumes section in the "YAML Examples" of the "Deploying SkylineGlobe Server" chapter for more information.
volumes:
# Option 1: Host folder to mount as a subfolder inside the container
- name: more-data-volume
hostPath:
path: "/run/desktop/mnt/host/c/sgs/more-data"
# Option 2: Host file to mount as read-only
- name: custom-file-volume
hostPath:
path: "/run/desktop/mnt/host/c/sgs/custom/myconfig.json"
containers:
volumeMounts:
# Option 1: Mount a subfolder (keeps the original /app/tef/custom contents)
- name: more-data-volume
mountPath: /app/tef/custom/more-data
# Option 2: Mount a single file (adds/replaces one file).
- name: custom-file-volume
mountPath: /app/tef/custom/my-config.json
9. Place the downloaded SLSkylineGlobeServer.lic license file in the config subfolder created above. If you don’t already have the file, download it from your Skyline Store account.
10. Enable TLS (commonly referred to as SSL) to secure SGS and ensure TerraExplorer Fusion functionality, which operates exclusively over HTTPS. See “Secure Deployment Options (HTTPS via Reverse Proxy or Kestrel)" and "Enabling HTTPS with Ingress" in this chapter for information on creating a Kubernetes TLS secret containing your certificate and key. This secret is referenced in the ingress.yaml file for secure SGS deployment with SQLite or PostgreSQL.
11. Set the configuration parameters in the env: section of your deployment.yaml file. See "Settings" in this chapter for more information. Use the following format:
env:
- name: SGS__ServerConfig__<ParameterName>
Common parameters include:
§ CatalogDBType: The type of database to use. Options: SQLite (default) or PostgreSQL.
§ PublicUrl: The public-facing service URL used in WMS/WFS/WMTS responses.
§ LicenseServerURL: The URL of the floating license server. This parameter is required only when using a floating license. The license file must be placed in the config subdirectory within the server directory, and this parameter should be set to that location. See "Loading the Skyline Floating License on Each of the SkylineGlobe Servers" in the "Basic Concepts" chapter for information.
12. Apply the YAML files by running the following for each file:
kubectl apply -f <file-name>.yaml
13. Unless you configured SGS__ServerConfig__PublicUrl differently in your deployment.yaml file, access the server at:
§ Basic SQLite - http://localhost:30080
§ SQLite+Ingress (HTTPS) - https://sgs.localhost
§ PostgreSQL+Ingress (HTTPS) - https://sgs.localhost
See example YAML files below. All files and support folders (e.g., config/, data/, tls/) should be placed in the same project directory for consistent volume mounting. To deploy SkylineGlobe Server using Kubernetes, your project directory should follow the structure below:
project-root/
├── config/ # contains SLSkylineGlobeServer.lic
├── data/ # SGS data directory
├── postgres_data/ # PostgreSQL volume (if using PostgreSQL)
└── tls/ # (Optional) contains tls.crt and tls.key for HTTPS Ingress
Enabling HTTPS with Ingress
To expose SkylineGlobe Server over HTTPS in a Kubernetes environment:
1. Install an OpenSSL tool to create a self-signed certificate:
§ If you're deploying Kubernetes on Windows: Download and install from https://slproweb.com/products/Win32OpenSSL.html (choose the version that matches your system).
§ Alternatively: Use a terminal environment that includes OpenSSL, such as Git Bash or Windows Subsystem for Linux (WSL).
2. Download the openssl.cfg file that specifies your self-signed certificate settings, such as the Common Name (CN) sgs.localhost:
# openssl.cfg
[ req ]
default_bits = 2048
prompt = no
default_md = sha256
distinguished_name = dn
[ dn ]
CN = sgs.localhost
O = Local Dev
3. Run the following OpenSSL command to generate a self-signed certificate and private key and store both files in a convenient local folder (e.g., tls/).
openssl req -x509 -nodes -days 365 -newkey rsa:2048 -keyout nginx/certs/tls.key -out nginx/certs/tls.crt -config openssl.cfg
4. Use the generated certificate and key to create a Kubernetes TLS secret named sgs-tls-secret. This secret will be referenced in your Ingress configuration (ingress.yaml) to enable HTTPS:
kubectl create secret tls sgs-tls-secret --cert=tls.crt --key=tls.key
5. Install the Ingress Controller. This sets up the necessary Ingress infrastructure to route external traffic to your services securely over HTTPS. Make sure port 443 is not occupied by another process.
kubectl apply -f https://raw.githubusercontent.com/kubernetes/ingress-nginx/controller-v1.8.1/deploy/static/provider/cloud/deploy.yaml
6. In your ingress.yaml file, the TLS secret (sgs-tls-secret) should be referenced under the tls: section, along with the host that matches the Common Name (CN) used in your certificate (e.g., sgs.localhost):
apiVersion: networking.k8s.io/v1
kind: Ingress
metadata:
name: sgs-ingress
annotations:
nginx.ingress.kubernetes.io/ssl-redirect: "true"
spec:
ingressClassName: nginx
tls:
- hosts:
- sgs.localhost
secretName: sgs-tls-secret
rules:
- host: sgs.localhost
http:
paths:
- path: /
pathType: Prefix
backend:
service:
name: sgs-app-service
port:
number: 80
Basic Kubernetes Operations
# Restart pods and pull the latest image (if imagePullPolicy: Always is set)
kubectl rollout restart deployment/<deployment_name>
# Update the deployment to use a specific image version
kubectl set image deployment/<deployment_name> <container_name>=<repository>/<image>:<version>
# Scale the deployment manually (set a fixed number of replicas)
kubectl scale deployment/<deployment_name> --replicas=<number_of_replicas>
# Enable horizontal pod autoscaling based on CPU usage
# (Requires Metrics Server; if not yet installed, apply it using the next command)
kubectl autoscale deployment/<deployment_name> --cpu-percent=<target_cpu_percent> --min=<min_replicas> --max=<max_replicas>
# Install the metrics server (required for autoscaling)
kubectl apply -f https://github.com/kubernetes-sigs/metrics-server/releases/latest/download/components.yaml
# Cleanup resources created from a manifest
kubectl delete -f <path/to/manifest.yaml>
YAML Examples
Docker Compose: Basic SQLite (HTTP) Docker-Compose.yaml Example File
services:
skylineglobeserver:
image: skylineglobe/skylineglobeserver:latest # Docker image to use
container_name: skylineglobeserver_container
ports:
- "5000:5155" # Map container port to host. Adjust according to your app's exposed port
environment: # Configure SGS
SGS__ServerConfig__CatalogDBType: SQLite
SGS__ServerConfig__SharedDataPath: /app/data/SkylineGlobeServerConfiguration
SGS__ServerConfig__PublicUrl: http://localhost:5000
SGS__ServerConfig__LicenseServerURL: ""
volumes: # Mount local folders for data persistence and optional TEF (TerraExplorer Fusion) customizations
# Main mounts for persistent SkylineGlobe Server data and configuration:
- ./data:/app/data
- ./config:/app/config
# Optional: TEF customizations
# Use these additional mounts only if you need to customize TerraExplorer Fusion,
# such as adding custom JavaScript tools or CSS styling.
# Option 1: Mount a subfolder (keeps the original /app/tef/custom contents)
# - ./more-data:/app/tef/custom/more-data
# Option 2: Mount a single customization file (adds/replaces one file). ":ro" makes the mount read-only
# - ./my-config.json:/app/tef/custom/my-config.json:ro
networks:
- skyline_network
networks:
skyline_network:
driver: bridge
Docker Compose: SQLite + NGINX (HTTPS) Docker-Compose.yaml Example File
services:
nginx:
image: nginx:latest
container_name: nginx_proxy
restart: always
depends_on:
- skylineglobeserver
ports:
- "8443:443" # External 8443 maps to internal NGINX HTTPS port 443
volumes: # Mount local folders for data persistence
- ./nginx/nginx.conf:/etc/nginx/nginx.conf:ro
- ./nginx/certs:/etc/nginx/certs:ro
networks:
- skyline_network
skylineglobeserver:
image: skylineglobe/skylineglobeserver:latest # Docker image to use
container_name: skylineglobeserver
restart: always
expose:
- "5155" # Expose for internal use
environment: # Configure SGS
SGS__ServerConfig__CatalogDBType: SQLite
SGS__ServerConfig__SharedDataPath: /app/data/SkylineGlobeServerConfiguration
SGS__ServerConfig__PublicUrl: https://sgs.localhost:8443
SGS__ServerConfig__LicenseServerURL: ""
SGS__Kestrel__Endpoints__Http__Url: http://0.0.0.0:5155
volumes: # Mount local folders for data persistence
- ./data:/app/data
- ./config:/app/config
# Optional: TEF customizations
# Use these additional mounts only if you need to customize TerraExplorer Fusion,
# such as adding custom JavaScript tools or CSS styling.
# Option 1: Mount a subfolder (keeps the original /app/tef/custom contents)
# - ./more-data:/app/tef/custom/more-data
# Option 2: Mount a single file (adds/replaces one file). ":ro" makes the mount read-only
# - ./my-config.json:/app/tef/custom/my-config.json:ro
networks:
- skyline_network
networks:
skyline_network:
driver: bridge
Docker Compose: PostgreSQL + NGINX (HTTPS) Docker-Compose.yaml Example File
services:
nginx:
image: nginx:latest
container_name: nginx_proxy
restart: always
depends_on:
- skylineglobeserver
ports:
- "8443:443" # External 8443 maps to internal NGINX HTTPS port 443
volumes: # Mount local folders for data persistence
- ./nginx/nginx.conf:/etc/nginx/nginx.conf:ro
- ./nginx/certs:/etc/nginx/certs:ro
networks:
- skyline_network
postgres:
image: postgis/postgis:latest
container_name: postgres_for_sgs
environment:
POSTGRES_USER: postgres
POSTGRES_PASSWORD: postgres
POSTGRES_DB: postgres
ports:
- "5433:5432"
volumes:
- ./postgres_data:/var/lib/postgresql/data
networks:
- skyline_network
healthcheck:
test: ["CMD-SHELL", "pg_isready -h postgres -U postgres -d postgres"]
interval: 10s
retries: 20
start_period: 120s
start_interval: 2s
timeout: 10s
skylineglobeserver:
image: skylineglobe/skylineglobeserver:latest # Docker image to use
container_name: skylineglobeserver_container
depends_on:
- postgres
expose:
- "5155" # Expose for internal use
environment: # Configure SGS
DB_HOST: postgres
DB_USER: postgres
DB_PASSWORD: postgres
DB_NAME: postgres
SGS__ServerConfig__CatalogDBType: PostgreSQL
SGS__ServerConfig__SharedDataPath: /app/data/SkylineGlobeServerConfiguration
SGS__ServerConfig__CatalogPostgreSqlConnString: server=postgres;port=5432;user id=postgres;password=postgres;
SGS__ServerConfig__PublicUrl: https://sgs.localhost:8443
SGS__ServerConfig__LicenseServerURL: ""
SGS__Kestrel__Endpoints__Http__Url: http://0.0.0.0:5155
SGS__AllowedHosts: "*"
volumes: # Mount local folders for data persistence
- ./data:/app/data
- ./config:/app/config
# Optional: TEF customizations
# Use these additional mounts only if you need to customize TerraExplorer Fusion,
# such as adding custom JavaScript tools or CSS styling.
# Option 1: Mount a subfolder (keeps the original /app/tef/custom contents)
# - ./more-data:/app/tef/custom/more-data
# Option 2: Mount a single file (adds/replaces one file). ":ro" makes the mount read-only
# - ./my-config.json:/app/tef/custom/my-config.json:ro
networks:
- skyline_network
networks:
skyline_network:
driver: bridge
Kubernetes: Basic SQLite (HTTP) Example Files
deployment.yaml file
apiVersion: apps/v1
kind: Deployment
metadata:
name: sgs-app-deployment
spec:
replicas: 2
selector:
matchLabels:
app: sgs-app
template:
metadata:
labels:
app: sgs-app
spec:
imagePullSecrets:
- name: my-dockerhub-secret
containers:
- name: sgs-app
image: skylineglobe/skylineglobeserver:latest
imagePullPolicy: Always
ports:
- containerPort: 5155
env:
- name: SGS__ServerConfig__CatalogDBType
value: SQLite
- name: SGS__ServerConfig__SharedDataPath
value: /app/data
- name: SGS__ServerConfig__PublicUrl
value: http://localhost:30080
- name: SGS__ServerConfig__LicenseServerURL
value: ""
volumeMounts:
- name: config-volume
mountPath: /app/config
- name: data-volume
mountPath: /app/data
# -----------------------------------------------------
# Option 1: Mount a subfolder (keeps the original /app/tef/custom contents)
# -----------------------------------------------------
-# name: more-data-volume
# mountPath: /app/tef/custom/more-data
# -----------------------------------------------------
# Option 2: Mount a single file (adds/replaces one file).
# The "readOnly: true" field is the equivalent of ":ro" in Docker.
# -----------------------------------------------------
# - name: custom-file-volume
# mountPath: /app/tef/custom/my-config.json
# subPath: my-config.json
# readOnly: true
volumes:
- name: config-volume
hostPath:
path: "/run/desktop/mnt/host/c/sgs/config"
- name: data-volume
hostPath:
path: "/run/desktop/mnt/host/c/sgs/data"
# -----------------------------------------------------
# Option 1: Host folder to mount as a subfolder inside the container
# -----------------------------------------------------
#- name: more-data-volume
# hostPath:
# path: "/run/desktop/mnt/host/c/sgs/more-data"
# -----------------------------------------------------
# Option 2: Host file to mount as read-only
# -----------------------------------------------------
#- name: custom-file-volume
# hostPath:
# path: "/run/desktop/mnt/host/c/sgs/custom/myconfig.json"
service.yaml file
apiVersion: v1
kind: Service
metadata:
name: sgs-app-service
spec:
type: NodePort
selector:
app: sgs-app
ports:
- port: 80
targetPort: 5155
nodePort: 30080
Kubernetes: SQLite + Ingress (HTTPS) Example Files
deployment.yaml file
apiVersion: apps/v1
kind: Deployment
metadata:
name: sgs-app-deployment
spec:
replicas: 2
selector:
matchLabels:
app: sgs-app
template:
metadata:
labels:
app: sgs-app
spec:
imagePullSecrets:
- name: my-dockerhub-secret
containers:
- name: sgs-app
image: skylineglobe/skylineglobeserver:latest
imagePullPolicy: Always
ports:
- containerPort: 5155
env:
- name: SGS__ServerConfig__CatalogDBType
value: SQLite
- name: SGS__ServerConfig__SharedDataPath
value: /app/data
- name: SGS__ServerConfig__PublicUrl
value: https://sgs.localhost
- name: SGS__ServerConfig__LicenseServerURL
value: ""
- name: SGS__Kestrel__Endpoints__Http__Url
value: http://0.0.0.0:5155
- name: SGS__AllowedHosts
value: "*"
volumeMounts:
- name: config-volume
mountPath: /app/config
- name: data-volume
mountPath: /app/data
# -----------------------------------------------------
# Option 1: Mount a subfolder (keeps the original /app/tef/custom contents)
# -----------------------------------------------------
#- name: more-data-volume
# mountPath: /app/tef/custom/more-data
# -----------------------------------------------------
# Option 2: Mount a single file (adds/replaces one file).
# The "readOnly: true" field is the equivalent of ":ro" in Docker.
# -----------------------------------------------------
#- name: custom-file-volume
# mountPath: /app/tef/custom/my-config.json
# subPath: my-config.json
# readOnly: true
volumes:
- name: config-volume
hostPath:
path: "/run/desktop/mnt/host/c/sgs/config"
- name: data-volume
hostPath:
path: "/run/desktop/mnt/host/c/sgs/data"
# -----------------------------------------------------
# Option 1: Host folder to mount as a subfolder inside the container
# -----------------------------------------------------
#- name: more-data-volume
# hostPath:
# path: "/run/desktop/mnt/host/c/sgs/more-data"
# -----------------------------------------------------
# Option 2: Host file to mount as read-only
# -----------------------------------------------------
#- name: custom-file-volume
# hostPath:
# path: "/run/desktop/mnt/host/c/sgs/custom/myconfig.json"
service.yaml file
apiVersion: v1
kind: Service
metadata:
name: sgs-app-service
spec:
type: ClusterIP
selector:
app: sgs-app
ports:
- name: http
port: 80
targetPort: 5155
ingress.yaml file
apiVersion: networking.k8s.io/v1
kind: Ingress
metadata:
name: sgs-ingress
annotations:
nginx.ingress.kubernetes.io/ssl-redirect: "true"
nginx.ingress.kubernetes.io/proxy-body-size: "0"
spec:
ingressClassName: nginx
tls:
- hosts:
- sgs.localhost
secretName: sgs-tls-secret
rules:
- host: sgs.localhost
http:
paths:
- path: /
pathType: Prefix
backend:
service:
name: sgs-app-service
port:
number: 80
Kubernetes: PostgreSQL + Ingress (HTTPS) Example Files
postgres-deployment.yaml file
apiVersion: apps/v1
kind: Deployment
metadata:
name: postgres
spec:
replicas: 2
selector:
matchLabels:
app: postgres
template:
metadata:
labels:
app: postgres
spec:
containers:
- name: postgres
image: postgis/postgis:latest
ports:
- containerPort: 5432
env:
- name: POSTGRES_USER
value: postgres
- name: POSTGRES_PASSWORD
value: postgres
- name: POSTGRES_DB
value: postgres
volumeMounts:
- name: pgdata
mountPath: /var/lib/postgresql/data
volumes:
- name: pgdata
hostPath:
path: /run/desktop/mnt/host/c/sgs/postgres_data
type: DirectoryOrCreate
postgres-service.yaml file
apiVersion: v1
kind: Service
metadata:
name: postgres
spec:
type: NodePort
selector:
app: postgres
ports:
- port: 5432
targetPort: 5432
nodePort: 31432
deployment.yaml file
apiVersion: apps/v1
kind: Deployment
metadata:
name: sgs-app-deployment
spec:
replicas: 2
selector:
matchLabels:
app: sgs-app
template:
metadata:
labels:
app: sgs-app
spec:
imagePullSecrets:
- name: my-dockerhub-secret
containers:
- name: sgs-app
image: skylineglobe/skylineglobeserver:latest
imagePullPolicy: Always
ports:
- containerPort: 5155
env:
- name: SGS__ServerConfig__CatalogDBType
value: PostgreSQL
- name: SGS__ServerConfig__CatalogPostgreSqlConnString
value: server=postgres;port=5432;user id=postgres;password=postgres;
- name: SGS__ServerConfig__SharedDataPath
value: /app/data
- name: SGS__ServerConfig__PublicUrl
value: https://sgs.localhost
- name: SGS__ServerConfig__LicenseServerURL
value: ""
- name: SGS__Kestrel__Endpoints__Http__Url
value: http://0.0.0.0:5155
- name: SGS__AllowedHosts
value: "*"
volumeMounts:
- name: config-volume
mountPath: /app/config
- name: data-volume
mountPath: /app/data
# -----------------------------------------------------
# Option 1: Mount a subfolder (keeps the original /app/tef/custom contents)
# -----------------------------------------------------
#- name: more-data-volume
# mountPath: /app/tef/custom/more-data
# -----------------------------------------------------
# Option 2: Mount a single file (adds/replaces one file).
# The "readOnly: true" field is the equivalent of ":ro" in Docker.
# -----------------------------------------------------
#- name: custom-file-volume
# mountPath: /app/tef/custom/my-config.json
# subPath: my-config.json
# readOnly: true
volumes:
- name: config-volume
hostPath:
path: "/run/desktop/mnt/host/c/sgs/config"
- name: data-volume
hostPath:
path: "/run/desktop/mnt/host/c/sgs/data"
# -----------------------------------------------------
# Option 1: Host folder to mount as a subfolder inside the container
# -----------------------------------------------------
#- name: more-data-volume
# hostPath:
# path: "/run/desktop/mnt/host/c/sgs/more-data"
# -----------------------------------------------------
# Option 2: Host file to mount as read-only
# -----------------------------------------------------
#- name: custom-file-volume
# hostPath:
# path: "/run/desktop/mnt/host/c/sgs/custom/myconfig.json"
service.yaml file
apiVersion: v1
kind: Service
metadata:
name: sgs-app-service
spec:
type: ClusterIP
selector:
app: sgs-app
ports:
- name: http
port: 80
targetPort: 5155
ingress.yaml file
apiVersion: networking.k8s.io/v1
kind: Ingress
metadata:
name: sgs-ingress
annotations:
nginx.ingress.kubernetes.io/ssl-redirect: "true"
nginx.ingress.kubernetes.io/proxy-body-size: "0"
spec:
ingressClassName: nginx
tls:
- hosts:
- sgs.localhost
secretName: sgs-tls-secret
rules:
- host: sgs.localhost
http:
paths:
- path: /
pathType: Prefix
backend:
service:
name: sgs-app-service
port:
number: 80
Settings
Key parameters can be defined to customize how SkylineGlobe Server (SGS) is deployed and behaves. The method of setting these parameters depends on the deployment type:
§ Windows: appsettings.json in the root application folder
§ Docker: environment section in the Docker Compose YAML
§ Kubernetes: environment section in the Deployment YAML
Common Configuration Parameters
§ CatalogDBType: Type of database to use. Options: SQLite (default), PostgreSQL.
§ CatalogPostgreSqlConnString: The connection string used for PostgreSQL deployments. If the catalog already exists, it will be used; if not, SGS will create it automatically. E.g., server=postgres;port=5432;user id=postgres;password=postgres;
§ SharedDataPath: Path to the folder containing catalog.db and other persistent data. Use double backslashes (\\) on Windows. If upgrading from a previous version, back up the existing database: Locate the catalog.db file (e.g., C:\SkylineGlobeServerConfiguration\catalog.db) and make a copy of it.
§ PublicUrl: Public-facing service URL used in WMS/WFS/WMTS responses.
§ LicenseServerURL: URL of the floating license server. This setting is only required when using a floating license. The license file must be placed in the correct location and then this parameter should be set to that location, e.g., "LicenseServerURL": https://cloud.skylineglobe.com/sws/[YOUR_LICENSE_TOKEN]. See "Loading the Skyline Floating License on Each of the SkylineGlobe Servers" in the "Basic Concepts" chapter for information.
§ Windows: root of the server directory
§ Docker/Kubernetes: config subdirectory within the server directory
§ OldVirtualPath: This parameter is used to ensure backward compatibility with projects created in earlier versions that may still reference URLs that include /sg. In the URL path. To ensure backward compatibility, this parameter should be set to "/sg" to allow the server to transparently support requests containing /sg by ignoring the legacy path component.
Windows: Configuring with appsettings.json
For Windows deployment, custom server settings for SkylineGlobe Server must be defined in an appsettings.json file, which is then placed in the root of the SkylineGlobe Server application folder. If no such file exists, the default values, defined in the appsettings.base.json provided with your application files, are used.
The appsettings.json file fully overrides the appsettings.base.json file. If you redefine a section (e.g., Kestrel), ensure it includes all necessary subsections such as endpoints.
To run SkylineGlobe Server (SGS) with TLS enabled, configure the server to use a certificate for secure HTTPS communication.
To create an appsettings.json configuration file:
1. Copy the appsettings.sample.jsonc file provided by Skyline.
2. Remove all comments (lines starting with //).
3. Rename the file to appsettings.json.
4. Edit only the values you want to override.
appsettings.sample.jsonc file
// ============================================
// 📝 Sample appsettings file for SkylineGlobeServer
// ============================================
//
// ❌ Do NOT use this file as-is.
//
// ✅ To customize the configuration:
// 1️⃣ Cpy this file and rename it to: appsettings.json
// 2️⃣ Remove the comments (lines starting with //)
// 3️⃣ Edit only the values you want to override
//
// ℹ️ If appsettings.json is missing, the app will use default values:
// - 🗂️ SQLite as the database engine
// - 📁 %localappdata%\skyline\SkylineGlobeServer\ as the main data folder
// - 🌐 No SSL, bound to http://localhost
//
// ⚠️ Note: appsettings.json completely overrides appsettings.base.json.
// If you want to change only one setting, make sure to include all required sections.
//
// 💡 For example: if you define "Kestrel" here, you must include all endpoints you want enabled.
// ============================================
{
// 🌐 ===== Kestrel (HTTP Server) Settings =====
// This section is optional.
// If omitted, the app will default to running on http://localhost without SSL.
"Kestrel": {
"Endpoints": {
"Https": {
"Url": "https://*:5000", // 🌍 Change port or interface if needed (e.g., "https://localhost:443")
"Certificate": {
"Path": "Path\\To\\Certificate.pfx"n> // 🔐 Full path to a .pfx certificate file
"Password": "PWD" //style=" font-family:'Segoe UI Emoji' ,sans-serif;">🔑 Certificate password
}
}
}
},
// 🌍 ===== Allowed Hosts =====
// Determines which hosts are allowed to access the server.
// "*" allows all.
"AllowedHosts": "*",
// ⚙️ ===== Custom Server Configuration =====
"ServerConfig": {
// 🛢️ Database type to use. Supported: "sqlite" (default), "postgresql"
"CatalogDBType": "sqlite",
// 🐘 PostgreSQL connection string (only used if DB type is "postgresql")
"CatalogPostgreSqlConnString": "server=localhost;port=5432;user id=postgres;password=PWD",
// 📂 App data folder path.
// If empty or missing, defaults to: %localappdata%\skyline\SkylineGlobeServer\
"SharedDataPath": "", // Point the data folder (e.g., C:\SkylineGlobeServerConfiguration), which includes your catalog.db. If upgrading Windows from a previous version, first back up the existing database: Locate the catalog.db file (e.g., C:\SkylineGlobeServerConfiguration\catalog.db) and make a copy of it.
// 🌐
// This must be the fully qualified public URL that clients will use to reach the server.
// Example: "https://myserver.domain.com"
: "" ,
// 🔐 License Server URL for floating license support.
// Required if you are using a floating license.
"LicenseServerURL": ""
}
}
Example Configuration
{
"Kestrel": {
"Endpoints": {
"Https": {
"Url": "https://*:5000",
"Certificate": {
"Path": "D:\\certs\\mycert.pfx",
"Password": "secret"
}
}
}
},
"AllowedHosts": "*",
"ServerConfig": {
"CatalogDBType": "sqlite",
"SharedDataPath": "C:\\SkylineGlobeServerConfguration",
"OldVirtualPath": "/sg1234",
"PublicUrl": "https://your-public-domain.com/SGS",/span>
"LicenseServerURL": ""
}
}
Docker: Configuring with Docker-Compose.yaml
In Docker deployments, configuration parameters are set in the environment: section of your Docker-Compose file using the following format:
SGS__ServerConfig__<ParameterName>: <value>
Example docker-compose.yaml environment section
environment:
SGS__ServerConfig__CatalogDBType: SQLite
SGS__ServerConfig__SharedDataPath: /app/data
SGS__ServerConfig__PublicUrl: https://sgs.localhost:8443
SGS__ServerConfig__LicenseServerURL: ""
SGS__ServerConfig__OldVirtualPath: /sg1234 # Optional: legacy base path for backwards compatibility with older SGS URLs
SGS__Kestrel__Endpoints__Https__Url: https://*:5000
SGS__Kestrel__Endpoints__Https__Certificate__Path: /app/certs/your-cert.pfx
SGS__Kestrel__Endpoints__Https__Certificate__Password: your_password
Kubernetes: Configuring with Deployment.yaml
In Kubernetes deployments, configuration parameters are set in the env: section of your deployment.yaml file using the following format:
env:
- name: SGS__ServerConfig__<ParameterName>
value: <value>
Example env: section for PostgreSQL + Ingress deployment:
env:
- name: SGS__ServerConfig__CatalogDBType
value: PostgreSQL
- name: SGS__ServerConfig__CatalogPostgreSqlConnString
value: server=postgres;port=5432;user id=postgres;password=postgres;
- name: SGS__ServerConfig__SharedDataPath
value: /app/data
- name: SGS__ServerConfig__PublicUrl
value: https://sgs.localhost
- name: SGS__ServerConfig__LicenseServerURL
value: ""
- name: SGS__Kestrel__Endpoints__Http__Url
value: http://0.0.0.0:5155
- name: SGS__ServerConfig__OldVirtualPath
value: /sg1234 # Optional: legacy base path for backwards compatibility with older SGS URLs
- name: SGS__Kestrel__Endpoints__Https__Url
value: https://*:5000
- name: SGS__Kestrel__Endpoints__Https__Certificate__Path
value: /app/certs/your-cert.pfx
- name: SGS__Kestrel__Endpoints__Https__Certificate__Password
value: your_password
Note: SGS__Kestrel__Endpoints__Http__Url is only required if you're exposing the internal HTTP service directly or behind an Ingress.
Managing and Migrating Databases
SkylineGlobe Server 8.5 simplifies database management by automatically creating and upgrading its three main databases:
§ catalog
§ messages
§ sgstatistics
When SGS starts, if the databases do not exist, they are automatically created. If they exist but are from an older version, they are automatically upgraded. This applies to both SQLite and PostgreSQL deployments, as long as the appropriate database configuration is provided. See "Settings" in this chapter for information on how to configure database parameters for Windows, Docker, or Kubernetes deployments.
To migrate data between different database types, locations, or instances, SGS provides a command-line utility called SGSDBTool. The migrate action transfers data from a source database to a new target database. The target must not already exist, since it will be created during the migration process.
Use this tool only when switching between SQLite and PostgreSQL deployments. It preserves existing data such as passwords, paths, sources, and usage statistics. Do not use the tool for first-time deployments since SGS automatically creates the required databases, or for upgrades, which are handled automatically at startup.
To use the SGS Database Tool:
1. Open the command prompt window.
2. Run the tool with the required parameters:
§ --action "migrate:[schema]":
Specifies the schema to migrate. Possible values are catalog, messages, sgstatistics, or all.
§ --sourcedb:
Connection string of the source database.
§ --targetdb:
Connection string of the target database to which data will be copied.
§ --sgsfolder:
Specifies which folder contains the SGS files. SGS Database Tool checks what version of SGS is deployed and based on this determines the appropriate database version.
3. Update the database type and location. See "Settings" in this chapter for more information.
Example Command:
SGSDBTool.exe --action "migrate:all" --sourcedb "sqlite://C:\SkylineGlobeServerConfiguration" --targetdb "postgresql://localhost:5432?Username=postgres&Password=pwd&ExtraParams=" --sgsfolder "C:\SG" --modifysgs
Adding Access Permission
In typical deployments, the user running SGS requires access to the configuration folder and any resources SGS needs to read from or write to, such as data sources or cache directories.