Setting Min and Max Elevation
The Min and Max Elevation tab contains settings for the minimum and maximum elevation values in the terrain database. This option removes unreasonable heights from the data, such as null values and peaks. This keeps the dynamic range of elevation values to a minimum, creating a smooth-looking MPT file.
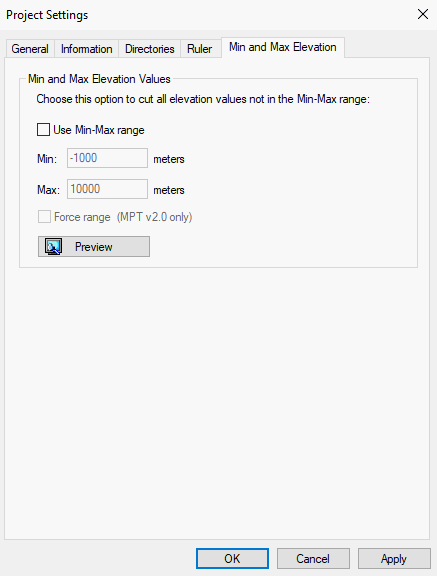
Project Settings - Min and Max Elevation Tab
To set the Min and Max elevation values:
1. Select the Use Min-Max range check box.
2. Type the Min and Max values.
3. If you want the dynamic minimum and maximum values to be set to the defined values, select the Force Range check box. If you clear the Force Range check box, the dynamic range minimum value is set to whichever value is larger: the defined minimum value or the project smallest elevation value and the dynamic range maximum value is set to whichever value is smaller: the defined maximum value or the project largest elevation value.
Note: This check box is unavailable when MPT v3.0 format is used.
Note: This option enables you to generate different MPT files with the same dynamic range. Such correspondence in dynamic range is required when the MPT files are used in the same DirectConnect project. When this is the case, the DirectConnect project itself needs to have the Force Range check box selected and be set to the same dynamic range Min-Max values.
4. If you want to see the changes in the Working Window (Elevation view), click the Preview button. Areas that are lower than the minimum height, as set in the dialog box, are reset as minimum height and they are displayed in blue. Areas that are higher than the maximum height, as set in the dialog box, are reset to the maximum height and are displayed in red.
5. Click OK.