Tiling Files
The tiling process gathers several files into a custom number of Tile Text File (TLT) source files, enabling the creation of pyramid files. These files must all have the same Units Per Pixel, and must be located in the same folder. The tiling process can be performed:
§ From the Insert Imagery/Insert Elevation dialog box when inserting multiple sources from file.
§ From the Tools tab as a standalone tiling process that does not include the loading of the tiled files into the project.
When tiling files, you can create a custom tile division. You must specify the required width and height tile division, together with the overlap (in pixels) to be created between the tiles. The tool divides the entire area of all the source files into a set of TLT files.
The following diagram shows a typical layout of a set of nine TLT files.

Diagram of TLT Files Layout
The files are named with the name given by the user plus 6-digits (YYYXXX) reflecting the position of the file in the tile.
For example, if you add a number of sources, and create a TLT file with a Width Tile Division of 2, a Height Tile Division of 2 and a 100-pixel Width and Height Overlap, four TLT files are created:
These files are Name000000.tlt, Name000001.tlt, Name001000.tlt and Name001001.tlt, each covering approximately a quarter of the total area of source files. There is an overlap of 100 pixels between each two files.
Note: Using a Width and Height Tile Division of 1 and an overlap of 0 (Default) results in one TLT file being created.
To create a TLT file from multiple files:
1. Make sure the files are geo-referenced.
Note: To check whether files includes geo-referencing information, insert them, individually, into a TerraBuilder project, and check if the information is automatically read from it.
2. Locate all the raster files and location files in the same directory. Make sure that all the corresponding location files exist.
Note: If this is not done, the Tile Files button is unavailable, and you cannot create a TLT file.
3. On the Home tab, in the Layers group, click Insert Imagery/Insert Elevation. The Add Image/Add Elevation dialog box opens.
4. Select the required file type and then the required files or folders, and click Tile Files. If you are selecting a folder, you must select a file type. The Create TLT File dialog box opens with the selected files displayed in the file section on the right.
Note: If you are tiling sources as a standalone tiling process that does not involve loading the tiled files into the project, skip steps 3-4, and instead: on the Tools tab, in the Convert group, click Create TLT. Then click Browse and select the files to tile. If you want to automatically add all files in the tile directory that are of the same type as the selected file, select this check box in the Create TLT File dialog box (note that this check box is only displayed when creating TLT from the Tools tab).
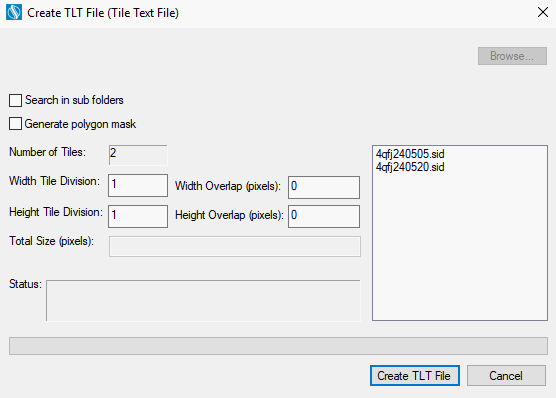
Create TLT File (Tile Text File) Dialog Box
5. If you want to include all files of the selected file type that are in the selected folders’ subfolders, select the Search in sub folders check box. The corresponding files are displayed in the file section on the right.
6. If you want to create a polygon mask, select the Generate polygon mask check box.
Note: If you generate a polygon mask, a shape file is created based on the extents of the tiles included in the TLT. It can be imported to the TLT layer to perform polygon operations.
7. Enter the following information:
|
Field |
Description |
|
Width Tile Division |
Number of tiles to cover the width of the area. |
|
Height Tile Division |
Number of tiles to cover the height of the area. |
|
Width Overlap |
Horizontal overlap in pixels. |
|
Height Overlap |
Vertical overlap in pixels |
Note: Using a Width and Height of 1 and a Tile Division and overlap of 0 (Default) results in one TLT file being created.
8. Click the Create TLT File button. When the tiling process is complete, the Save As dialog box is displayed.
9. Type a file name for the TLT file and save it in the required location.
10. If the source files include coordinate system information that TerraBuilder can read from the file, the TLT file directly opens. If the source files do not include coordinate system information or TerraBuilder could not read it from the files, the Coordinate System dialog box is displayed. Enter the coordinate system information. See “Setting a Source’s Coordinate System” in this chapter for more information.