Elevation Comparison
The Elevation Comparison tool analyzes the elevation difference between two layers of any of the following types: elevation, feature, point cloud or 3D mesh, or between a layer and base terrain in a defined polygonal area. This allows you to carefully compare before and after states, e.g., the state of an area before and after a landslide or volcano, or before and after mining restorative efforts.
The area for analysis is defined by a drawn polygon or by objects already on the clipboard. The output of the analysis is a text label with the analysis results and a point shapefile that stores the elevation difference information in its attribute fields and graphically represents the elevation difference at different points in the defined area. Only elevation differences that you consider significant for your analysis, i.e., that are above the Min Difference that you set, are marked:
§ Yellow – Layer 1 is higher than Layer 2
§ Cyan (Blue-green) – Layer 2 is higher than Layer 1
A summary is also generated, with statistics on the percentage of points in which each layer was higher and the maximum elevation difference between the two.
Note: The visibility of layers or objects in the designated area that are not part of the comparison should be turned off, so that the comparison results are not affected.
To use the Elevation Comparison tool:
1. On the Analysis tab, in the Comparison group, click Elevation. The Elevation Comparison dialog is displayed.
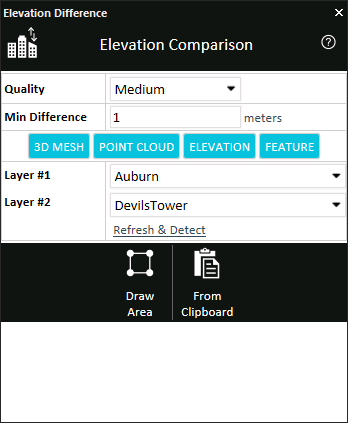
Elevation Comparison
2. Click any of the following: 3D Mesh, Point Cloud, Elevation or Feature to filter the selection to the layer type(s) you want. If you want to refresh the dropdown layers, and automatically detect and select the layers in current view, click Refresh & Detect. Only layers that are calculated as part of the terrain’s elevation (i.e., their “Ground Object” property is set to yes) are included in the dropdown lists.
3. Select two layers for comparison, or a layer and base terrain.
4. Select the Quality of the result layer. This determines the accuracy level by which the analysis is performed. Select one of the following options:
§ Low – Performs approximately 16K samples
§ Medium – Performs approximately 65K samples
§ High – Performs approximately 260K samples
5. In the Min Difference field, select the minimum elevation difference between the layers that should be marked.
6. Select either of the following methods to mark your area of interest:
§ Draw Area – The area is marked by drawing a polygon in the 3D Window. If this option is selected, left-click in the 3D Window to place the polygon waypoints, and right-click to complete.
§ From Clipboard – Analysis is performed in the locations of all polygon clipboard objects. The polygons must be on the clipboard before selecting this option.
7. After the analysis is complete, a results dialog is displayed. These results are saved in the Project Tree as a text label.
§ Number of sampled points for which the elevation difference between the layers was greater than the Min Difference set.
§ Number of sampled points above Min Difference in which Layer 1 was higher than Layer 2.
§ Number of sampled points above Min Difference in which Layer 2 was higher than Layer 1.
§ Maximum elevation difference in which Layer 1 was higher than Layer 2.
§ Maximum elevation difference in which Layer 2 was higher than Layer 1.
8. Review the elevation difference results, graphically represented by the generated point feature layer. Only elevation differences. that are above the Min Difference that you set, are marked:
§ Yellow – Layer 1 is higher than Layer 2
§ Cyan (Blue-green) – Layer 2 is higher than Layer 1
Point to any point on the graph to display the elevation and volume difference at that point.
9. The elevation difference results are automatically exported to a point shapefile that is listed in the Project Tree and saved under the application AppData. You can find the full path to this shapefile in the layer's property sheet, in the File Name property under the Layer tab.