How to Publish a Project to SGS
To publish a project to SkylineGlobe Server:
1. On the Home tab, in the Project group, click Publish to SG.
2. If you aren’t already logged in to a SkylineGlobe Server, the Login to SkylineGlobe Server dialog is first displayed to enable you to log in. See “Logging In to a SkylineGlobe Server” in the “Working with SkylineGlobe Server” chapter for information. After logging in, the Publish to SkylineGlobe dialog is displayed.
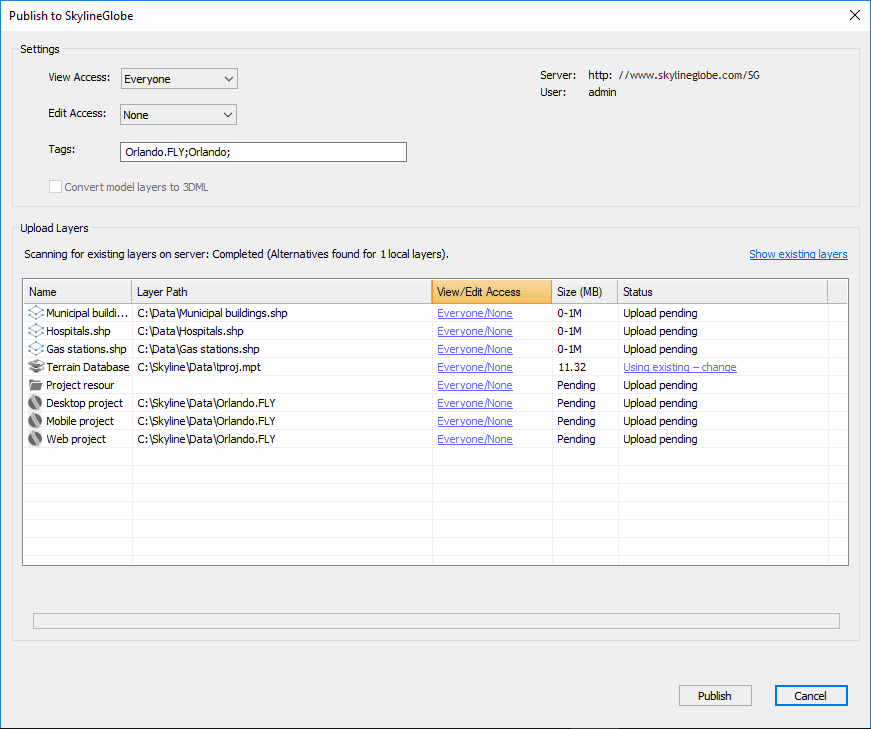
Publish to SkylineGlobe Dialog
3. Set the View Access for the project:
§ Only me – Only for user publishing the project
§ My group – Everyone in the user’s group
§ Everyone – Viewable by everyone
Note: Users with View access can view and load the project from the Layers page.
4. Set the Edit Access for the project:
§ None – No Edit access is granted even to the user publishing the project
§ Only me – Only for user publishing the project
§ My group – Everyone in the user’s group
§ Everyone – Editable by everyone
Note: Users with Edit access can also load, edit and save changes to the project from TerraExplorer and the browser.
5. If you want to set unique permissions for specific project layers, click the View / Edit Access link for the required layer, and in the Set Permissions dialog, select the required permissions for that layer.
6. Set Tags (Key words or terms associated with the project file) for advanced searches. The default value for this field is the project name. If adding multiple tags, they should be semicolon delimited.
7. If you want to set a viewer token that can be used to grant view access to the project, generate a viewer access token in SkylineGlobe Server Manager, and then enter the token here in the Viewer Token field. The token is appended to the project URL (see step 11), e.g., http://skylineglobe.com/SG/projects/Default_Local_Terrain.35199954?token=0cad22c2h96e4f8fbb91c8a7a9gb7387, and enables a user to directly access SGS project layers that are non-public, without logging in to SGS. See the Access Token property in the "Adding Users and Setting User Properties" chapter of the SkylineGlobe Server User Guide for more information.
8. If you want to create a unified, stream optimized 3D Mesh Layer (3DML) database from a point feature layer with individually referenced 3D model files, select the Convert model layers to 3DML check box. To retain the individual models, clear the Convert model layers to 3DML check box. Conversion to 3DML will improve performance and provide better support for web and mobile devices, especially for large layers that reference many different models. See "Streaming 3D Models Using Feature Layers" in the "Feature Layers" chapter.
9. If the project you are currently publishing was opened from SkylineGlobe Server, and you want to update the existing project on the server, click the arrow next to Publish, and select Update existing. When a project is loaded from SGS, the most updated version is served, unless a different version was selected from SGS Manager. See the SGS User Guide for more information. If you want to create a new FLY project, select Create new.
Note: You can only update a project that you are the owner of, e.g., you published the original project to SGS.
10. Before uploading a layer, TerraExplorer compares its file size, checksum, and metadata to all files currently on the server, to determine if a duplicate of this layer was already published to the server. If a duplicate is found, the existing copy can be used instead of expending resources on re-publishing this layer. TerraExplorer’s default action depends on how close a match is found: When a perfect match is found, the default action is to use the existing layer; when no match or only a similar (but not perfect) match is found, the default action is to upload the new layer. If you want to perform the default action, click Publish.
11. If you want to view similar layers on the server for all project layers, click the Show existing layers link. The Publish to SkylineGlobe Server – Layer Duplication dialog is displayed, showing all the layers for which there is already a close or identical copy on the SkylineGlobe Server. If you want to view similar layers on the server for a specific layer for which a similar or perfect match was found, click the link in the layer’s Status field. The Publish to SkylineGlobe Server – Layer Duplication dialog is displayed, showing all duplicates on the server for the specific layer. Do the following:
a. If you want to republish layer(s) for which matches were found instead of using the existing layers on the server, clear the Use Existing checkbox for each of the layers, and click Apply.
b. If you want to use existing layers on the server for layers for which a similar but not exact match was found, select their check boxes, and click Apply.
c. Click Publish.
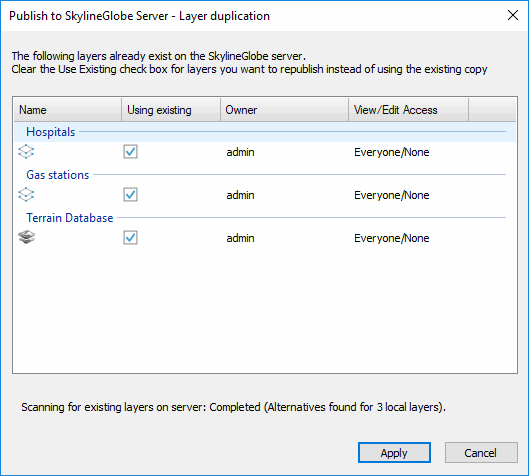
Publish Project to SkylineGlobe Server – Layer Duplication Dialog
12. After the publishing process is complete, a dialog box is displayed with the URLs for both Desktop/Mobile and TerraExplorer Fusion.
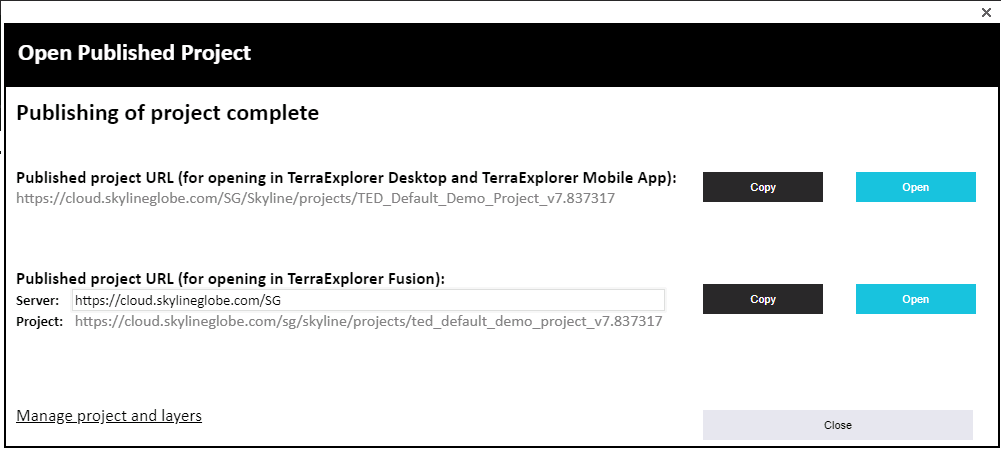
Open Published Project Dialog
13. To copy a URL, click Copy next to the required URL. If you want to open the project in TerraExplorer Fusion, click Open next to the Fusion link. If you want to open the published project in the open Desktop application, click Open next to the Desktop/Mobile link.
14. Click Manage project and layers to open the SkylineGlobe Layers dialog to manage your project and layers. The published project FLY is listed in the dialog as well as all project layers that are either:
§ Local layers.
§ Layers that you are both the owner of, i.e., you originally published the layer to SGS, and which were loaded into this project from the SkylineGlobe Server you are currently connected to.
See “Managing Your Own SkylineGlobe Layers” in the “Working with SkylineGlobe Server” chapter for more information.