Using the Timespan Tags Tool
To use the Timespan Tags tool:
1. In the Project Tree, select the group.
2. On the Tools tab, in the Time group, click Timespan Tags. The Timespan Tags dialog is displayed.

Timespan Tags
3. Select a Method:
§ Time Sequence – Split the timespan evenly between the group objects with each object displaying after the one that preceded it on the Project Tree, for an equal fraction of the total time.
§ Full Time Range – Set the entire timespan for each of the group objects (so that they all display for the entire timespan).
4. Click Start Date and Time ![]() , and enter a Start Time.
, and enter a Start Time.
5. Click End Date and Time ![]() , and enter an End Time.
, and enter an End Time.
6. If the group contains subgroups, in the Subgroup Objects field, define how the objects within each subgroup should display:
Note: When the Method is set to Full Time Range, this field is not available.
§ Consecutive - The objects within each subgroup display successively, each for an equal fraction of the total timespan.
§ Simultaneous - Each subgroup should function like a unified object, with all the objects within each subgroup displaying simultaneously during the subgroup’s segment of the total timespan.
7. In the Apply to field, select to apply the group timespan to either:
§ All – All objects in the group. Any timespan tags previously set for individual objects in the group are deleted and reset in accordance with the timespan set in this tool.
§ Objects without time – Only group objects that didn’t already have a timespan tag. All objects with a previously set timespan tag will display according to that timespan tag.
8. Click Apply to Group. A timeline is displayed showing each object in the group and the date and time in which it will be visible.
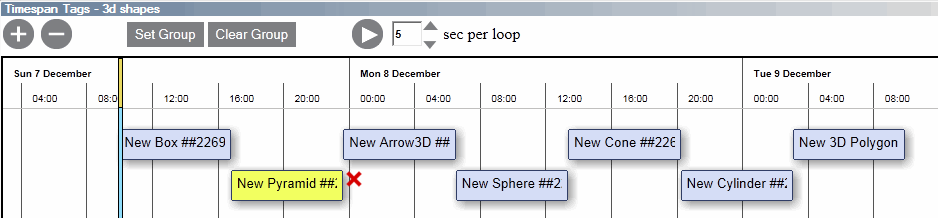
Timespan Timeline
9. If you want to clear the timespan set for the group, click Clear Group.
10. If you want to modify an object's display, click the required object on the timeline and then do any of the following:
§ To remove the object from the timespan group - click the red x next to the object.
§ To modify the sequence in which an object displays, drag the object to the required position on the timeline.
§ To change the length of time for which the object displays, point to the edge of the required object until the cursor becomes a double-sided arrow. Then click and drag the mouse to resize the selected object.
11. If you want to automatically cycle through the group objects with each displaying in turn in the 3D Window during its segment of the group timespan, click Play ![]() . Set the time for each cycle in the sec per loop field.
. Set the time for each cycle in the sec per loop field.
12. Click Zoom in/out ![]() to zoom in and out of the timeline.
to zoom in and out of the timeline.
If you want to clear the timespan set for a particular group (after closing the group’s timeline):
1. On the Tools tab, in the Time group, click Timespan Tags.
2. In the Project Tree, select the required group.
3. In the Timespan Tags table, click Clear Group.