Attaching objects to other objects
You can attach an object to another object. If the second object is in motion, the attached object follows its movements.
You can set the distance between the two objects in all three axes. Use this feature to unite several TerraExplorer Pro objects to one virtual unit. You can also use this feature to add movement to 2D and 3D primitives that are not natively supported by the dynamic object, by creating an empty dynamic object and attaching the primitive to the object.
It is possible to attach more than one object to the same target object. It is also possible to attach an object, which has another object attached to it. It is illegal to attach an object to a target object that is attached to the first object (loop).
To attach an object to another object:
1. In the Project Tree, right-click the required object, and then from the shortcut menu select Attach object to object. If you are attaching a stationary object to a dynamic object to add movement to it, the object you right-click needs to be the stationary object.
2. With the "attachment" mode cursor , click the target object’s name in the Project Tree. The Attachment property sheet opens.
Note: You can right-click anywhere in the Project Tree to cancel the operation.
3. Edit the attachment properties and close the property sheet. See "Editing the Attached Parameters" in this chapter for more information.
Detaching an object from another object
To detach an object from another object:
§ In the Project Tree, right-click the required object, and then from the shortcut menu select Detach from object.
Editing the attached parameters
You can edit the attachment properties at the time you set the attachment or by right-clicking the attached object’s name in the Project Tree and selecting the Edit Attach Parameters option.
The attachment properties allow you to set the offset between the attached object and the target object. All offsets are relative to the target object’s axis. If the target object has pitch and roll angles, the attached object is positioned accordingly.
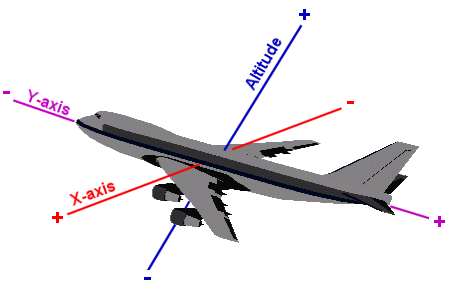
Offset Settings
In the Attachment property sheet, set the following parameters:
|
Parameter |
Options and Activities |
|
Attachment Offsets |
§ X Offset: Enter the distance between the two objects in the X-axis of the target object. Positive values place the object on the left side of the target object and negative values on the right side. § Y Offset: Enter the distance between the two objects in the Y-axis of the target object. Positive values place the object on the left side of the target object and negative values on the right side. § Altitude Offset: Enter the distance between the two objects in the Altitude-axis of the target object. Positive values place the object above the target object and negative values below it. § Yaw Offset: Enter the angular difference between the two objects in the yaw axis of the target object. Positive values place the object on the left side of the target object and negative values on the right side. § Pitch Offset: Enter the angular difference between the two objects in the pitch axis of the target object. Positive values place the object on the left side of the target object and negative values on the right side. § Roll Offset: Enter the angular difference between the two objects in the roll axis of the target object. Positive values place the object on the left side of the target object and negative values on the right side. |
|
Attachments Objects |
§ Attached Object: Shows the name of the attached object. This field is for information only; you cannot enter a new name. § Attached To: Shows the name of the target object to which the selected object is attached. This field is for information only; you cannot enter a new name. |