Basic actions
Creating and opening a project
You can do either of the following:
Creating a new .FLY project
To create a new .FLY project:
1. From the File menu  , select New (Ctrl +N). The Open Terrain Database dialog is displayed.
2. Enter the name of the local or remote MPT database, or browseto the required local database. See "Opening a Remote Database (MPT or DirectConnect Project) from SkylineGlobe Server" in this chapter for information.
3. If you instead want to open a low resolution MPT included in the installation folder, type: "%localterrain%".
4. Click OK.
Opening a remote database (MPT or DirectConnect project)
A remote database is an MPT file or a TerraBuilder DirectConnect project (TBP) published to a SkylineGlobe server.
To open an MPT/TBP file from a SkylineGlobe server:
§ Use: <Layer Name>@<SkylineGlobe Server URL>:<Port Number>/SG
(e.g., [email protected]/SG)
Note: The Port Number is only required when not using the default port 80.
Note: When opening an MPT or TBP file from a SkylineGlobe server (that is configured to use SSL) over a secure connection (SSL), use <Layer Name>@<SkylineGlobe Server URL>:<Port Number>$/SG
To open an MPT/TBP file from a legacy TerraGate server:
§ Use: <Layer Name>@<name of the TerraGate server or IP address
Loading an existing project
To load an existing project from file:
1. From the File menu , point to Open and select Open Project from File. The Open dialog is displayed.
2. Enter a file name or URL, or browse to an existing .FLY file in your file system.
Note: If you use a URL, you must enter the complete address, including the file name. For example: http://www.skylineglobe.com/SkylineGlobeLayers/SG_ExternalFlys/skylineglobe7.fly
Note: You can also open a .FLY project by double-clicking on any .FLY file in your file system or any link to a .FLY file on an HTML page. If TerraExplorer Viewer, and not TerraExplorer Pro, is your default viewer for .FLY files, you can still use this feature by opening TerraExplorer Pro and then selecting the .FLY file or link.
Note: At any point while loading a project, you can hit the ESC key to abort.
To load an existing project from SkylineGlobe Server:
1. From the File menu , point to Open and select Open Project from SkylineGlobe.
2. If you aren’t already logged in to a SkylineGlobe Server, the Login SkylineGlobe Server dialog is first displayed. Click Log in to connect to a server. See "Logging In to a SkylineGlobe Server" in the "Working with SkylineGlobe Server" chapter for more information.
3. The SkylineGlobe Layer dialog is displayed showing all project layers on your SkylineGlobe server.
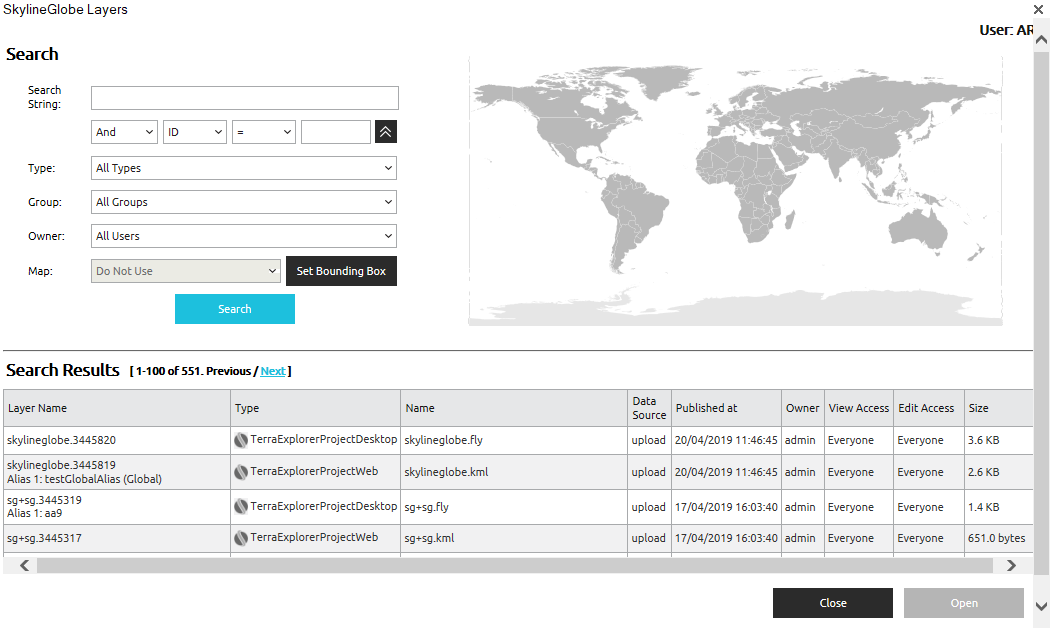
SkylineGlobe Layers Dialog
4. Select the required project layer and click Load.
Saving a project
When you save your project, it is saved to a .FLY file, a file that contains all the project settings and content. The .FLY file does not include the actual terrain databases (MPT file) or any other loaded 2D or 3D files. It only contains pointers to the local or remote files.
The names of the external files are stored in the .FLY file in their full path format. You can copy .FLY files to other locations in your local system, but not to remote computers or servers.
Note: You can create projects for distribution, either on an external storage device or on network servers, by publishing the project. See the "Publishing TerraExplorer Projects" chapter for information.
Save project
To save a project:
§ From the File menu , select Save (Ctrl + S).
Save as
To save a project under a different name or in a different directory:
1. From the File menu , select Save As.
2. In the Save Project As dialog, select a path and type a new project name.
3. Click Save.
Export to KML
A TerraExplorer project can be exported to an OGC KML file. KML uses a tag-based structure with nested elements and attributes and is based on the XML standard. All tags are case-sensitive and must appear exactly as they are listed in the OpenGIS® KML Encoding Standard (OGC KML) reference. The export process preserves TerraExplorer object properties as accurately as possible by translating TerraExplorer objects to their equivalent KML geometries. If there is no KML element that precisely represents a TerraExplorer object, TerraExplorer uses the closest match.
The following translations are performed:
|
TerraExplorer 2D objects |
Equivalent KML geometry |
|
Rectangle, regular polygon, ellipse, circle |
Polygon |
|
Arc: § Fill opacity =0 |
Line string |
|
§ Fill opacity >0 |
Polygon |
|
Arrow: § |
Polyline |
|
§ |
Polygon |
|
Image label, text label |
Point |
|
Video on terrain |
Does not export. |


|
TerraExplorer 3D objects |
Equivalent KML object |
|
Box, sphere, cone, cylinder, 3D arrow, pyramid |
3D model |
|
Building |
3D model |
|
3D Model (that does not contain DAE) |
Label |
|
Modify Terrain |
Does not export. |
|
Hole on terrain |
Does not export. |
|
Multi-polygon |
Multi-polygon |
|
Polygon with hole |
Polygon with hole |
|
3D Polygon § with altitude = 0 relative to terrain |
Polygon |
|
§ with altitude ≠ 0 relative to terrain |
3D Model |
|
Rectangle with texture, polygon (only with 4 vertices) with texture, imagery layer. Note: Only if their resources contain the following formats: jpeg, BMP, tif, png, gif. |
Ground overlay |
When exporting a project with a presentation to KML, the following Tour tags are exported (Tag, Parent Tag):
§ <gx:Tour> <gx:Document>
§ <gx:PlayList> <gx:Tour>
§ <gx:FlyTo> <gx:PlayList>
§ <gx:duration> <gx:FlyTo>
§ <gx:flyToMode> <gx:FlyTo>
§ <Camera> <gx:FlyTo>
§ <gx:AnimationUpdate> <gx:Tour>
To export a project to a KML file:
1. On the File menu , point to Save As, and then select Export Project to KML.
2. In the Save Project As dialog, select a path and type a new project name.
3. Click Save.
Closing a project
To close a project:
§ From the File menu , select Close. If you haven’t saved changes, a dialog is displayed asking whether you want to save your changes.
Note: When the application is in minimized mode, it stays open, but stops processing. All routes, flights, dynamic objects, etc. halt their movement. No CPU power is consumed in this mode. When the application is restored, all movement resumes from the point at which it was halted. The TerraExplorer Pro application is also halted when the 3D Window is completely covered by other applications.
Dragging and dropping files in TerraExplorer
TerraExplorer’s drag and drop capability supports all raster and feature layer, image label, 3D model, 3DML, and CPT formats, in addition to, FLY, KML, KMZ, TBP, and MPT files. A single or multiple files can be dragged and dropped anywhere on the 3D Window or Project Tree or to specific Project Tree groups. Each dropped file is added to the current project as the TerraExplorer object that is the best match for the respective file based on an analysis of the file’s properties as well as other factors. All file types supported in TerraExplorer can be dragged and dropped into TerraExplorer, and are loaded into the project as follows:
|
File Type |
How Loaded |
|
FLY dropped onto TerraExplorer Start page (no project open) |
Project file |
|
FLY (project already open) |
Project layer |
|
MPT dropped onto TerraExplorer Start page (no MPT already open) |
Terrain database |
|
MPT (MPT already open) |
Ignored |
|
Geo-referenced layer |
Loaded in correct location on terrain |
|
Non-geo-referenced layer |
Placed at the center of the 3D Window |
|
Feature layer |
Loaded with default settings |
|
Raster layer: width & height < 1000px |
Image label |
|
Raster layer: width & height > 1000px, elevation-specific file format |
Elevation layer |
|
Raster layer: width & height > 1000px, not elevation-specific file format |
Imagery layer |
|
Model dropped on polyline feature |
Dynamic object with the polyline as its path |