Creating and adding objects
You can add 2D, 3D and dynamic objects to the project.

Objects Tab
To create a new object:
1. On the Objects tab, in the 2D Objects, 3D Objects and Dynamic Objects groups, click the object you want to create:
|
Icon |
Activity |
|
Label |
|
|
Text |
Create a new text label in the 3D Window. |
|
Image |
Create a new text label in the 3D Window. |
|
Video |
|
|
Video on Terrain |
Play a video file onto any selected area of the terrain. You can also use a telemetry file to move the projected video based on recorded readings. Supported video file formats are determined by the codecs that are installed and registered on your computer. Most files that Windows Media Player can play (e.g., *.avi, *.mpg, etc.), including streaming Microsoft Media Server (MMS) content, can be draped on the terrain. |
|
Video Billboard |
Play a video file on a floating billboard. |
|
2D Objects |
|
|
Polyline |
Create a new polyline object in the 3D Window. |
|
Polygon |
Create a new polygon object in the 3D Window. |
|
2D Shape
|
Click the arrow, and then click the required 2D shape to create in the 3D Window: rectangle, circle, ellipse, arrow, arc, or pentagon. |
|
3D Objects |
|
|
3D Model
|
Click and then browse to the desired 3D model. |
|
3D Shape |
Click the arrow, and then click the required 3D shape to create in the 3D Window: cylinder, sphere, 3D arrow, 3D polygon, box, pyramid, cone. |
|
Building |
Create a new building object in the 3D Window. |
|
Terrain Objects |
|
|
Modify Terrain |
Modify the elevation values in an area of the terrain by drawing a polygon in the 3D Window and then setting the Modify Terrain object’s properties in its property sheet. The surface of the terrain is raised or lowered according to the elevation values of the polygon's points. Different elevation behaviors allow replacing, cropping above or cropping below the original values of the terrain. The interior of the polygon can be flat or irregular in shape. |
|
Hole on Terrain |
Select this icon to cut a hole in the terrain based on a polygon that exposes the other side of the terrain through the opening. |
|
Dynamic Objects |
|
|
Ground Object |
Create a new ground vehicle object in the 3D Window and load its route from external file. |
|
Aerial Object |
Create a new aerial vehicle object in the 3D Window. |
|
Move by Time |
Create a dynamic object’s route that begins and ends at specific times. |
|
Libraries |
|
|
Data Library |
Set of graphic elements you can add to your project. See "Loading Objects from the Data Library" in this chapter for information. The Data Library has both local and online objects. Note that online models require an Internet connection. |
|
SketchUp Warehouse |
An online repository of 3D models you can add to your project. See "Loading Objects from SketchUp Warehouse" in this chapter for information. |
Loading objects from the Data Library
The Data Library gives you access to a collection of ready-to-use graphic resources (icons, 3D models, textures, and line patterns/animation) that you can add to your project. It can be opened as a standalone tool to place objects directly on the terrain or accessed from an object's property sheet or from certain TerraExplorer tools to assign a resource to a specific field.
|
Graphic Source |
Description |
|
3D Models |
Ready-to-use 3D models of a wide range of real-world objects, including vehicles, vegetation, and signage, in .x, .xpc, .flt, .fpc or .dae file format. |
|
Icons |
2D images in BMP or GIF format. |
|
Texture Patterns |
Textures that can be applied as a fill for polygons. |
|
Line Patterns and Animations |
Static and scrolling textures that can be applied along a line path. |
To load an object from the Data Library:
1. On the Objects tab, in the Libraries group, click Data Library. The Data Library dialog is displayed.
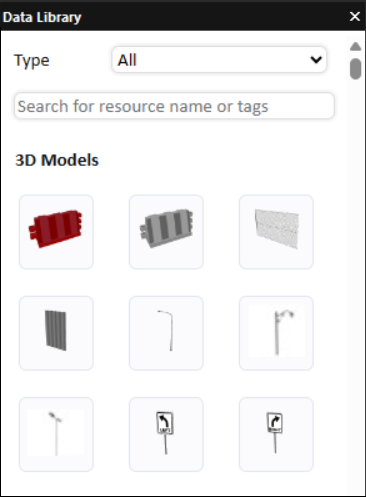
Data Library Tool
2. Filter by Type: Icons, 3D Models, Line Patterns and Animations, or Texture Patterns. You can also search by resource name or tags.
3. Select the graphic item you want to add.
4. Add the object in the 3D Window:
§ For 3D models or icons: In the 3D Window, click to place the object, or press Esc to cancel.
§ For line patterns/animations: In the 3D Window, click to define waypoints for the line path. Right-click to finish. The selected pattern or animation is applied to the line, and its color is determined by the value of the Line Color property.
§ For texture patterns: In the 3D Window, click to place the polygon points. Right-click to finish. The polygon is filled with the selected texture.
5. Edit the added items using TerraExplorer Pro editing tools. See "Editing Objects in the 3D Window" in this chapter for information.
Loading objects from SketchUp Warehouse
SketchUp 3D Warehouse is an online repository of 3D models.
To use SketchUp Warehouse:
1. On the Objects tab, in the Libraries group, click SketchUp Warehouse. The SketchUp Warehouse dialog is displayed.
2. Enter the model to search for and click Search. The SketchUp 3D Warehouse Search is displayed with a collection of relevant thumbnail images.
3. Click the thumbnail image of the model you want to download and click Download.
4. From the dropdown list of formats, select either: KMZ from SketchUp or COLLADA (.zip).
5. Save the model to your local or network drive.
6. If you downloaded a model in KMZ format, load the model into your project by using TerraExplorer’s Load KML/KMZ command.
7. If you downloaded a COLLADA (DAE) model, open the .zip file, and extract its contents to a folder. Then load the .dae file into your project by using TerraExplorer’s Load 3D Model command.