Selecting, adding, and moving Project Tree items
The Project Tree provides a set of tools for selecting single or multiple items from the tree. A new selection of single or multiple items deselects the previous selection on the tree.
Selecting a single item
To select a single item:
§ In the Project Tree, click the required item.
Note: If you double-click the item, you automatically perform the item’s action.
Selecting sequential tree items
You can select a set of sequential items from the tree. The items can be part of a single group or from several different groups.
To select sequential items:
1. In the Project Tree, click the required item.
2. Press and hold the SHIFT key.
3. Move the cursor to the last object you want to select and click it. All objects between the first and last objects are selected.
Note: If there is a group between the selected objects, the group, and all of its children (including other groups) are automatically selected. If a group name is selected, all its components are also selected, even though the components (children) are not highlighted on the tree.
Selecting non-sequential tree items
To select a set of items from the Project Tree that are not arranged sequentially:
1. In the Project Tree, click the required item.
2. Press and hold the CTRL key.
3. Move the cursor to the next item you would like to select and click it.
You can repeat this operation as many times as you like, selecting multiple items from the same or different groups.
Note: If you want to deselect an item, click a previously selected item while the CTRL key is still pressed. The item becomes deselected in the same manner as it was selected.
You can combine sequential and non-sequential selections.
If you select a group, you automatically select all the children in that group. If you have selected a group, but then you wish to select only certain children from that group, first deselect the group, and then select the specific children that you require.
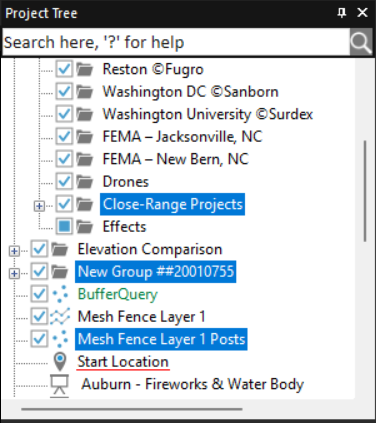
Multiple Non-Sequential Selections
Adding items to the Project Tree
Any new element you add to the system is placed either in the root area or under one of the groups. You add elements in the following ways:
§ From the right-click menu - To add locations, presentations, and messages.
§ From the Objects tab -To add objects.
§ From the Home tab (Add group) - To add locations, presentations, and messages.
Note: If you want to add an object to a specific group, make sure the group or one of its children is selected before you create the object.
If you want to add an element under the root, make sure to deselect the current element by selecting the root area. Then, create the new element.
To add an element to a specific group:
1. Right-click the group to which you want to add a new element.
2. Point to New, and select Location, Presentation, or Tree Message.
To add an element under the root area:
1. Right-click in the root area.
2. Point to New, and select Location, Presentation, or Tree Message.
Moving items in the Project Tree
You can reorder items in the Project Tree
To move an item to a new position in the Project Tree:
1. Click and drag the item to the required position on the Project Tree.
Note: All groups and feature and 3D layers always appear at the top of the Project Tree. Items such as objects and imagery layers cannot be placed above them.
2. If you want to move an item to the highest position in the Project Tree that it can be moved, drag it to the root folder, i.e., the leftmost area on the side of the Project Tree. When an item is dragged to the root folder, a blue line appears on the left side of the Project Tree.