Water effects
You can simulate naturally or artificially flowing water such as rivers, oceans, waterfalls, and pools.
Water animation
To create a water object, such as a waterfall, fountain, or water pipe, which realistically simulates the particular object’s water flow, color, and other attributes:
1. On the Effects tab, in the Water group, click Water Animation, and select the required effect. The Effect property sheet opens.
2. If you want to change the default water animation parameters, in the Effect property sheet, set the required parameters. See "Effect Property Sheet Parameters" in this chapter for information.
3. If you want to modify particle properties such as base image, color, size, rotation, speed, and lifetime, then in the property sheet's Effect Setting field, click Set. The Particle Editor is displayed. See "Particle Editor Parameters" in this chapter for information.
4. Place the effect object in the 3D Window by clicking in the desired location. The effect object is added to the Project Tree.
5. Continue to edit the effect's parameters, or close the property sheet to finish the operation.
Water body
To simulate flowing water effect in a water body:
1. On the Effects tab, in the Water group, click Water Body, and select the required body of water. The Polygon property sheet opens.
2. If you want to change the default water body parameters, in the Polygon property sheet, set the required parameters. See "Polygon Property Sheet Parameters" in the "Objects and Labels" chapter for information.
Note: The default water body parameters vary depending on the water body that was selected. The primary differences are in the values set for the Texture File.
3. If you want to modify particle properties such as water and reflection color and opacity or bump scale, then in the property sheet's Water Setting field, click Set. The Particle Editor is displayed. See "Water Particle Editor Parameters" in this chapter for information.
4. Place the polygon points in the 3D Window by clicking in the desired locations. You must place at least three points.
Note: When creating a filled polygon, the lines of the polygon should not overlap each other. This may result in an irregular fill pattern.
5. Finish the polygon creation by right-clicking.
6. Edit the polygon’s parameters in the 3D Window or using the property sheet. See "Editing Objects in the 3D Window" in the "Working with Objects" chapter for information. Close the property sheet to finish the operation.
Water particle editor parameters
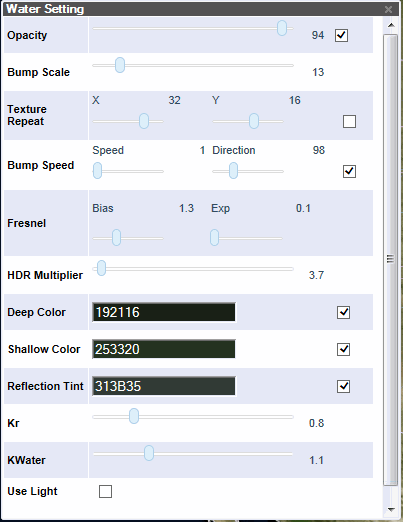
Water Animation Particle Editor
|
Effect Parameter |
Activity |
|
Opacity |
Controls the opacity of the water, where 100% is opaque and 0% is transparent. Drag the slider (0-100) to adjust the opacity. |
|
Bump Scale
|
Controls how bumpy the water texture appears. Drag the slider (0-100) to adjust the scale. |
|
Texture Repeat |
Drag the slider to adjust the repeats of the texture file: § X – Number of repeats of the water texture file in the X-axis (0-1024). § Y - Number of repeats of the water texture file in the Y-axis (0-1024). |
|
Bump Speed |
§ Speed - Drag the slider to adjust the speed (0-20). § Direction - Drag the slider to adjust the direction (0-360). |
|
Fresnel |
Bias and exponent values for Fresnel calculation. |
|
HDR Multiplier |
Multiply HDR values in background cube map. |
|
Deep Color |
Color of deep water. |
|
Shallow Color |
Color of shallow water. |
|
Reflection Tint |
Reflection color. |
|
Kr |
Strength of reflection. |
|
KWater |
Strength of water color. |
|
Use Light |
Display the sun’s reflection on the water. The sun’s position is based on the system’s current date and time. The reflection dynamically updates when the system date and time is changed. |
Oceans
You can display animated water on all sea and ocean terrain.
To toggle the display of the animated water on sea and ocean terrain:
§ On the Effects tab, in the Water group, click Oceans.