About Building
After all photos are added to the project and all properties are set as required, you can begin the build process. The build process provides flexibility with regard to the AT area, reconstruction area, build steps that are to be completed, and output formats.
The build process entails a series of sequential steps beginning with data preparation and aerotriangulation and followed by three reconstruction steps: point cloud creation, model creation, and model texturing, and then project output. The required build steps are selected in the Build Parameters dialog. The final output can be created in any of the following output formats: 3DML (for loading directly into TerraExplorer and streaming with SkylineGlobe Server), DAE, OBJ, 3D Tiles, SLPK (I3S), OSGB, Orthophoto, DSM, DTM/DEM, and LAS (Point cloud public file format). See "Setting Build Steps, Parameters, and Outputs" in this chapter for information on the different file formats.
As the build process is progressing, the 3D Window displays the interim build results and PhotoMesh Build Manager displays information about the current step and active fusers.
If a previously built project requires modification, instead of building the entire project again from the first step of the build process, you have the option to rebuild, incorporating some of a previous build’s results. Rebuilding provides flexibility both with regard to the project section (entire project, only error tiles or selected tiles) and project steps that are to be rebuilt. See "Rebuilding" in this chapter for more information.
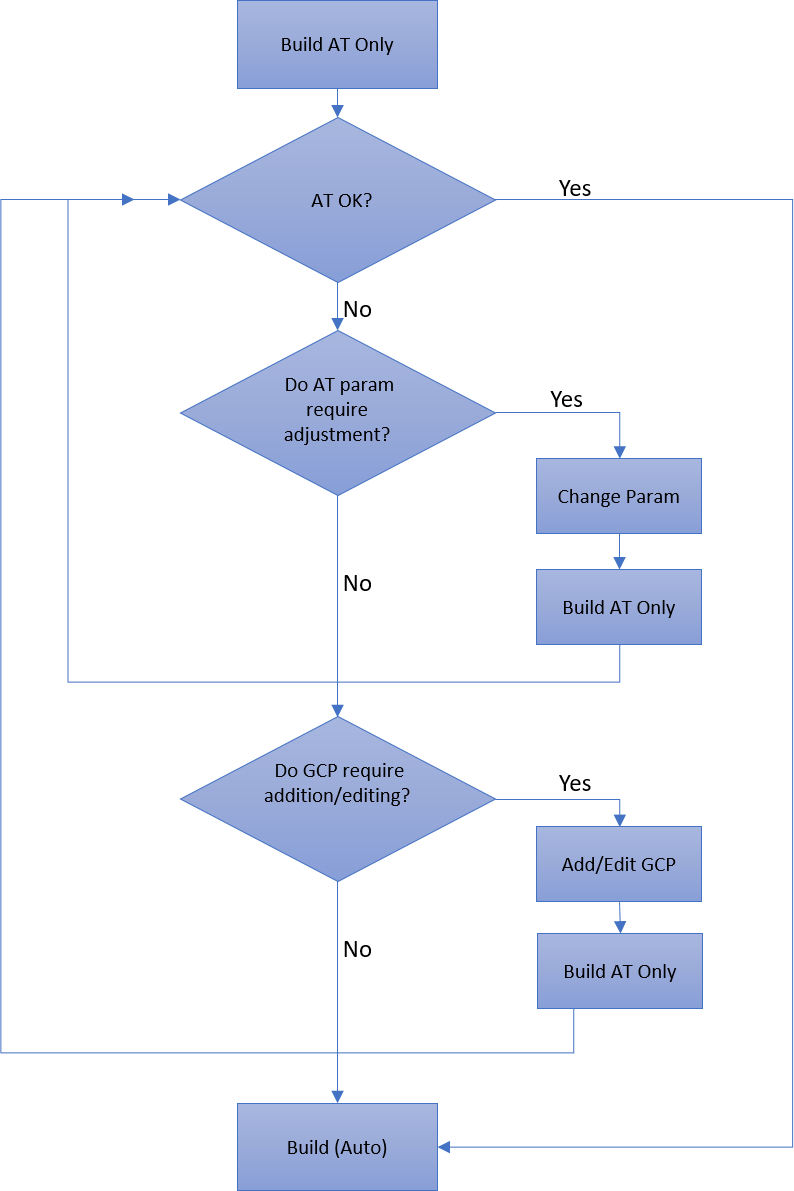
Recommended Aerotriangulation Workflow
For optimal AT results, it is recommended to initially perform only the aerotriangulation step ("AT Only"), and then review the results, to ensure a precise AT which includes all project’s photos that intersect with the AT area, before proceeding with the rest of the build. If the results of the AT Only were in fact satisfactory, you can continue with the rest of the build process. PhotoMesh will automatically determine what processing is required to apply the changes to the project, by rebuilding the project from "Auto". See "Rebuilding" in this chapter for more information.
If the results of the initial AT Only build were unsatisfactory, modify the AT parameters or collection properties and/or edit/add control points based on the aerotriangulation result. Then repeat the aerotriangulation by selecting AT Only, and review your results. When repeating the aerotriangulation, PhotoMesh determines precisely which tiles and which specific AT sub-processes were affected by the modification of properties or control points, enabling a much lighter and faster AT process. This iterative process should be repeated until satisfactory AT results are achieved.
The diagram below outlines the recommended aerotriangulation workflow.