Installing PhotoMesh
PhotoMesh offers a standard installation, which includes both the application and fuser, and a standalone fuser installation. Both installation types support silent, unattended setup.
Standard Installation
The PhotoMesh application installation includes fuser installation. A standalone fuser installation is also available. See "Installing PhotoMesh Fusers" in this chapter for information.
Note: If your project will include a WKT of a coordinate system that references a grid shift file (GSB, GTX) that was not bundled with the PhotoMesh installation, the grid shift file can be automatically installed during the PhotoMesh installation process by placing a zip file that includes the required grid shift files next to the PhotoMesh.exe file in the installation folder. See "Grid Shift Files" in the "Basic Concepts" chapter for information on grid shift files and how to install them after PhotoMesh was installed.
To install PhotoMesh:
Note: On some operating systems, administrative privileges may be required.
1. If you have an old version of PhotoMesh running, close it before continuing with the installation.
2. Place the PhotoMesh license file (SLPhotoMesh.lic) next to the PhotoMesh.exe file in the installation folder.
3. On your computer, browse to the Photomesh.exe file and double-click. The Skyline Software End User License Agreement dialog is displayed.

End User License Agreement
4. Select the check box to agree to the license agreement terms and then click Install to continue the installation.
Destination Folder
5. Select the folder in which setup should install the files, and then click Next. The Ready to Install PhotoMesh dialog is displayed.
Ready to Install PhotoMesh Dialog
6. Click Install. A dialog is displayed when the installation process is complete.
PhotoMesh Setup Complete
7. Click Finish to exit the Setup Wizard.
Manual Installation of the HASP Driver
If your software was delivered with a HASP license key, you can manually install the required HASP driver.
To install the HASP driver:
1. Download the HASP driver zip file: Sentinel_LDK_Run-time_setup.
2. Unzip the file to a temporary directory, and run the HASPUserSetup.exe file.
3. Follow the installation wizard instructions to complete the installation.
Silent Installation of PhotoMesh
To install PhotoMesh:
1. Open a command prompt and use the "cd" command to change directories to where PhotoMesh.exe is located.
2. Run the following command to install PhotoMesh to a particular folder. If no installation folder is included in the command, PhotoMesh is installed to the default folder (c:\Program Files\Skyline\PhotoMesh).
PhotoMesh.exe -s INSTALLFOLDER=[Path to installation folder]
Note: Place the license file in the same directory as the installation executable (.exe) file before calling this command.
To install PhotoMesh fuser:
1. Open a command prompt and use the "cd" command to change directories to where PhotoMeshFuser.exe is located.
2. Run the following command to install PhotoMeshFuser to a particular folder. If no installation folder is included in the command, PhotoMeshFuser is installed to the default folder (c:\Program Files\Skyline\PhotoMeshFuser).
PhotoMeshFuser.exe -s INSTALLFOLDER=[Path to installation folder]
Note: Place the license file in the same directory as the installation executable (.exe) file before calling this command.
Configuring PhotoMesh to Use the Skyline Floating License Server (SFLS)
Each machine that is sharing the floating license for PhotoMesh must be configured with the address of the Floating License Server.
Note: The Skyline Floating License should be installed on the server before configuring it on each of the machines that is sharing the license.
To configure PhotoMesh to the SFLS address:
1. Open the License Manager. See "License Manager" in this chapter for information.
2. If the Skyline Floating License received from Skyline was not used in the installation (i.e., placed next to the PhotoMesh.exe file in the installation folder), from the File menu, select Load License File, and browse to the license file.
3. To set the floating license server URL, from the File menu, select Set Floating License Server. The Floating License Server dialog box is displayed.
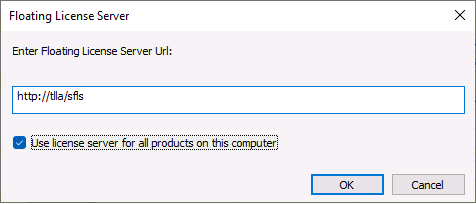
Floating License Server
4. Enter the floating license server URL, e.g., http://<server_name>/SFLS.
5. If you want to override the protection type set in the currently loaded license file for each Skyline product on the computer, select Use license server for all products on this computer.
Checking Out Licenses on the Client Side
To check out a license:
1. Close the application for which you want to check out a license.
2. Open the License Manager, and under the section for the desired application select Check Out. The Application Protection Type field will refresh and read Floating (Checked Out). When the License Server Products page is refreshed, the Checked out count will have increased by the number of licenses checked out.
To check a license back in:
§ Open the License Manager and select Check In.
See the SFLS Setup Guide for more information.
Uninstalling PhotoMesh
The Uninstall feature lets you quickly remove all folders and files that you installed to your hard disk during the installation procedure.
To uninstall PhotoMesh (including PhotoMesh fuser):
1. Exit the PhotoMesh and PhotoMesh fuser applications.
2. From the Windows Start menu, click All Programs, then click the Skyline PhotoMesh folder, and select Uninstall. The Windows Installer dialog is displayed.
3. Click Yes to uninstall.
Installing PhotoMesh Fusers
PhotoMesh fuser can be installed as a standalone installation on any client computer on the same network. The number of fusers that can run simultaneously is determined according to the PhotoMesh license. See "PhotoMesh License Options" in the "Getting Started" chapter. See the "Fusers" chapter for information on installing fusers for a fusers pool and for general fuser information.
To install a PhotoMesh fuser:
1. Log on as a user with administration privileges.
2. On your computer, browse to the PhotoMesh Fuser.exe file and double-click. The Welcome dialog is displayed.

PhotoMesh Fuser Welcome Dialog
3. Click Next to view the Software License Agreement dialog. If you agree to the licensing terms, click Yes to continue the installation. The Installing PhotoMesh Fuser dialog is displayed.

Installing PhotoMesh Fuser Dialog
4. Click Next. The Completed PhotoMesh Fuser Setup dialog is displayed.

Completed Fuser Setup Dialog
5. Click Finish.
Installing Linux Fusers
When installing fusers on Ubuntu Server, which is installed without a graphical desktop environment by default, additional components (X server, window manager, etc.) must be installed and configured manually since PhotoMesh Fuser requires a graphical environment,
To install a Linux fuser on Ubuntu 24.04:
See: "Customizing the Instance" in the "Getting Started with AWS" chapter for more information.
1. Make sure you have installed the latest graphics drivers for your graphics card.
Note: To verify that your graphics card is configured properly, type the following in the terminal window: "glxinfo -B" and confirm that the correct graphics card information is displayed.
2. Install and configure Wine and the necessary packages (for a clean installation of Ubuntu Server 24.04) by doing the following:
a. Enable 32-bit architecture, and update the system:
sudo dpkg --add-architecture i386
sudo apt-get -y update
sudo apt-get -y upgrade
b. Install the required packages
sudo apt-get -y install pkg-config unzip x11vnc xterm fvwm dkms xserver-xorg xvfb ubuntu-drivers-common cifs-utils wine winetricks winbind mesa-utils
c. Start the X window system:
sudo /usr/bin/X :0 &
export DISPLAY=:0
Note: The listed packages include an X server and the FVWM window manager. You can use a different window manager or none at all, but a graphical user interface is required in order to run a PhotoMesh Fuser.
d. (Optional) Configure VNC in order to verify X runs properly:
i. in the PuTTY terminal window, set a VNC password.
x11vnc -storepasswd.
ii. When prompted, confirm saving the password to /home/<user>/.vnc/passwd.
iii. Start VNC and the window manager:
x11vnc -rfbauth ~/.vnc/passwd &
fvwm &
e. (Optional) Connect to the Ubuntu Server with a VNC client, using your Ubuntu Server’s IP and the password set in step c above.
3. Install the PhotoMesh Fuser environment:
a. Click here to download the configuration file for AWS. For running a local fuser, only the installation package "wineinst.tar" is required. Copy this file to your Linux machines, under "/home/[your Linux user name]/".
Note: If you don't know your user name, you can run the command "whoami” in the Linux command line to retrieve it.
b. Extract the contents of the "wineinst.tar" file and run the fuser setup script::
tar -xvf wineinst.tar
sh fuser.sh
Note: This process may take a few minutes to complete.
3. Run PhotoMeshFuser:
a. In the terminal window, mount all the relevant shared drives on the Linux machine. (working folder, project folder, input data)
mount -t cifs //<IP>/<SharedDrive> /mnt/mount1 -o username=<username>,password=<password>,vers=2.0,uid=<user ID, either a number or name>
Note: To retrieve your user ID, run the command "id” in the Linux command line.
b. Mount and hard link the Wine DOS devices:
mkdir ~/.wine/dosdevices/unc
mkdir ~/.wine/dosdevices/unc/<IP>
ln -s /mnt/mount1 ~/.wine/dosdevices/unc/<IP>/<SharedDrive>
c. Navigate to the PhotoMesh fuser folder and run PhotoMeshFuser.exe with Wine. The fuser files can be on your Linux machine or on a shared drive.
wine photomeshfuser.exe
Uninstalling PhotoMesh Fusers
The uninstall feature lets you quickly remove all folders and files that were installed on the hard disk during the installation procedure.
To uninstall a standalone PhotoMesh fuser:
1. Exit PhotoMesh application.
2. From the Windows Start menu, click All Programs, then click the Skyline PhotoMesh Fuser folder, and select Uninstall PhotoMesh Fuser.
3. The Windows Installer dialog is displayed. Click Yes to uninstall.
Starting PhotoMesh
Start PhotoMesh by doing one of the following:
§ Click Start > Skyline PhotoMesh> PhotoMesh.
§ Click the PhotoMesh icon on your desktop.
§ Double-click any .PhotoMeshXML file on your file system.