Exporting 3D Mesh Layers to Other Formats
3DML can be exported to Cesium 3D Tiles, I3S/SLPK, 3MX, and 3DML formats. You can also export sections of a mesh layer using clip polygons on the clipboard. Export is supported for all mesh layers except for imported OGC 3D Tiles and 3DML created from models feature layers. The export’s output folder should be located on a fast local drive. When exporting to Cesium 3D Tiles, the tileset.json is exported to version 1.0 and the models (b3dm) to version 2.0.
In addition to the export methods supported from TerraExplorer user interface, additional export options can be performed from the SLMeshConverter command line tool. See "Importing and Exporting Using the Command Line" in this chapter for information.
To export a mesh layer to other formats:
1. Select the mesh layer, and then on the 3D Mesh Layer tab, in the Mesh Layer group, select Export to Mesh. The Export to Mesh Layer dialog is displayed.
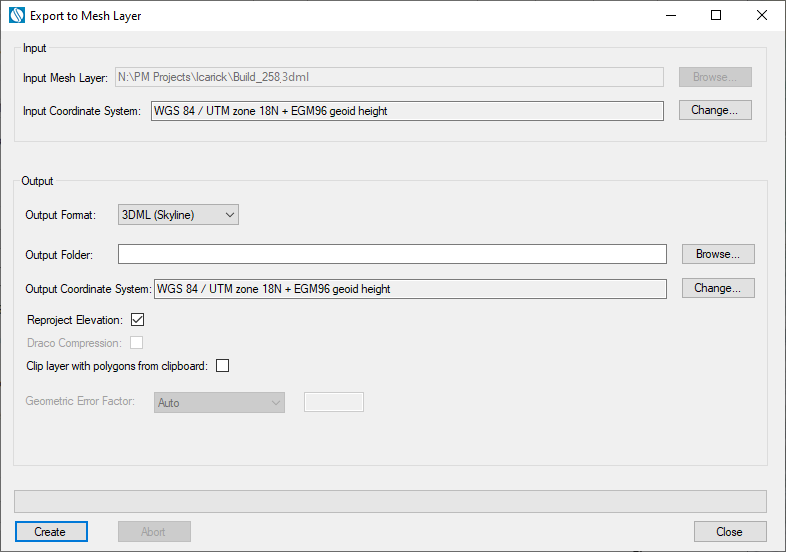
Export to Mesh Layer
2. The Input Mesh Layer is automatically populated based on the layer selected in the previous step.
3. The mesh layer’s coordinate system is automatically read from the layer. If you want to change the model’s coordinate system, in the Input Coordinate System field, click Change. See “Coordinate System Dialog” in the “Basic Concepts” chapter for information.
4. Select an Output Format: Skyline 3DML, Cesium 3D Tiles, Esri I3S-SLPK, or Bentley 3MX.
5. Browse to the required Output Folder. The exported mesh layer will be saved to this folder.
6. In the Output Coordinate System, set the output mesh model’s coordinate system. This is by default set to the project’s terrain coordinate system. If you want to change the model’s coordinate system, in the Output CS field, click Change. See “Coordinate System Dialog” in the “Basic Concepts” chapter for information. 3D Tiles output is always produced in ECEF coordinate system.
7. If you want to reproject the input layer’s elevation values to the output coordinate system, select the Reproject Elevation check box. When exporting to 3D Tiles, it is recommended to select the Reproject Elevation option in order to reproject the elevation values to ellipsoid, and then to ECEF as required by the Cesium 3D Tiles standard for compatibility with other standard Cesium resources, e.g., data from terrain providers, that use ellipsoid elevation.
Note: Some Cesium resources, e.g., data from terrain providers, use geoid elevation value that were declared as ellipsoid. This data does not adhere to the Cesium standard of the ellipsoidal WGS 84 Earth-Centered, Earth-Fixed (ECEF) reference frame (EPSG 4978) coordinate system and would only match other resources, e.g., 3D Tiles, that also use such ellipsoid-declared geoid values. To export a mesh layer that is compatible with these resources, the elevation values should not be reprojected to ellipsoid, so the check box should be cleared.
8. For 3D Tiles and I3S-SLPK mesh formats, if you want to compress the mesh in Draco format for reduced size and better streaming, select Draco Compression.
9. If you want to export sections of the mesh layer using clip polygons on the clipboard, select the Clip layer with polygons from clipboard check box.
Note: Only objects with a polygon geometry, i.e., created via 2D Objects > Polygon (on the Home or Objects tab) or polygons in a feature layer are supported.
10. Click Create. The created 3DML is added to the project and displayed in the Project Tree.