Marking a Mesh Layer for Retouching
Mesh imperfections, such as bumps, irregular surfaces, or floating artifacts, can be edited in TerraExplorer using manual retouch layers, in which you mark surfaces for flattening and floating artifacts for removal. The implementation is then performed in PhotoMesh. The output of the Manual Retouch tool is a polygonal feature "retouch layer" with attribute information that defines what retouch action should be performed in each area: clean, flatten, and retexture. This "retouch layer" must then be reimported to PhotoMesh. When rebuilding the project, PhotoMesh uses the manual retouch layer to add a set of constraints to the reconstruction algorithms. Most of the constraints defined apply to the mesh model, and the modified model is then retextured using the project’s photos. There is also an option in the Manual Retouch tool to set a specific file texture, e.g., water or grass, for a marked area, instead of basing texturing on the project’s photos.
To mark a mesh layer for retouch:
1. Load the mesh layer on which you want to mark the retouches. The 3DML outputs produced in PhotoMesh are found in the build’s outputBuild folder. See “Accessing the Build Outputs” in the PhotoMesh User Guide for more information.
Note: If the loaded 3DML's vertical coordinate system is different from the terrain’s, the elevation values must be reprojected. See “Setting and Editing 3D Mesh Layer Properties” in the “Mesh Layers” chapter for more information.
2. Load an SQLite retouch layer that was exported from PhotoMesh. See the PhotoMesh User Guide for information. See "Loading Feature Layers" in the "Feature Layers" chapter for more information on loading the retouch layer.
3. In the Project Tree, select the loaded retouch layer, and then on the Tools tab, in the PhotoMesh group, click Manual Retouch. The Manual Retouch dialog is displayed.
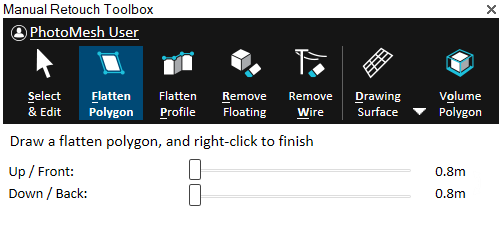
Manual Retouch
4. If this is the first time you are opening the retouch layer in this TerraExplorer project, the Enter User Name dialog is displayed so you can tag your edits with your name. To open this dialog at a different time, click the user name link ![]() in the Manual Retouch toolbox. The user name entered here is saved in the layer’s username attribute. When multiple users work on the same retouch layer, this attribute enables you to identify the particular user that worked on each retouch polygon.
in the Manual Retouch toolbox. The user name entered here is saved in the layer’s username attribute. When multiple users work on the same retouch layer, this attribute enables you to identify the particular user that worked on each retouch polygon.
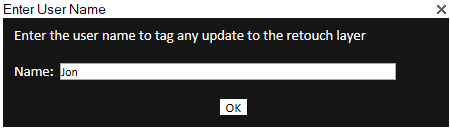
Enter User Name Dialog
5. If you want to create a surface on which to draw your retouch polygon or polyline, e.g., for a model that is not flat or missing corners, click the arrow next to Drawing Surface (Shortcut key: d) and select one of the options. See "Using Drawing Surfaces" in the "Working with Objects" chapter for information.
6. Perform one of the following retouch operations:
§ Flatten polygon (Shortcut key: f) – Remove all elements inside a defined volume, and add a flat surface in the area of the 2D polygon.
i. Click Flatten Polygon.
ii. Draw a polygon around the area for flattening. Right-click to complete.
§ Flatten profile (Shortcut key: p) – Create multiple flatten polygons by defining a profile line (usually on a roof top) and the base elevation. A flatten polygon is created for each segment of the profile line (from the line to the base elevation). This method is useful for creating retouch polygons in hard to access places, e.g., between buildings.
iii. Click Flatten Profile.
iv. Draw the profile line, and then right-click to complete.
v. Use the property sheet's mini toolbar to edit the polygon. See "Editing Objects in the 3D Window" in the "Working with Objects" chapter for information. Close the mini toolbar when finished editing.
vi. Place the "X" on the model to define the base elevation.
§ Remove floating (Shortcut key: r) – Remove all elements inside a defined volume. This option is generally used to remove floating elements that aren’t connected to the ground.
i. Click Remove Floating.
ii. Click any point on the floating artifact. PhotoMesh automatically creates a polygon that includes the selected point.
§ Remove wire (Shortcut key: w) – Remove thin elements such as power lines by drawing a polyline that marks the wire to be removed. A separate floating polygon is created for each segment of the polyline.
i. Click Remove Wire.
ii. Draw a polyline along the wire to remove, and then right-click to complete.
7. To select the polygon for editing after it is drawn, click Select and Edit, and then select the retouch object for editing. Use the property sheet's mini toolbar to edit the polygon. See "Editing Objects in the 3D Window" in the "Working with Objects" chapter for information.
8. To adjust the length to extrude the retouch polygon upwards or frontwards and downwards or backwards in the direction of the polygon’s normal, select the polygon and in the Manual Retouch Toolbox, slide the Front buffer and Back buffer sliders. If a polygon’s elevation angle to the ground is less than 20 degrees, the polygon is extruded vertically. If the polygon points were created in a clockwise orientation, then the front is the side facing the user.
9. If you want to add water or grass texture to your flatten polygon (created via "Flatten Polygon" or "Flatten Profile"), select the polygon, and then in the Manual Retouch Toolbox, select a Texture file. Enter a value for the texture tile size. If you want to remove the added texture, select the first entry which is blank in the Texture file list.
10. To select how to display the drawn polygon, click the Volume icon (Shortcut key: o) to switch between the following options:
§ Volume Colorize – Mark the area for retouching by colorizing all parts of the mesh contained within the extruded polygon.
§ Volume Polygon – Mark the area for retouching by displaying 3D polygons based on the extruded polygon.
§ Volume No – Mark the area for retouching only with a 2D polygon.
11. All changes to the Retouch layer are automatically saved, so no export of the retouch layer is required. When finished, import the SQLite retouch layer back into PhotoMesh.