Navigating to locations and objects
Navigating to a specific address or location
You can search for a specific address or location or obtain address information for any point on the terrain. The search provider is dependent on the SkylineGlobe Server that TerraExplorer is currently connected to. If you aren’t already logged in to the required SkylineGlobe Server, log in to the server. See "Logging In to a SkylineGlobe Server" in the "Working with SkylineGlobe Server" chapter for information.
To search:
§ In the Project Tree, Search here field, type a search term. See "Search Tool" in the "Using the Project Tree" chapter for information on additional search options.
To fly to a specific coordinate:
§ In the Project Tree, Search here field, type the coordinates using the following syntax:
§ Coord: Lon, Lat or X, Y - Fly to coordinate.
§ MGRS: MGRS coordinate - Fly to MGRS coordinate
Obtaining address details
To obtain address details for a specific location:
1. On the Navigation tab, in the Navigation Aid group, click Point to Address. The Point to Address panel is displayed.
2. Navigate to the desired location on the terrain and click. The location address is displayed in the Point to Address panel.
3. While the Point to Address panel is open, you can click again on any point on the terrain to find its address. Repeat for as many points as you require.
4. If you want to close the Point to Address tool, click the x on the upper right corner of the panel.
Bookmarking locations
A location defines the geographical coordinates of a point on the terrain as well as the position from which the point is to be viewed. By right-clicking or double-clicking a location name in the Project Tree you can perform a flight, jump to the location or play one of the predefined patterns (circle, oval, line or arc).
Viewing a location
To view a location, do either of the following:
§ In the Project Tree, double-click a location to perform the location’s activation action. The specific activation action set in the location’s property sheet is performed.
Note: When you play a flight pattern, the default flight time for one round trip around the point of interest is 15 seconds.
§ In the Project Tree, right-click and select one of the following options from the shortcut menu:
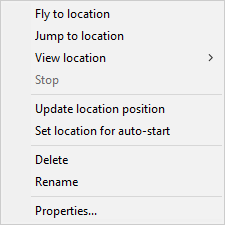
Location Shortcut Menu
|
Option |
Activity |
|
Fly to Location |
Flies from the current location directly to the selected location |
|
Jump to location |
Jumps directly to the location’s position |
|
View Location |
This option’s sub-menu contains a list of pre-defined flight patterns that compass about the location. § Circle Pattern: Performs a circle flight around the location. The camera always faces the specified location. The radius is set according to the distance parameter. § Oval Pattern: Performs an oval flight pattern around the location. The camera always faces the specified location. The first radius is set to the distance parameter and the second radius is set to half of the distance parameter. § Line Pattern: Performs a tight oval flight pattern around the location. The camera always faces the specified location. The first radius is set to the distance parameter and the second radius is set to one-tenth of the distance parameter. § Arc Pattern: Performs a vertical arc flight above the location. The camera always faces the specified location. The radius is set according to the distance parameter. |
Stopping a flight to or around a location
To stop a flight to or around a location:
§ Right-click anywhere in the 3D Window, and from the shortcut menu select Stop.
or
§ In the Project Tree, right-click the location’s name, and from the shortcut menu select Stop.
Creating locations
To create a new location in the current camera position:
1. In the Project Tree, select the required group or click in the root area if you want to create the location in the root folder.
2. On the Home tab, in the Add group, click Location.
3. Type a name for the location or accept the default and press ENTER.
Note: When you create a location, by default, the activation action is Fly to, and no message is displayed. If you want to change the activation action or add a message, open the property sheet and make the required modifications. See "Editing Locations" in this chapter for more information.
The location of interest is set to the terrain coordinate at the center of the 3D Window. If there is no terrain at the center of the view (the camera is facing the sky), the location of interest is set to a distance of two times the current altitude of the camera above the terrain.
Note: When you create a location, the point of interest is set only to the terrain coordinate of the center of the 3D Window and is not affected by any 2D or 3D models in front of the terrain.
Setting Locations for Auto-Start
You can assign a location for the Auto-Start procedure of the project. In this case, the project starts with the camera viewing the location or performing the location’s activation action.
See "Setting the Auto-Start Procedure" in the "Setting the Project" chapter for further information on how to set locations for the Auto-Start procedure.
Editing locations
To edit a location:
1. In the Project Tree, right-click the required location, and select Properties from the shortcut menu. The Location property sheet opens.
2. Modify the Location property sheet parameters as required.
|
Location Parameter |
Activity |
|
General |
|
|
Name |
Description or name of the location. This text appears in the Project Tree as the name of the location. |
|
Activation Action |
Action to perform when selecting the location from the Project Tree. |
|
Message |
Message associated with the location. The number displayed is the number of the message. To create a new message, or update an existing message, open the Create Message dialog by clicking in this field and selecting Edit. See "Using the Create Message Dialog" in the "Working with Objects" chapter for more information. |
|
Location |
|
|
Altitude Method |
Altitude method to be used by the location: § Select Relative to Terrain to place the location of interest at a specified altitude above the ground. § Select Absolute to place the location of interest at a specified altitude above the terrain database vertical datum base ellipsoid. |
|
Altitude |
Altitude above the ground for the specified location. |
|
X |
X-coordinate of the location of interest. |
|
Y |
Y-coordinate of the location of interest. |
|
MGRS |
Coordinates of the location of interest in Military Grid Reference System (MGRS) coordinates. This field is only available if Show MGRS Coordinates was selected in the Options dialog. See "View" in the "Using TerraExplorer Options" chapter for more information. |
|
Direction |
Horizontal angle of the camera when viewing the location. |
|
Tilt |
Vertical angle of the camera when viewing the location. |
|
Viewing Distance |
Distance between the camera and the specified location. This property also affects the radius of the flight patterns. |
|
Set Location |
Click Capture to define the current camera position as the selected location. The updated coordinates for the location appear in the Location property sheet. |
|
View Location |
Click Jump to jump to the set location. |
Navigating to objects
In the 3D environment, you can engage with objects using a variety of flight actions, such as flying to or jumping towards an object, and executing pre-defined flight patterns. Additionally, you have the ability to pause or stop these flight actions at any point for better control and navigation.
To perform an object’s activation action, do either of the following:
§ In the Project Tree, double-click the required object. The specific activation action set in the object’s property sheet is performed.
§ In the Project Tree, right-click the required object, and then select one of the options from the shortcut menu.
|
Menu Option |
Description |
||
|
Fly to Object |
Flies from the current location directly to the selected object, stopping at the object’s "Viewing Distance". For static objects, the flight ends when the object is reached. For dynamic objects, the fly to operation continues until the dynamic object stops. |
||
|
Jump to Object |
Jumps directly to the object, stopping at the object’s "Viewing Distance". |
||
|
View Object |
This option’s sub-menu contains a list of pre-defined flight patterns that compass about the object. When you play a flight pattern, the default flight time for a round trip around the point of interest is 15 seconds. |
||
|
|
Circle Pattern |
Performs a circle flight pattern around the object, always facing the specified object. |
|
|
|
Oval Pattern |
Performs an oval flight pattern around the object, always facing the specified object. The first radius is set to the distance parameter and the second radius is set to one-half of the distance parameter. |
|
|
|
Line Pattern |
Performs a tight oval flight pattern around the object/location, always facing the specified object. The first radius is set to the distance parameter and the second radius is set to one-tenth of the distance parameter. |
|
|
|
Arc Pattern |
Performs a vertical arc flight above the object/location, always facing the specified object. The radius is set according to the distance parameter. |
|
|
|
For objects, the View submenu also contains a set of pre-defined view angles around the object. The flight stops at the object’s "Viewing Distance" from the object’s location. For dynamic objects, the flight continues to follow the object until the user stops it or performs another action. |
||
|
|
Behind Object |
To view the object from behind |
|
|
|
Above Object |
To view the object from above |
|
|
|
From Below |
To view the object from below |
|
|
|
From Right |
To view the object from the right-hand side |
|
|
|
From Left |
To view the object from the left-hand side |
|
|
|
From Behind and Above |
To view the object from behind and above (45 degrees) |
|
|
|
Cockpit View |
To view the world from the object’s pivot point. The roll, tilt, and direction are set based on the object. In this mode, the dynamic object is hidden. |
|
|
|
Projector View |
Available for Video On Terrain objects only. This is for viewing the world from the video projector’s position. The roll, tilt, and direction are set based on the projector. |
|
|
|
From Ground Location |
To view the object from the ground. After selecting this option, select a point on the terrain from which you want to view the object. Note: The "View From Ground Location" action cannot be defined as the activation action for the object because it requires a reference point on the terrain. |
|
To stop a flight to or around an object, do any of the following:
§ Click anywhere in the 3D Window and then press the spacebar.
§ Right-click anywhere in the 3D Window, and from the shortcut menu select Stop.
§ In the Project Tree, right-click the object’s name, and from the shortcut menu select Stop.
Navigating using the 3D Window shortcut menu
When you right-click the terrain, sky, or an object, a shortcut menu opens allowing you to perform flight patterns around the selected object or location. You can open the 3D Window shortcut menu even when in the middle of a pre-defined flight or while playing a presentation.
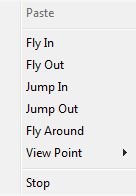
3D Window Shortcut Menu
|
Command |
Description |
|
Fly In |
Fly closer and centered to the selected point. To stop the flight, click the terrain or right-click and select Stop. |
|
Fly Out |
Fly away and centered from the selected point. To stop the flight: § Click the terrain or right-click again and select Stop. |
|
Jump In |
Jumps to the selected point while keeping it centered. |
|
Jump Out |
Jumps away from the selected point while keeping it centered. |
|
Fly Around |
Starts a circle pattern flight around the selected point. To stop the flight, either right-click again and select Stop, or press the SPACE key. |
|
Viewpoint |
Starts the selected pattern flight around the selected point. To stop the flight: § Either right-click again and select Stop, or press the SPACE key. |
|
Stop |
Stop the flight. |