Shadow tools
The following shadow tools are available:
Global shadow
You can display a shadow effect for an entire scene (including terrain and all 3D models, objects, and buildings), for a more realistic visualization that takes far less time to create than shadow generation per individual object. Using TerraExplorer Options, you can select the precise color of the shadow to more accurately simulate the actual lighting conditions. See "Graphics" in the "Using TerraExplorer Options" chapter for more information.
Shadows can be cast for all 3D objects in the 3D Window (whose ground object property is set to Yes) based on the sun’s position. The sun is positioned according to the time, date and time zone you set using the Date and Time controls. The shadows dynamically update when the system date and time is changed.
Note: Project startup settings for shadows can be set in the Date and Light tab in the Project Settings dialog. See "Date and Light Effects" in the "Setting the Project" chapter for further information.
Note: The degree of shadow coverage in a specified area and period of time can be calculated using the Shadow Query tool. See "Shadow Query" in this chapter for further information.
Displaying a shadow
To display a shadow:
1. In the 3D Window, set the time, date and time zone using the Date and Time controls. See "Date and Time Slider" in this chapter for information.
2. On the Analysis tab, in the Shadow group, click Shadow.
Note: If you want to cast a shadow only for currently selected buildings and 3D models, you can create a selection shadow. See "Selection Shadow" in this chapter.
Selection shadow
In addition to the option to cast a global shadow for all 3D objects, shadows can also be cast only for selected objects. This enables you to visualize the shadow effect of a particular object on surrounding buildings and terrain.
You can cast a shadow from any 3D object whose ground object property is set to Yes, based on the sun’s position. The sun is positioned according to the time, date and time zone you set using the Date and Time controls. The shadows dynamically update when the system date and time is changed.
To display a shadow for selected objects:
1. In the 3D Window, set the time, date and time zone using the Date and Time controls. See "Date and Time SliderDate and Time Slider" in the "Basic Concepts" chapter for information.
2. Select the objects from which you want to cast a shadow.
3. On the Analysis tab, in the Shadow group, click Selection Shadow.
Note: A selection shadow persists even after the object is deselected.
4. If you want to clear a selection shadow, on the Analysis tab, in the Shadow group, toggle off Selection Shadow.
5. If you want to recast the shadow from the previously selected object to a currently selected object, click the arrow next to Selection Shadow, and then click Update Selection.
Shadow query
The Shadow Query tool calculates the sun-shadow ratio in a specified area, over a selected timespan. The area is defined by a drawn line or polygon, or by a selection of points, lines or polygons. Shadow analysis can be based on the shadow effect of selected objects (Selection Shadow) or of all the project’s objects. See "Global Shadow" for information on viewing and creating global shadows. See "Selection Shadow" in this chapter for information on creating shadows for selected objects.
The output of the analysis is a point shapefile that graphically represents the sun-shadow ratio at different points in the specified area. Each point in the feature layer is color-coded according to its sun-shadow ratio:
§ Green = Point receives 100% exposure to sunlight during the selected timespan
§ Yellow = Point receives more than 65% exposure to sunlight during the selected timespan
§ Orange = Point receives between 35-65% exposure to sunlight over the selected timespan
§ Red = Point receives less than 35% exposure to sunlight over the selected timespan
To use the Shadow Query tool:
1. On the Analysis tab, in the Shadow group, click Shadow Query. The Shadow Query dialog is displayed.
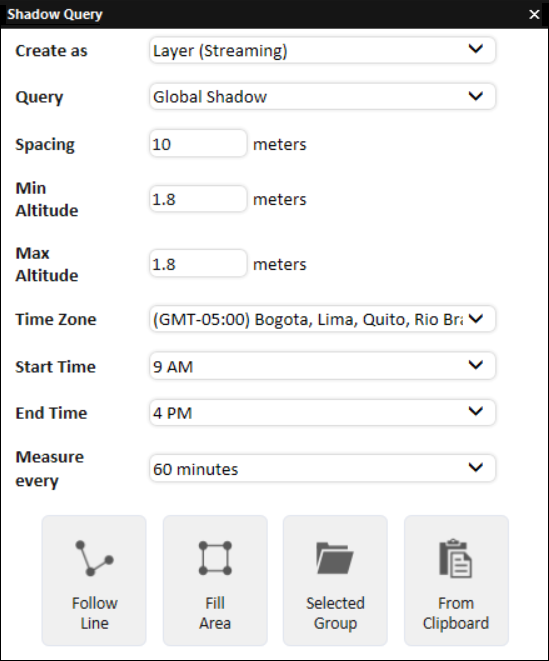
Shadow Query
2. Select one of the Create as options:
|
Option |
Description |
|
Layer (Entire) |
Create a feature layer under the application’s AppData. |
|
Layer (Streaming) |
Create a streaming feature layer under the application’s AppData. |
3. Enter the following parameters:
|
Parameter |
Description |
|
Query |
Defines which objects’ shadows are taken into account in the shadow query: § Global Shadow – Measure the sun-shadow ratio for each query point based on the shadow cast by all objects in the project. Note: If querying based on global shadow, the global shadow must be toggled on before querying. See "Global Shadow" in this chapter for information. § Selection Shadow – Measure the sun-shadow ratio for each query point based only on the objects selected in the Selection Shadow. See "Selection Shadow" in this chapter. § Selection Shadow supplement - Measure the sun-shadow ratio for each query point based only on shadows cast exclusively by the objects selected in the Selection Shadow. |
|
Spacing |
Determines the horizontal and vertical spacing (in meters) between query points in the area for which the sun-shadow ratio is being calculated. |
|
Min Altitude |
Defines the altitude above ground level of the closest point to the ground. Note: When selecting points from a group, layer or the clipboard, the query points are created according to the altitude of the selected points and not according to the Min/Max altitude parameters. |
|
Max Altitude |
Defines the maximum altitude above ground level. If the Max Altitude is higher than the Min Altitude, the Shadow Query tool generates a matrix of points according to the Spacing value. |
|
Time Zone |
Time zone of the Start Time and End Time. The time zone should reflect the actual time zone in the query area. The tool tries to select the best match according to the camera’s position when the tool is opened. If the user navigates to an area in another time zone, while the tool is open, the user may need to manually select the appropriate time zone. If the difference between the calculated time zone and the selected time zone is too large, an alert message is displayed. |
|
Start Time |
Start time on the day of the query. The date of the query (day, month and year) is based on the current TerraExplorer date (showing on the Time Slider or defined in the Date and Time Settings dialog). |
|
End Time |
End time on the day of the query. The date of the query (day, month and year) is based on the current TerraExplorer date (showing on the Time Slider or defined in the Date and Time Settings dialog). |
|
Measure every |
The interval (in minutes) between the Start Time and End Time. The smaller the interval, the more accurate the calculation, but the longer it takes to calculate. |
4. Select one of the following methods of designating the area for which the sun-shadow ratio should be calculated:
§ Follow Line – Query points are created along the drawn line. In the 3D Window, left-click to place the line waypoints, and right-click to complete the line.
§ Fill Area – Query points are created inside the drawn polygon. In the 3D Window, left-click to place the polygon waypoints, and right-click to complete the polygon.
§ Selected Group – Query points are placed along each polyline and inside each polygon, in the selected feature layer or group. The required Project Tree layer/group must be selected before selecting this option.
§ From Clipboard – Query points are placed along each polyline and inside each polygon clipboard object.
5. Shadow queries are performed for each polyline/polygon and results are automatically exported to point shapefiles that are listed in the Project Tree and saved under the application AppData. You can find the full path to each shapefile in the layer's property sheet, in the File Name property under the Layer tab.