Working with the property sheet
The property sheet is the main editing tool for all TerraExplorer Pro objects. The property sheet displays all the parameters for the selected object and their values. The property sheet also determines the operation mode for editing the objects in the 3D Window. See "Editing Objects in the 3D Window" in this chapter for further information.
If a group of objects is selected for editing, the property sheet displays a set of common parameters. See "Multi-Editing" in this chapter for further information.
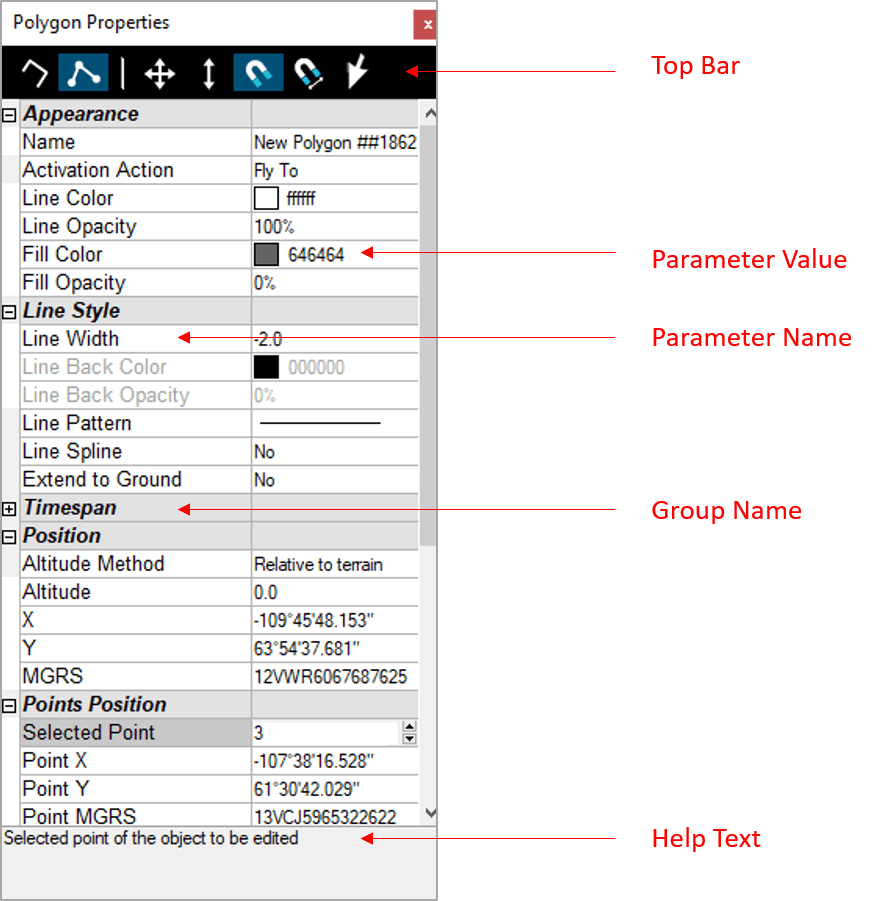
Property Sheet
The property sheet has the following fields:
|
Property Sheet Field |
Description |
|
Group |
Contains a group of parameters |
|
Parameter Name |
Contains the name of each parameter |
|
Parameter Value |
Contains the current value of each parameter |
|
Help Text |
Displays the help text for the currently selected parameter |
If a Group is selected for editing, the property sheet displays a tab for the group parameters and a tab for the object parameters.
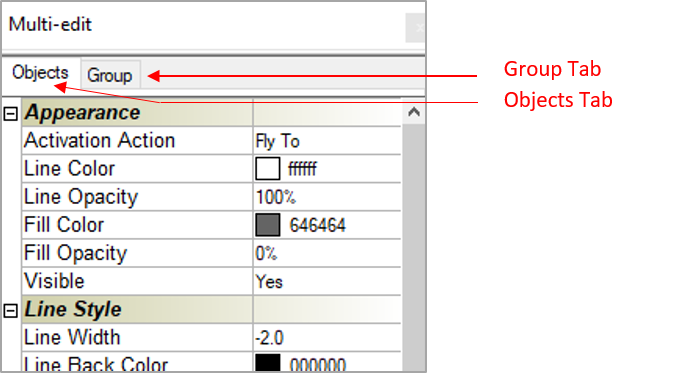
Group Property Sheet
If a feature layer that includes an annotation symbol is selected for editing, the property sheet displays a tab for the layer’s common parameters, a tab for the features parameters (point; polyline or polygon) and a tab for the annotations parameters. When loading feature layers, point annotation objects can be created in the center of each layer feature, which can be used to convey information, textually or graphically, relating to the feature.
Select the Field by Attribute button to define an expression that calculates the value of the field based on the attribute value of each object in the layer.
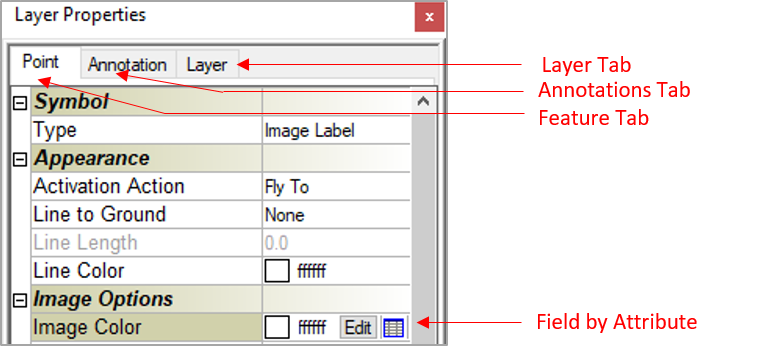
Feature Layer Property Sheet
Opening the property sheet
To open an object’s property sheet:
§ In the Project Tree, right-click the object, and then from the object’s shortcut menu, select Properties. The property sheet opens.
Navigating in the property sheet
The properties in the property sheet are divided into groups according to their association.
To expand a group of properties:
§ Click the + sign near the name of the group or double-click the group’s name.
To collapse a group of properties:
§ Click the - sign near the name of the group or double-click the group’s name.
Editing fields
To change the value of a property:
1. Click the property's name or value to set the focus on the property.
You can also set the focus by scrolling up and down between the properties using the arrow keys.
2. For each field type use the following method:
|
Field Type |
Description |
|
Text Field |
Click again with the mouse on the value field to get an edit cursor and edit the current text string. You can start typing a new text without getting the edit cursor first. This entirely replaces the old text with the new text. Press the ENTER key or choose another parameter to accept the update or press ESC to cancel and restore the previous text. There are three types of unique text fields: § Text property for Text Label: The Text property of the Text Label object uses the Enter Label Text dialog. When you start typing text, or click the Edit button, the dialog opens. You can then edit the multiple lines of text. Click OK to accept the new text or Cancel to restore the previous text. § Tooltip property: The Tooltip property can accept multiline strings using the ENTER key. To accept the changes for this property you must choose another property in the property sheet or close the property sheet window. § Attributes parameter: All the properties that were loaded from a native feature layer are placed in the Attributes group. The legal data type for each of the properties in this group is displayed in the Help text field. When you enter text in the value field, only valid input is updated and saved. |
|
Number Field |
Click again with the mouse on the value field to get an edit cursor and edit the current number. You can start typing a new number without getting the edit cursor first. This entirely replaces the old number with the new number. Press the ENTER key or choose another parameter to accept the update or press ESC to cancel and restore the previous number. You can also use the up and down buttons at the right side of the value field. Click and hold the buttons to change the value. The longer you hold the buttons the bigger the steps between the values are. Every value-change from the up and down buttons affects the object immediately and you cannot restore the old value. |
|
Dropdown Lists |
Click again with the mouse on the value field to open the dropdown list. Select the new value using the mouse or the arrow keys. Press the ENTER key or choose another property to accept the update or press ESC to cancel and restore the previous value. |
|
Buttons |
There are two types of buttons: § Button: Click once to enable the operation, or click it again to disable. § Push Button - Click once to perform the operation. |
|
Special Text Fields |
There are several custom-made value fields. You can edit these fields as regular text fields or select the open button, at the right side of the field, to open the special edit dialog. § Color Field: Click to open the Colors dialog. § File Field: Click to open the Browse dialog. § Message Field: Click to open the Message dialog. |
Editing fields by attribute value
After loading a native feature layer with attribute fields, you can apply different properties such as line color or cylinder height, based on the attribute field values of the objects.
See "About basing native feature layer properties on layer attribute fields" in the "Feature Layers" chapter for further information.
Undoing and redoing edits
You can undo or redo edit actions to objects. Changes to object properties can be undone or redone, even after the property sheet is closed, and then reopened. Changes to object geometry can only be undone or redone while the object is being created; once object creation is finished by right-clicking, undo/redo commands are unavailable.
Note: The undo and redo commands are supported for the following object types: text and image labels, video objects, polylines, polygons, 2D and 3D shapes (except for 3D polygons), and 3D models.
To undo an edit action:
§ On the top of the object’s property sheet, click Undo  (CTRL+ z).
To redo an edit action:
§ On the top of the object’s property sheet, click Redo  (CTRL+y).
Multi-editing
The Multi-Edit property sheet includes a set of common parameters for the objects multi-selected from either the Project Tree or from the 3D Window). Some of the parameters only affect objects from a specific type (i.e., parameters that affect only text labels) whereas others affect all of the objects in the selection. Each change in one of the properties updates all the objects to which this property applies.
Only parameters that are relevant to at least one object in the selected group are displayed in the Multi-Edit property sheet. If all the selected objects have one or more parameters with the same values, these values are displayed.
To open the Multi-Edit property sheet, right-click one of the multi-selected objects, and then from the shortcut menu, select Properties.
The parameters in the Multi-Edit property sheet are divided into eight groups:
|
Parameter |
Description |
|
Appearance |
Visible appearance parameters relevant to all objects. |
|
Line Style |
Line style parameters relevant to all objects. |
|
Position |
Allows you to change the location of the objects. Set the offset of the X, Y and Altitude from the current location of each object. Note: The delta values are relative to the object’s locations at the time the Multi-Edit property sheet was opened. For example, if you set the delta X to 10 meters and afterward to 20 meters, all objects move 20 meters from their location at the time you opened the property sheet. |
|
General |
General parameters relevant to all objects. |
|
Label Options |
Label appearance parameters. This group is relevant to text and image labels. |
|
Label Geometry |
Label sizes and geometry parameters. This group is relevant to text and image labels. |
|
Label Alignment |
Label alignment parameters. This group is relevant to text and image labels. |
|
3D Model |
Parameters that are relevant to 3D model objects (static and dynamic). |
|
Dynamic Objects |
Parameters relevant to dynamic objects. |
|
Texture |
Parameters relevant to objects with textures. |
|
Buildings |
Parameters relevant to building objects. |
Adjusting the property sheet window size
To change the size of the property sheet window:
1. Place the cursor over one of the four corners of the window.
2. When the cursor becomes a double-headed arrow, click and hold the mouse. Adjust the window to the desired size by dragging the cursor.
Note: The property sheet window is always placed on top of the TerraExplorer main window.