Using attribute fields
Most feature layers can store attribute field values for each of their features. This information can be used to:
§ Display attribute field information in the Information Query Tool results. See "Information Query Tool" in the "Analysis Tools" chapter for further information.
§ Control the appearance and behavior of layer features based on field attribute values. For example, you can represent the number of people living in a country attribute by the line color of the country's boundary. See "About basing native feature layer properties on layer attribute fields" in this chapter for further information.
§ Perform actions on sets of layer features matching a specific set of attribute field values. For example, you can show in the 3D Window or export to a new layer only countries whose GNP per capita surpasses $15,000. This capability is enabled by the Attribute Table Tool. See "Searching and performing operations by attribute (Attribute Table)" in this chapter for further information.
Loading layer attribute fields
Feature layers can be loaded with their attribute fields and values. If attribute fields were not loaded with a layer or you want to modify which fields are loaded, you can select or clear field attributes in the layer’s property sheet. However, if you base a property sheet field on an attribute field, the attribute field's check box is automatically selected and disabled.
To select attribute fields to load when loading a layer:
1. In the Layer Settings dialog, in the Select Attribute Fields to Load section, select the check boxes of the attributes you want to load. Attributes are listed here only if the chosen layer has attribute field information.
Note: If you want to load all the attribute fields, click Select All. If you want to load no attribute fields, click Clear All.
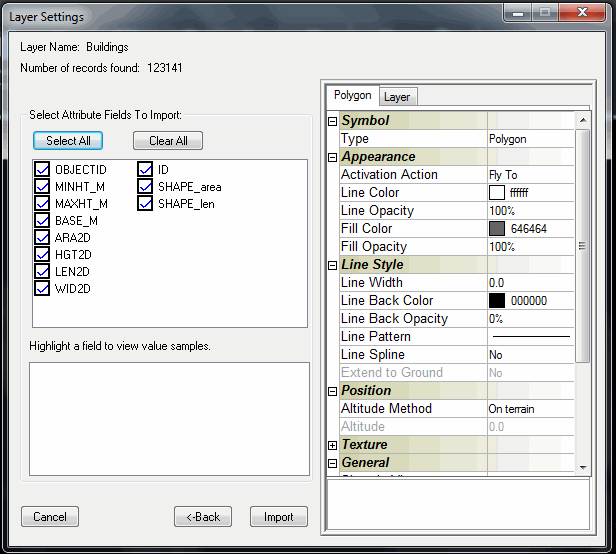
Layer Settings Dialog
2. If you want to view samples of an attribute field, highlight it in the Select Attribute Fields to Load section. A sample is displayed in the Highlight a field to view value samples section.
3. In the Layer Settings dialog, in the property sheet panel, set layer and layer object parameters. See "Setting and Editing Feature Layer Properties" in this chapter for further information.
To load attribute fields after a layer was loaded.
1. On the Layer tab of the layer’s property sheet, in the Load Attribute Fields section, select the check boxes of the attribute fields you want to load, and clear the check boxes of the attribute fields you want unloaded.
Note: Attribute fields that were already loaded display with their check boxes selected.
2. A dialog is displayed reminding you that you need to refresh (reload) the layer before the new attribute fields are loaded. Click OK, and continue selecting or clearing check boxes as required.
3. When you close the property sheet, a dialog is displayed asking if you want to refresh the layer. Click OK to refresh.
Modifying layer attribute data
After loading a native feature layer with attribute fields, you can view and edit the attribute field values of the objects.
The attribute values appear in the Attributes group in the object’s property sheet. Any change you make to the attribute fields values is saved in the FLY file.
To edit layer attribute data:
1. Select a single object for editing.
2. On the Feature Layer tab, in the Selection group, click Select Feature.
3. In the 3D Window, select the object. A yellow frame surrounds the feature object and the feature’s property sheet opens.
4. In the layer’s property sheet, in the Attributes section, click the parameter name to edit. The Help text at the bottom of the property sheet displays the field’s data type (e.g., "String. Character Length:13", "Double", etc.).
Note: Each attribute field that was loaded from the feature layer has a Parameter Name in the Attributes group. The value in the parameter’s value is the appropriate value for the selected object.
5. Click the parameter value field and enter the new value.
Note: Only valid inputs according to the field’s data type are updated and saved.
About basing native feature layer properties on layer attribute fields
After loading a feature layer with attribute fields, you can apply different properties such as line color or cylinder height, based on the attribute field values of the objects.
Let's take as an example a polygon’s layer that covers the terrain with country boundaries. With the help of this feature, it is possible for TerraExplorer to color in red only the boundaries of countries with a population of more than 10 million people.
Note that you can base properties on field attributes, only if the feature layers are loaded with attribute fields, such as "Country Population". If the layer does not contain attribute fields, or in the loading phase, you did not select any attribute field to load, you cannot take advantage of this feature.
See "Loading layer attribute fields" in this chapter to learn how to add the attribute field information in the loading phase.
When basing a property field on an attribute field, you have to establish the property you want to set, and the attribute field on which to base your setting. In our example, the property is the country boundary's Line Color, and the attribute field is "Country Population".
Attribute fields
Properties can be based on three types of attribute fields:
|
Description |
Type of Storage /Example |
|
Textual attribute field types |
e.g., Country Name. |
|
Integer attribute field types |
Stores whole numbers without any decimals. e.g., State Population. |
|
Double attribute field types |
Stores real numbers having a double precision floating point. e.g., Average Income. |
The field attribute type determines how the property is based on the value of the field attribute.
§ When the attribute field is numeric - integer or double - it is possible to group attribute field values in ranges. For example, you can set the boundary line color to red for countries with a population between 1,000,000 and 2,000,000 and to green for countries with a population between 2,000,001 and 3,000,000.
§ When a property is based on a numeric field attribute, it is also possible to use the >< =><= operators. For example, you can set the boundary line color to orange for all countries with a population larger (>) than 1,000,000.
Properties
There are four types of properties that can be set based on attribute fields:
§ Color properties such as line color and fill color.
See "Basing color properties on attribute fields" in this chapter for further information.
§ Numeric properties such as cylinder height or text label altitude.
See "Basing numeric style properties on attribute fields" in this chapter for further information.
§ The text content of text labels, tooltips and other text elements.
See "Basing text content on attribute fields" in this chapter for further information.
§ Dropdown lists properties such as font size or text underline.
See "Basing dropdown list properties on attribute fields" in this chapter for further information.
Basing color properties on attribute fields
To base color properties on attribute fields:
1. In the layer property sheet, click the color property box, and then click the Field by Attribute button  .
.
2. From the Use Attribute dropdown list, select the field attribute on which to base the color property.
3. Select one of the following color property setting modes:
§ Expression: See "Applying the color expression mode" in this chapter for further information.
§ User Defined: See "Applying the color user defined mode"in this chapter for further information.
§ Default Palette: See "Applying the color default palette mode"in this chapter for further information.
§ Gradient: See "Applying the color gradient mode" in this chapter for further information.
Applying the color expression mode
The Expression mode lets you set the color property according to the values of the field attribute you selected in the Use Attribute dropdown list. The required color should be in decimal format. If the selected field contains the required decimal color, you can use it as is. Otherwise, you can use an expression whose end result is a color in decimal format, e.g., <[R]+[G]*255 + [B]*65536>.
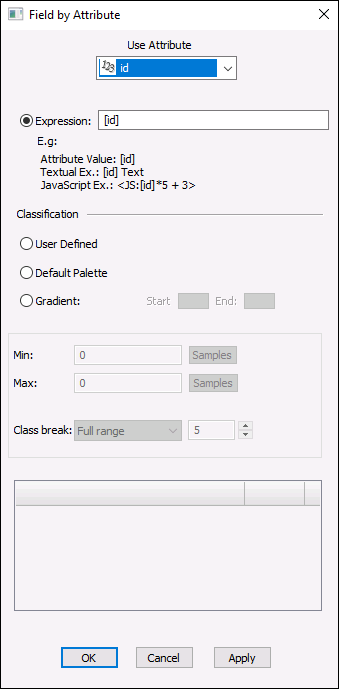
Field by Attribute Dialog – Color Expression Mode
To apply the color Expression mode:
1. In the Field by Attribute dialog, select the Expression option.
2. In the Expression field, build an expression that contains the attribute as a variable.
Note: Legacy VBScript has been deprecated and will not work in TerraExplorer Fusion.
3. Click Apply.
Applying the color user defined mode
The User Defined mode enables you to assign a specific color to a specific attribute field value. In this field, for example, you can set the line color for all country boundaries in Europe to purple. You assign the purple color to the 'Europe' value, provided that you select the 'Continent' field attribute in the Use Attribute dropdown list.
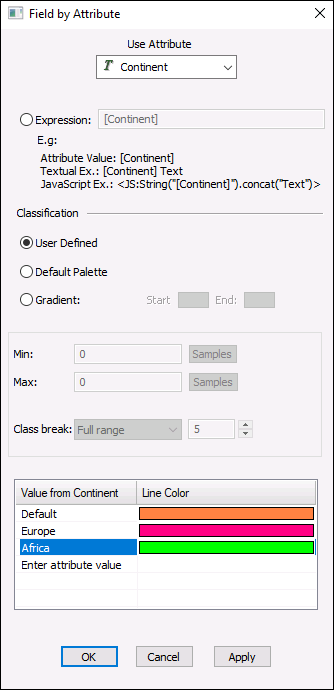
Field by Attribute Dialog – Color User Defined Mode
To apply the User Defined mode:
1. In the Field by Attribute dialog, select the User Defined option.
2. In the Value from [Attribute] section, in the first empty row of the left-hand side column, click  and select a value from the Choose Attribute Value dialog. If the attribute type is numeric, you can use the >< =><= operators, e.g., ">50". You can also define the value by which to assign color, using a JavaScript expression with multiple attribute field values, which evaluates to true or false. Use syntax as in the following example: <JS:"[ATTRIB_1]"==2500&&"[ATTRIB_2]"=="New York">. Features that do not match any of the defined expressions are assigned the Default color.
3. Click the Color column in the same row, and select a color from the Color dialog.
4. Repeat steps 2-3 above to assign colors to additional field attribute values.
5. Click Apply.
Applying the color default palette mode
The default palette mode assigns automatically a different color to each unique attribute field value or to each range of numeric values.
|
Value |
Activity |
|
Unique (Full Range) |
Assigning automatically a different color to each attribute field value. For example, you can use this mode to color country boundaries of the same continent with the same color. In this case, all unique values of the 'Continent' field attribute are assigned a different color automatically. |
|
Class Breaks (Linear/Logarithmic) |
Assigning automatically a different color to each range of numeric values. This option is only relevant for numeric attribute types. For example, you can use this mode to have all countries within a certain population range have the same color. In this case, the numeric values of the 'Country Population' field are divided into ranges (class breaks) where each range is assigned a different color automatically. |
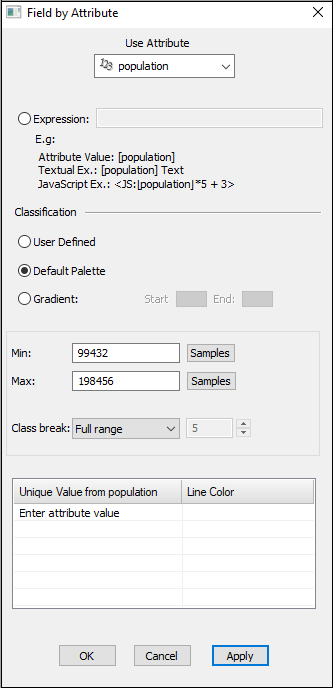
Field by Attribute Dialog – Default Palette Unique Value
To assign a unique color to each unique attribute field value:
1. In the Field by Attribute dialog, in the Classification section, select the Default Palette option.
2. From the Class break dropdown list, select Full range.
Note: For textual attribute types, this option is automatically selected.
3. Click Apply. A unique color is applied in the 3D Window to each unique attribute field value for a max of 256 values.
Note: These values are not listed in the dialog. If you want to change the color assigned to a specific attribute field value, in the Value from [Attribute] section, in the left column, click , enter that attribute value and select the required color from the Color dialog. If the attribute type is numeric, you can also enter attribute values that are ranges using the >< =><= operators, e.g., ">50".
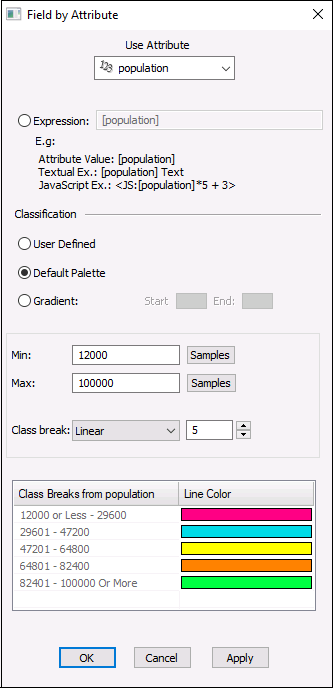
Field by Attribute Dialog – Default Palette with Class Breaks
To assign a unique color to each class break:
1. In the Field by Attribute dialog, select the Default Palette option.
2. From the Class break dropdown list, select the required division mode of the attribute field values range:
§ Linear: The range of the attribute field values is divided equally between the classes.
§ Logarithmic: The range of the attribute field values is divided in a logarithmic way between the classes.
3. In the Classes field, enter the number of class breaks.
4. In the Min box, type the minimal attribute field value of the first class in the range.
5. In the Max box, type the maximal attribute field value of the last class in the range.
6. Click Apply.
Note: If you want to change the color assigned to a specific class break, click the color you want to change and select a different color from the Color dialog.
Applying the color gradient mode
The Gradient Mode assigns automatically a different color from a predefined color spectrum to each unique value of the attribute field or to each range of numeric values.
The colors are assigned according to their location in the color spectrum. Adjacent values or ranges of values in the field attribute database column are assigned to adjacent colors in the color spectrum.
The gradient mode is applicable in two ways:
|
Value |
Activity |
|
Unique (Full Range) |
Assigning automatically a different color from a predefined color spectrum to each unique value of the attribute field. For example, you can use this mode to have all country boundaries of the same continent to have the same color. In this case, all unique values of the 'Continent' field attribute are assigned different adjacent colors from a predefined color spectrum. |
|
Class Breaks (Linear/Logarithmic) |
Assigning automatically a different color from a predefined color spectrum to each range of numeric values. This option is only relevant for numeric attribute types. For example, you can use this mode to have all countries within a certain population range have the same color. The numeric values of the 'Country Population' field are divided into ranges (class breaks) where each range is assigned a different adjacent color from a predefined color spectrum. |
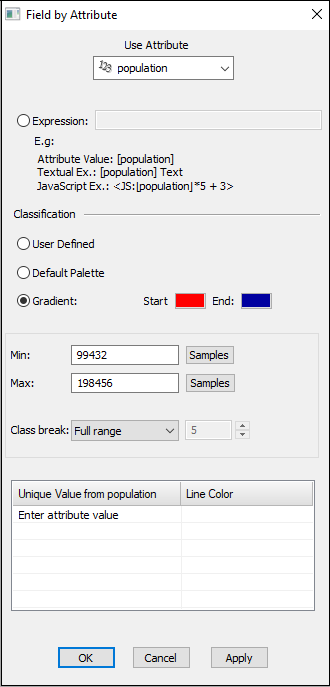
Field by Attribute Dialog – Gradient Unique Value
To apply a unique gradient color to each attribute field value:
1. In the Field by Attribute dialog, select the Gradient option.
2. Click the Start button, and select from the Color dialog the first color of the color spectrum range.
3. Click the End button, and select from the Color dialog the last color of the color spectrum range.
4. From the Class break dropdown list, select Full range.
Note: For textual attribute types, this option is automatically selected.
5. Click Apply. A unique gradient color is applied in the 3D Window to each unique attribute field value for a max of 256 values.
Note: These values are not listed in the dialog. If you want to change the color assigned to a specific attribute field value, in the Value from [Attribute] section, in the left column, click , enter that attribute value and select the required color from the Color dialog. If the attribute type is numeric, you can also enter attribute values that are ranges using the >< =><= operators, e.g., ">50".
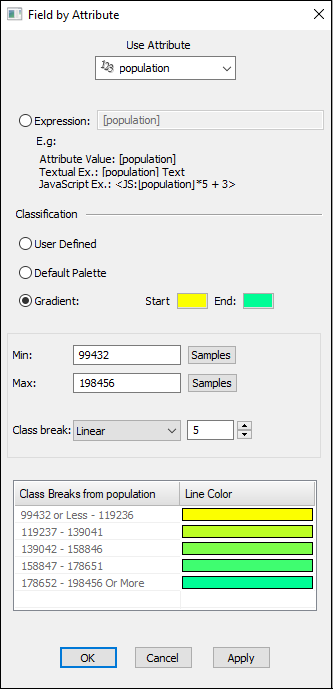
Field by Attribute Dialog – Gradient Class Break
To apply a unique gradient color to each class break:
1. In the Field by Attribute dialog, select the Gradient option.
2. Click the Start button, and select from the Color Palette dialog the first color of the color spectrum range.
3. Click the End button, and select from the Color Palette dialog the last color of the color spectrum range.
4. From the Class break dropdown list, select the required division mode of the attribute field values range:
§ Linear: The range of the attribute field values is divided equally between the classes.
§ Logarithmic: The range of the attribute field values is divided in a logarithmic way between the classes.
5. In the Classes field, enter the number of class breaks.
6. In the Min box, type the minimal attribute field value of the first class in the range.
7. In the Max box, type the maximal attribute field value of the last class in the range.
8. Click Apply.
Note: If you want to change the color assigned to a specific class break, click the color you want to change and select a different color from the Color dialog.
Basing numeric style properties on attribute fields
To base numeric style properties on attribute fields:
1. In the layer property sheet, click the numeric property box, and then click the Field by Attribute button .
2. In the Use Attribute dropdown list, select the field attribute on which to base the numeric property.
3. Select one of the following numeric property setting modes:
§ Expression mode: See "Applying the numeric expression mode" in this chapter for further information.
§ User Defined mode: See "Applying the numeric user defined mode" in this chapter for further information.
§ Use Range mode: See "Applying the numeric use range mode" in this chapter for further information.
Applying the numeric expression mode
The Expression mode sets the numeric property to the numeric value contained in the selected field attribute. Using this option, for example, you can represent the population size of all countries by the height of their annotation cylinder or box. The numeric property, in this case is the cylinder height, which is determined by the numeric value of the Country Population attribute field.
You can also set the numeric property to an expression based on a field attribute numeric value.
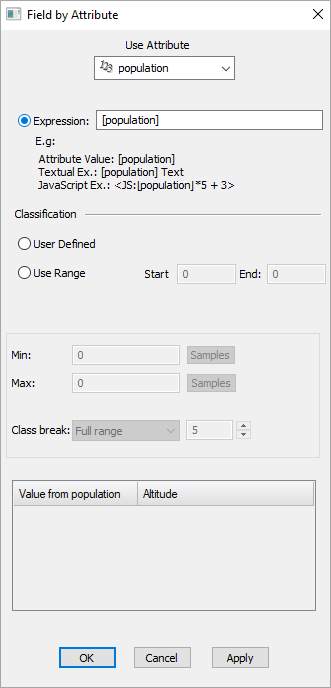
Field by Attribute Dialog – Expression Mode
To apply the numeric Expression mode:
1. In the Field by Attribute dialog, select the Expression option.
2. In the Expression field, build an expression that contains the attribute as a variable.
§ Attribute Value: Attribute name in brackets e.g., [ATTRIB]
§ Textual expression: Attrib name in brackets with other text, e.g., Text Before [ATTRIB] Text After.
§ JavaScript expression: Bounded by <> e.g., <JS:[ATTRIB]*5 + 3>.
Note: Legacy VBScript has been deprecated and will not work in TerraExplorer Fusion.
3. Click Apply.
Applying the numeric user defined mode
The User Defined mode enables you to assign a numeric value to a specific value of an attribute field.
In this mode, for example, you can set the cylinder height of all countries with a population greater than 2,000,000 people to a specific numeric value, and then set the cylinder height for all other countries to zero. First, however, you have to select the 'Country Population' field attribute in the Use Attribute dropdown list.
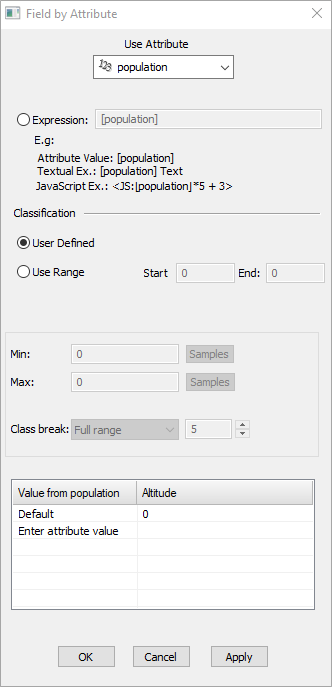
Field by Attribute Dialog – User Defined
To apply the User Defined mode:
1. In the Field by Attribute dialog, select the User Defined option.
2. In the Value from [Attribute] section, in the first empty row of the left-hand side column, click and select a value from the Choose Attribute Value dialog. If the attribute type is numeric, you can use the >< =><= operators, e.g., ">6". You can also define the value by which to assign numeric value, using a JavaScript expressions with multiple attribute field values, which evaluates to true or false. Use syntax as in the following example: <JS:"[ATTRIB_1]"==2500&&"[ATTRIB_2]"=="New York">. Features that do not match any of the defined expressions are assigned the default value.
3. Click the right column in the same row, and type the value of the numeric property.
4. Repeat steps 2-3 above to assign numeric values to additional field attribute values.
5. Click Apply.
Applying the numeric use range mode
The Use Range mode is applicable in two ways:
|
Value |
Application |
|
Unique Values (Full Range) |
A different numeric property value is automatically assigned to each attribute field value. For example, you can set different cylinder heights for each value of the Country Population attribute field. |
|
Class Breaks (Linear/Logarithmic) |
Divides the range of attribute field values to a number of classes, with a different numeric property value assigned to each class. For example, you can set a certain cylinder height to all countries in the 1,000,000 to 2,000,000 population range and a different cylinder height to all countries in the 2,000,001 to 3,000,000 population range. |
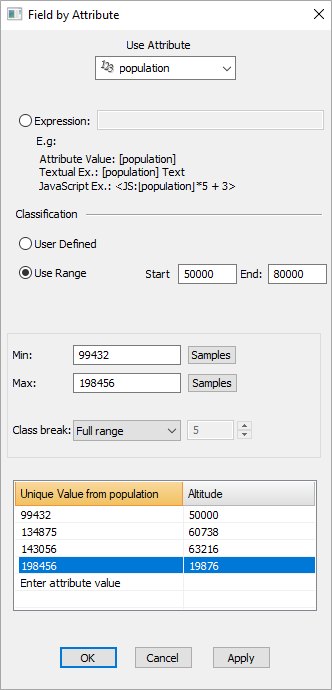
Field by Attribute Dialog – Numeric Use Range Mode Unique Value
To apply the unique numeric values option:
1. In the Field by Attribute dialog, select the Use Range option.
2. In the Start field, type the minimal numeric property value to be assigned to a field attribute.
3. In the End field, type the maximal numeric property value to be assigned to a field attribute.
4. From the Class break dropdown list, select Full range.
5. Click Apply. A unique numeric value is applied in the 3D Window to each unique attribute field value.
Note: These values are not listed in the dialog. If you want to change the numeric value assigned to a specific attribute field value, in the Unique Value from [Attribute] section, in the left column, click , enter that attribute value and enter the required numeric value. If the attribute type is numeric, you can also enter attribute values that are ranges using the >< =><= operators, e.g., ">50".
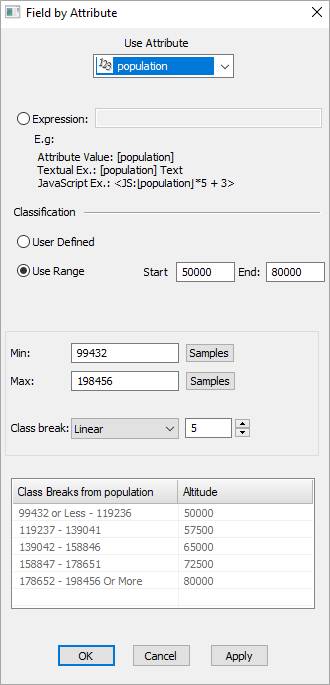
Field by Attribute Dialog – Use Range Mode with Class Breaks
To apply the Class Break option:
1. In the Field by Attribute dialog, select the Use Range option.
2. In the Start field, type the minimal numeric property value to be assigned to a field attribute.
3. In the End field, type the maximal numeric property value to be assigned to a field attribute.
4. In the Min box, type the minimal attribute field value of the first class in the range.
5. In the Max box, type the maximal attribute field value of the last class in the range.
6. From the Class break dropdown list, select the required division mode of the attribute field values range:
§ Linear: The range of the attribute field values is divided equally between the classes.
§ Logarithmic: The range of the attribute field values is divided in a logarithmic way between the classes.
7. In the Classes field, enter the number of class breaks.
8. Click Apply.
Note: You can change a specific numeric property value assigned to a specific attribute field value. Click the value you want to change, and substitute it with another value.
Basing text content on attribute fields
To base text label content on attribute fields:
1. In the layer property sheet, click on the Text property box, and then click the Field by Attribute button
2. In the Use Attribute dropdown, select the field attribute on which to base the text label content.
3. Select one of the following text label content setting modes:
§ Expression mode: See "Applying the text expression mode" in this chapter for further information.
§ User Defined mode: See "Applying the text user defined mode" in this chapter for further information.
Applying the text expression mode
The Expression mode sets the text label content to the values of the attribute field you selected in the Use Attribute dropdown list. Use this mode only when the attribute field contains text values.
You can also set the text property to an expression based on a field attribute textual value.
To set the text property to an expression based on a field attribute textual value:
§ Build an expression that contains the text field attribute as a variable.
Using this option, for example, you can append the text values of the attribute field by a fixed text. For example, you can add an "St." to each street name.
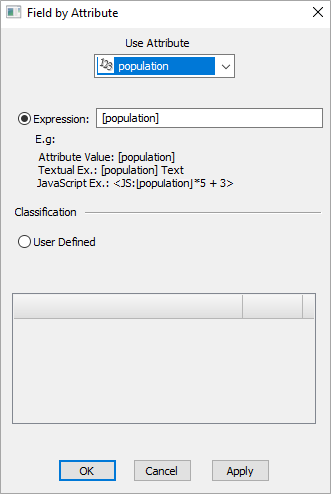
Field by Attribute Dialog – Text Expression Mode
To apply the Expression mode:
1. In the Field by Attribute dialog, select the Expression option.
2. In the Expression field, build an expression that contains the attribute as a variable.
§ Attribute Value: Attribute name in brackets, e.g., [ATTRIB]
§ Textual expression: Attribute name in brackets with other text, e.g., Text Before [ATTRIB] Text After
§ JavaScript expression: Bounded by <>, e.g., <JS:"[ATTRIB]".toLowerCase() + "Text">.
Note: Legacy VBScript has been deprecated and will not work in TerraExplorer Fusion.
3. Click Apply.
Applying the text user defined mode
The User Defined mode enables you to substitute specific text with a specific attribute field text value.
In this option, you can substitute text derived from a specific field attribute value with your typed text content.
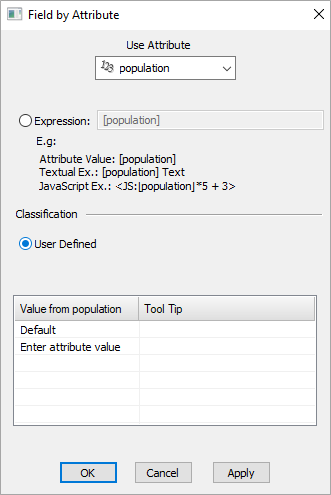
Field by Attribute Dialog – Text User Defined Mode
To apply the User Defined mode:
1. In the Field by Attribute dialog, select the User Defined option.
2. In the Value from [Attribute] section, in the first empty row of the left-hand side column, click and select a value from the Choose Attribute Value dialog. You can also define the value by which to assign text, using a JavaScript expression with multiple attribute field values, which evaluates to true or false. Use syntax as in the following example: <JS:"[ATTRIB_1]"==2500&&"[ATTRIB_2]"=="New York">. Features that do not match any of the defined expressions are assigned the default text.
3. Click the Text column in the same row, and type the text you want displayed instead of the field attribute text.
4. Repeat steps 2-3 above to substitute other field attribute values.
5. Click Apply.
Basing dropdown list properties on attribute fields
Some properties are determined by a selection from a dropdown list. For example, Font Size is a property that accepts only predefined set of values, such as 8, 12 and 14 points. Another example is the Bold style property that accepts only Yes or No values.
To base such properties on attribute fields, follow the steps below.
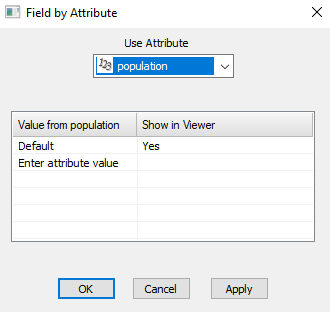
Field by Attribute Dialog
To base properties with fixed values on attribute fields:
1. In the layer property sheet, click on the fixed values property box, and then click on the Field by Attribute button .
2. In the Use Attribute dropdown list, select the field attribute on which to base the property.
3. In the Value from [Attribute] section, in the first empty row of the left-hand side column, click and select a value from the Choose Attribute Value dialog. You can also assign fixed values, using a JavaScript expression with multiple attribute field values, which evaluates to true or false. Use syntax as in the following example: <JS:"[ATTRIB_1]"==2500&&"[ATTRIB_2]"=="New York">. Features that do not match any of the defined expressions are assigned the default fixed value.
4. Click the right column in the same row, and select the fixed value from the dropdown list.
5. Repeat steps 3-4 above to assign another field attribute value with a property value.
6. Click Apply.