Clip Box Tool
The Clip Box tool clips everything except labels that are outside or inside of a selected box to help you focus on specific elements in your 3D project.
To use the Clip Box tool:
1. Draw a box around the area, e.g., building, you want to clip. See “Creating a 3D Shape – Box” in the “Objects and Labels” chapter for information.
2. In the Project Tree, select the box you want to use for the clipping operation.
3. On the Analysis tab, in the Terrain Analysis group, click Cross Section and select Clip Box. The Clip Box controls are displayed.
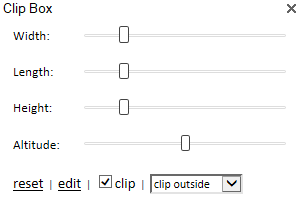
4. Use the Clip Box controls to change the dimensions of the box, and to determine the clip area: inside or outside the box:
|
Parameter |
Description |
|
Width |
Determines the width of the box. Slide the slider to the right to increase the width, and left to decrease (5-500% of starting width). |
|
Length |
Determines the length of the box. Slide the slider to the right to increase the length, and left to decrease (5-500% of starting length). |
|
Height |
Determines the height of the box. Slide the slider to the right to increase the height, and left to decrease (5-500% of starting height). |
|
Altitude |
Determines the altitude of the box. Slide the slider to the right to move it up and left to move it down (range of +/- 500 meters from the starting altitude). |
|
Clip outside/ Clip inside |
Defines the area to be clipped. |
5. Click Reset if you want to restore the original dimensions of the box.
6. Toggle the clipping action by selecting/unselecting the Clip check box.
7. Click Edit to close the Clip Box tool, and edit the box in the 3D Window using the object's resizers and rotators. See “Editing a 2D or 3D Object Using Object Handles” in the “Working with Objects” chapter for information.
8. Close the Clip Box controls to return to the normal view mode.