Application layout
The TerraExplorer display is divided into four primary panels:
|
Panel |
Description |
|
3D Window |
The heart of TerraExplorer Pro. In this window, you view the terrain and overlaid content in 3D. |
|
Project Tree |
Contains a list of all the items in the project organized in a tree structure. See "Using the Project Tree" chapter for further information. |
|
Navigation Map |
Provides quick and easy navigation through the entire terrain. It shows the location and direction of view of the camera. The Navigation Map window offers a simple mechanism to integrate file-based maps into the application. With the support of the TerraExplorer Pro COM interface, web-based maps can also be integrated as part of the HTML window. See "Navigation Map" in the "Navigating in the 3D World" chapter for further information. |
|
Error/Message Log |
The TerraExplorer log records and displays warnings, messages, and errors to help you troubleshoot any TerraExplorer issue. See "Error/" in this chapter for more information. |
The Project Tree, Navigation Map and 3D Window can be arranged in five different standard layouts:
Standard layouts
Five standard layouts are available:
§ Normal
§ Maximize
§ Full Screen
§ Stereo
§ AR/VR
To select a standard layout:
§ On the View tab, in the Layout group, click one of the following layout options:
|
Layout Option |
Description |
|
Normal |
TerraExplorer restored to normal size. If the layout was customized (See "Customized Layouts" below), then it is restored to the customized layout. |
|
Maximize |
TerraExplorer application maximized to entire screen. Docked panels set to auto-hide mode, and ribbon minimized (See "Auto-Hide" in this chapter for more information). |
|
Full Screen |
3D Window maximized to entire screen, and ribbon hidden (Alt + Enter). |
|
Stereo |
Side-by-side stereo view on any supporting displays (See "Viewing in Stereo" in this chapter for more information). |
|
AR/VR |
Two options are available: § Oculus Rift/Meta Quest - TerraExplorer is compatible with Oculus Rift (Rift and Rift S) and Meta Quest (Quest, Quest 2, Quest Pro, and Quest 3) virtual reality systems, which enable you to use slight, natural head movements to easily fly through the 3D world. § Axiom Holographic Table – TerraExplorer is compatible with Axiom’s holographic wall and table, for an immersive viewing experience. To activate the holographic table mode, contact Axiom Holographics for a full deployment kit. " |
Note: In Normal or Maximize layout, the size of each of these panels can be adjusted by moving their borders.
To move a border:
§ Rest the cursor on the partition until it changes to a double-headed arrow, and then drag horizontally or vertically.
Viewing in stereo
Stereo viewing provides added depth and realism to the 3D visualization. It uses a standard technique of rendering two images – one for the left eye and one for the right – side by side on the screen. Supporting displays (screens and projectors) use various methods to deliver the proper view to each eye, thus conveying true-to-life 3D depth perception.
To view in stereo mode:
§ On the View tab, in the Layout group, click Stereo.
Multiple windows in one panel
Application panels can include multiple HTML windows in addition to the standard window. You can switch between windows using the tabs.
HTML panels can be displayed using either the Internet Explorer rendering engine or the Microsoft Edge (WebView2) rendering engine. They can be added as fixed windows, using the container settings, or as hyperlink messages.
Using the capabilities of the TerraExplorer Pro COM interface, HTML pages can communicate with other TerraExplorer Pro elements.
Customized layouts
You can create the application layout that is most convenient for you by repositioning panels (e.g., the Navigation Map, Project Tree, Error/Message Log, or any of the TerraExplorer Tools) on the screen.
To reposition a panel:
1. Click the panel's title bar and drag the panel from its current location. A guide diamond with four arrows appears.
2. If you want the panel to float in front of the other application panels, drag it to the desired location.
3. If you want to dock the panel, do the following:
a. Drag the panel towards the location where you want to dock it, and then rest the cursor on the guide diamond arrow that best corresponds to the desired docking location. A shaded blue outline of the panel appears in the area where the panel will dock.
b. Release the mouse button to dock the panel in the area indicated.
Note: All TerraExplorer Tools initially open in the same location - at the bottom, left side of the screen. When multiple tools are opened simultaneously, a tab displays for each tool on the bottom of the tool window. If you want to move one of these tools to a different screen location, click the tool’s tab and drag it, as described in the steps above.
Hiding and displaying panels
The Project Tree, Navigation Map, Error/Message Log, and Tool Windows can be hidden from view, leaving more room on your screen for the 3D Window.
Hide
To hide a panel entirely, do any of the following:
§ On the View tab, in the Show/Hide group, clear the check boxes of the panels you want hidden.
Note: This option is only available for the Project Tree and Navigation Map.
§ Right-click the panel’s title bar, and from the shortcut menu, select Hide.
§ Click the X on the right side of the panel’s title bar.
To restore a panel that was hidden:
§ On the View tab, in the Show/Hide group, select the check box of the panel you want restored or reopen the tool. For the Error/Message Log, click the  icon below the 3D Window.
Auto-Hide
When a panel is in auto-hide, a tab appears on an edge of the screen that controls the panel’s display. When the cursor rests on the tab, the panel displays, and when it is moved away from the tab and the displayed panel, the panel disappears.
To auto-hide a panel:
§ Click the pushpin icon  on the panel’s title bar.
To view an auto-hidden panel:
§ Move the cursor over the panel’s tab.
Note: If you want to hide the panel again, move the cursor off the panel.
To restore a panel from auto-hide, do either of the following:
§ Right-click the panel’s title bar, and from the shortcut menu, clear the Auto Hide option.
§ Click the pushpin icon  on the panel’s title bar.
Message bar
The Message bar displays a variety of text and HTML messages. Any hyperlink message for objects, presentations or any other item in the system can be displayed on the Message bar. The Message bar cannot include multiple windows. Anytime a new message appears, it overrides the previous one. The Message Bar is a mandatory auto-hide window and cannot be removed.
The Message Bar can display the following information:
§ Hyperlink messages for objects, presentations, locations and tree messages.
§ Start project message.
§ System information messages that display the loading and saving status.
§ Present measurement information (when the Measure feature is used).
§ Information by external applications and HTML pages using the COM interface.
Error/message log
The TerraExplorer log records and displays warnings, messages, and errors to help you troubleshoot any TerraExplorer issue. Logs can be exported and sent to Skyline support:
§ Errors - Alerts users of critical problems.
§ Warnings - Alerts users of conditions they should be aware of, which might cause problems in the future.
§ Messages - Records various activities.
Viewing the log
To view the log:
1. Click Log on the bottom of the 3D Window. The log opens.
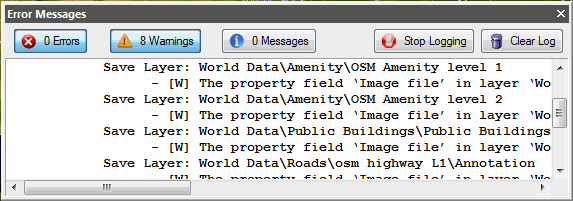
Error, Message, and Warning Log
2. Click the Warnings, Messages and Errors buttons to toggle the display of their respective messages on and off.
Clearing the log
To clear the log:
§ At the top of the log, click Clear Log.
Stop logging
To stop logging:
§ At the top of the log, click Stop Logging.
Hiding the log
To hide the log:
§ On the top right corner of the log, click the X.