Dynamic objects
Dynamic objects provide an easy-to-use way to add movement to 3D objects as well as text and image labels. You can also create a virtual dynamic object that is a dynamic route with no object assigned to it. You can then attach any object to the virtual dynamic object, and it follows the route you have set for it.
You set the route of a dynamic object by manually placing waypoints in the 3D Window. The object’s speed is set either by setting a specific speed for the object in the object’s property sheet, or by setting the object to Move by Time and then defining a Start and End time. TerraExplorer Pro features a set of ground and aerial vehicles that you can add to your project.
Ground and aerial vehicles
Ground vehicles get pitch and roll angles according to the terrain surface under the object while it moves. Aerial vehicles get pitch and roll angles according to the altitude differences between the waypoints, regardless of the terrain surface.
Creating dynamic objects
To create a new dynamic object:
1. If you want to create a ground vehicle, on the Objects tab, in the Dynamic Objects group, click Ground Object. The Dynamic Object property sheet is displayed.
2. If you want to create an aerial vehicle, on the Objects tab, in the Dynamic Objects group, click Aerial Object. The Dynamic Object property sheet is displayed.
3. In the Object Options section of the property sheet, in the Object Type field, select one of the following:
§ 3D model
§ Image label
§ Text label
§ Virtual
4. In the Object Options section of the property sheet, in the Motion Style field, select one of the following:
§ Ground Vehicle
§ Airplane
§ Helicopter
§ Hover
5. If you selected a "3D Model" or "Image Label" type, in the File Name field, select the model or image file.
6. If you selected a "Text Label" type, in the Text field, enter the desired text string.
7. Using the property sheet, set the other parameters of the ground or aerial object. See "Creating Dynamic Objects that Move by Time" in this chapter.
8. If you want to position the dynamic object based on where the mouse is pointing in the 3D Window, on the top bar of the label’s property sheet, click Set Position Based on Mouse  . See "Moving an Object Based on Where the Mouse is Pointing in the 3D Window" in the "Working with Objects" chapter for more information.
9. If you want to position the dynamic object based on where the mouse is pointing in the 3D Window and snap it to another object, on the top bar of the dynamic object’s property sheet, click Snap Based on Snapping Options  . See "Moving an Object Based on Where the Mouse is Pointing in the 3D Window" and "Setting Snapping Options" in the "Working with Objects" chapter for more information.
10. If you want to position the dynamic object in the XY plane, on the top bar of the object’s property sheet, click XY Plane  . See "Moving an Object in the XY Plane" in the "Working with Objects" chapter.
11. If you want to position the dynamic object in the Z plane, on the top bar of the object’s property sheet, click Z Plane  . See "Moving an Object in the Z Plane" in the "Working with Objects" chapter for more information.
12. With the cursor in the 3D Window, click the mouse to define the first waypoint of the vehicle’s route.
13. Use additional mouse clicks to add waypoints to the path.
14. When you finish adding waypoints to the path, right-click to complete the route. When you close the property sheet, the vehicle starts moving along the route you have defined.
Note: After creation, you can change the parameters of the vehicle and the route using the property sheet. See "Working with the Property Sheet" in the "Working with Objects" chapter.
Creating dynamic objects that move by time
Instead of setting an object’s speed and acceleration, a dynamic object’s route can be set to begin and end at specific times. In this case, the object's acceleration is set to zero and its position is derived from the route distance, set timespan, and current TerraExplorer time.
To set a dynamic object’s movement by time:
1. On the Objects tab, in the Dynamic Objects group, click Move By Time. The Choose Time dialog and Dynamic Object property sheet are displayed.
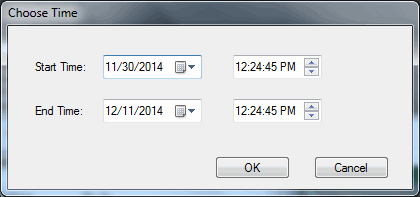
Choose Time Dialog
2. Enter a Start Time and End Time and click OK.
3. In the Object Options section of the property sheet, in the Object Type field, select one of the following:
§ 3D model
§ Image label
§ Text label
§ Virtual
4. In the Object Options section of the property sheet, in the Motion Style field, select one of the following:
§ Ground Vehicle
§ Airplane
§ Helicopter
§ Hover
5. If you selected a "3D Model" or "Image Label" type, in the File Name field, select the model or image file.
6. If you selected a "Text Label" type, in the Text field, enter the desired text string.
7. Using the property sheet, set the other parameters of the ground or aerial object. See "Dynamic Object Property Sheet Parameters" in this chapter.
8. If you want to position the dynamic object based on where the mouse is pointing in the 3D Window, on the top bar of the label’s property sheet, click Set Position Based on Mouse . See "Moving an Object Based on Where the Mouse is Pointing in the 3D Window" in the "Working with Objects" chapter for more information.
9. If you want to position the dynamic object in the XY plane, on the top bar of the object’s property sheet, click XY Plane  . See "Moving an Object in the XY Plane" in the "Working with Objects" chapter.
10. With the cursor in the 3D Window, click the mouse to define the first waypoint of the vehicle’s route.
11. Use additional mouse clicks to add waypoints to the path.
12. When you finish adding waypoints to the path, right-click to complete the route. The vehicle will only be visible during the timespan you set.
Note: After creation, you can change the parameters of the vehicle and the route using the property sheet. The Speed parameter will be unavailable since when moving objects by time, object speed is determined by the speed required to travel the set route in the set timespan. See "Working with the Property Sheet" in the "Working with Objects" chapter.
Dynamic object property sheet parameters
|
Object Parameter |
Activity |
|
Appearance |
|
|
Activation Action |
Select the action to perform when selecting the dynamic object from the Project Tree. |
|
Object Options |
|
|
Motion Style |
Determines the style of motion of the dynamic object. You can choose from Ground Vehicle, Airplane, Helicopter or Hover. § Ground Vehicle: The object is a ground vehicle. § Airplane: The object sets the pitch angles during the flight according to altitude differences between the waypoints. It also rolls while turning between the waypoints. § Helicopter: The object leans forward with a fixed pitch angle of -15 degrees. It also rolls while turning between the waypoints. § Hover: The object always keeps the pitch and roll angles set to zero. § Manual: The object turns as fast as required to point to the next waypoint (same as value over 1000), ignoring the Turn Speed. An API user can further edit the waypoint orientation (yaw, pitch, and roll). |
|
Object Type |
Determines the type of object. Choose "3D Model" to add a loaded 3D model, "Image Label" to add an image label, "Text Label" to add a text label or "Virtual" to add a virtual object. |
|
File Name |
For 3D Model and Image types, select the associated file. In the File Name field, type, or browse, a path to an .x, .xpc, .flt, .fpc, .dae, .3ds, .obj, or .glb for 3D models, or .bmp, .jpg, jpeg, .gif, .png, or .ico for image labels. |
|
Text |
Determines the text to be used if the Object type is a Text Label. |
|
Scaling Mode (previously "Limit Growth") |
This option is only available if you selected Image Label or Text Label as the Object Type. Select either of the following: § Fixed Pixel Size – Keeps the label size in pixels constant, regardless of zoom. § Fixed Real-World Size – Keeps the label size constant in real world units, so it appears smaller when you zoom out and larger when you zoom in. |
|
Font |
Click on the Edit button to open the Character Format dialog. Select the required font type, size color and style. (This option is available only if the Text Label object type is selected.) |
|
Background Color |
Select the color for the vehicle’s background. Click in the field to open the Color dialog. (This option is available only if the Text Label object type is selected.) |
|
Background Opacity |
Determines the type of background for the dynamic object. Select Transparent, Opaque or None. (This option is available only if the Text Label object type is selected.) |
|
Scale |
Determines the dimensions of the object. § For 3D Model type, the actual size of the model in the 3D World is the size of the model in its internal coordinate system times the Scale value. (i.e., if the model has a width of 5 units and the scale is set to 10 meters per pixel, the width of the object in the 3D World is 50 meters.) |
|
Route Options |
|
|
Move By Time |
When set to Yes, the dynamic object’s movement along the route is derived from its start and end times (as well as the route distance and current TerraExplorer time), rather than from its speed and acceleration. These start and end times are set in the Timespan group of the object’s property sheet. |
|
Altitude Method |
For ground vehicles, this property is set to Relative to terrain and cannot be changed. For aerial vehicles, set the altitude method to be used for the waypoints: § Select Relative to Terrain to place the waypoint at a specified altitude above the ground. § Select Absolute to place the waypoint at a specified altitude above the terrain database vertical datum base ellipsoid. |
|
Altitude |
During the creation of the route, this property determines the altitude above ground of the next waypoint. After you have finished placing all the waypoints on the terrain, you can use this property to set a new altitude for the entire route. |
|
Speed |
After you have finished placing all the waypoints on the terrain, you can use this property to set a new speed for the entire route. Note: This property is unavailable if Move by Time was set to Yes. |
|
Acceleration |
Determines the acceleration and deceleration speed of the object. The object tries to reach the defined speed at each waypoint by accelerating or decelerating according to this property. Note: This property is unavailable if the Move by Time property was set to Yes. |
|
Turn Speed |
Select the rate at which the object turns. Note: When set to a value of 1000 or higher, the object will turn as fast as required to point to the next waypoint ignoring the Turn Speed. Note: This property is unavailable if the Move by Time property was set to Yes. |
|
Circular Route |
Determines if the object restarts its route when it reaches the endpoint. Select one of the following options: § Stop at end – The object stops at the end of the route. § Move to start – The object drives/flies/walks back to the beginning of the route when it reaches the end. § Jump to start – The object jumps to the beginning of the route when it reaches the end. Note: This property is unavailable if the Move by Time property was set to Yes. |
|
Play Route on Startup |
Determines if the dynamic object starts moving when a FLY project opens. Choose Yes to start the dynamic object automatically when a FLY file opens or No to instruct the object to wait for a start command. |
|
Waypoints |
|
|
The parameters in this group are enabled only when Edit Nodes |
|
|
Selected Point |
Select the point you wish to edit. The selected point is highlighted on the 3D Window. |
|
Point X |
Enter the X-coordinate for the selected waypoint. |
|
Point Y |
Enter the Y-coordinate for the selected waypoint. |
|
Point MGRS |
The coordinates of the selected waypoint in Military Grid Reference System (MGRS) coordinates. This field is only available if Show MGRS Coordinates was selected in the Options dialog. See "View" in the "Using TerraExplorer Options" chapter for more information. |
|
Point Altitude |
Enter the altitude above ground for the selected waypoint. |
|
Point Speed |
Enter the speed for the selected waypoint. The object tries to achieve this speed by the time it reaches the waypoint, under the limitation of the acceleration parameter. |
|
Time |
Click Edit and select the date and time when the object should reach the selected waypoint. |
|
Reverse Direction |
Reverse the order of route waypoints, automatically flipping the waypoint sequence so the route runs from the last waypoint to the first. |
|
General |
|
|
Tree Name |
Type the description or name of the dynamic object. This text appears in the Project Tree as the name of the object. |
|
Message |
The message associated with the object. The number displayed is the number of the message. To create a new message, or update an existing message, open the Create Message dialog by clicking in this field and selecting Edit. See "Using the Create Message Dialog" in the "Working with Objects" chapter for more information. |
|
Tooltip |
Type a tooltip text to appear when the mouse cursor is placed over the object in the 3D Window. |
|
Ground Object |
Determines if the object is calculated as part of the terrain’s elevation. |
|
Track Style |
|
|
Show Track |
Determines if a track line indicating the dynamic object’s path is displayed in the 3D Window. Note: A track is displayed while the dynamic object is being edited (i.e., as long as its property sheet is open), regardless of this property value. This property only determines whether a track will continue to display even after the object’s property sheet is closed. |
|
Line Color |
Select the color of the dynamic object’s track line. Click the Edit button to open the Color dialog, or type the color code in hexadecimal BBGGRR format (B = Blue channel 00-ff, G = Green channel 00-ff, R = Red channel 00-ff). |
|
Line Opacity |
Enter the opacity of the dynamic object’s track line. The opacity is defined as a percentage, where 100% is opaque and 0% is transparent. |
|
Line Width |
Enter the line width for the dynamic object’s track line, in the selected Line Width Units. |
|
Line Width Units |
Select Pixels or Meters/Feet. If Meters/Feet is selected, the unit displayed, meters or feet, depends on the setting in the View tab of the Options dialog. See "View" in the "Using TerraExplorer Options" chapter. |
|
Line Pattern |
Select the dynamic object’s track line pattern. You can choose between different line patterns, e.g., solid, dashed, dotted or a combination thereof. |
|
Max. Show-Through Distance |
Sets the maximum distance of object's pivot from camera, in meters, beyond which it will not show through terrain, mesh layer, or objects that are hiding it. Set to -1 to enable show-through at any distance when editing the object. When an object is showing through terrain, mesh or objects, it can be selected, edited, and snapped to other objects. |
|
Visibility |
|
|
Max. Visibility Distance |
Sets the distance from the camera at which the object disappears. |
|
Min. Visibility Distance |
Sets the minimal distance from the camera below which the object disappears. |
|
Viewing Distance |
Determines the viewing distance of the camera from the object. This distance is used as a stop mark for any "Fly-to" or "View Object" operation. It is also used when selecting to edit the object from the Project Tree. When this value is set to the default of -1, TerraExplorer calculates and sets the ideal viewing distance for the object based on its size. |
|
Start Time |
Click Edit and select the date and time when the object should first become visible. |
|
End Time |
Click Edit and select the date and time when the object should stop being visible. |

Attaching objects to virtual dynamic objects
You can add movement to any 2D or 3D primitive by attaching them to a dynamic object with a "Virtual" Object Type.
To add movement to any object, follow these steps:
1. Create a new dynamic object, and set its waypoints. See "Creating Dynamic Objects" in this chapter for more information.
2. In the Dynamic Object property sheet, in the Object Options section, select Virtual as the Object Type, and then close the property sheet.
3. Create the 2D or 3D primitives you want to use.
4. Attach the primitive to the virtual dynamic object. See "Attaching Objects to Other Objects" in the "Working with Objects" chapter for further information.
Editing dynamic objects
You can edit dynamic objects directly in the 3D Window. This is similar to editing other objects where changing the location of the object changes the location of the route, and changing the location of a node changes the location of a waypoint.
See "Editing Objects in the 3D Window" in the "Working with Objects" chapter for further information.