Loading a point cloud model
Point cloud models are created from a list of points in a 3D area that are collected by various sources including 3D scanners. TerraExplorer supports Skyline’s proprietary Point Cloud files (CPT).
Converting point cloud data to CPT
The Convert Point Cloud to CPT tool converts point cloud data from various formats to a unified, visualization and stream-optimized Skyline-proprietary Point Cloud file (CPT) format. Supported input formats include all of the following:
§ LAS files containing LiDAR point cloud data and their compressed version (LAZ)
§ PTS text files
§ Point cloud text files (.txt, .xyz)
§ E57 files
Text point cloud files must be in space delimited format and in the order X Y Z R G B I or X Y Z I, where X, Y, and Z are coordinate data, R, G, and B are color values between 0 and 255, and I is the intensity value between 0 and 255.
The following is an example of XYZ RGBI formatted data:
1.0 1.0 1.0 0 0 255 0
2.0 2.0 2.0 0 255 0 100
3.0 3.0 3.0 255 0 0 255

Convert Point Cloud to CPT Tool
To use the Convert Point Cloud to CPT tool:
1. On the Layers tab, in the Point Cloud group, click the arrow under Point Cloud and select Convert Point Cloud. The Convert Point Cloud to CPT dialog is displayed.
2. To add source files to be converted, click Add Files, and browse to the required source files.
3. To remove a source file from the output, in the Files list, select the source, and click Remove Files.
4. Select Combine all sources into single output file to generate all the source data as one CPT model.
5. In the property sheet, set the parameters for all of the sources:
|
Parameter |
Description |
|
General |
|
|
Output Folder |
Set the folder for the generated file. Note: The output file name will be set to the same as the input file with a CPT extension. When the option to Combine all sources to single output file is selected, the combined file name is the same as the first input. |
|
Input Coordinates |
Select the type of coordinate system: Planar, Local Lat-Long or Global Lat-Long based on the coordinate system of your data. For Lat-Long data, it is generally preferable to use Local Lat-Long except when the project covers a large geographic area (e.g., an entire US state). Use Planar for data with Projected coordinate systems. |
|
Adjust Globe Curvature |
Select Yes to increase accuracy for Lat-Long CPT that will only be used with Globe terrain databases. |
|
Clip by Bounding Box (LAS) |
Select Yes to clip the CPT by the bounding box (BBox) information included in the LAS file. This property only applies to LAS files. |
|
Switch X/Y Columns (Text Files) |
Transpose the X Y columns. This property only applies to text files. Note: Text point cloud files need to be in space delimited format and in the order X Y Z R G B I or X Y Z I. |
|
Coordinate System (for LAS Files) |
|
|
Description |
Free text describing the coordinate system. |
|
Coordinate System |
Click Set to open the Coordinate System dialog, and set the required coordinate system. See "Coordinate System Dialog" in the "Basic Concepts" chapter for information. |
|
Compression |
|
|
Use Compression |
Select Yes or No. |
|
Import Attribute Fields Select the check boxes of the attribute fields you want to load with the layer. |
|
6. Click Convert to convert the files to a CPT model. When conversion is complete, you can load the converted CPT using the CPT from File command. See "Loading a Point Cloud Model from File" in this chapter for information.
Loading a point cloud model from file
To load a point cloud model from file:
1. On the Layers tab, in the Point Cloud group, click the arrow next to Point Cloud, and select CPT from File. The Browse for Point Cloud Model dialog is displayed.
2. Browse to the required .cpt file to load as the point cloud model. The point cloud model is displayed in the 3D Window and its property sheet is opened.
3. If the point cloud model is geo-referenced, it is located accordingly on the terrain. Otherwise, it is placed at the center of the 3D Window. You can then manually edit its position, or reproject it. With the cursor in the 3D Window, click the mouse to define the position of the point cloud model’s center point on the terrain.
Note: The center point of a point cloud model is automatically calculated as the center of the bounding box holding all the points in the file.
4. Using the property sheet, set the parameters of the point cloud object. See "Setting and Editing Point Cloud Properties" in this chapter for information.
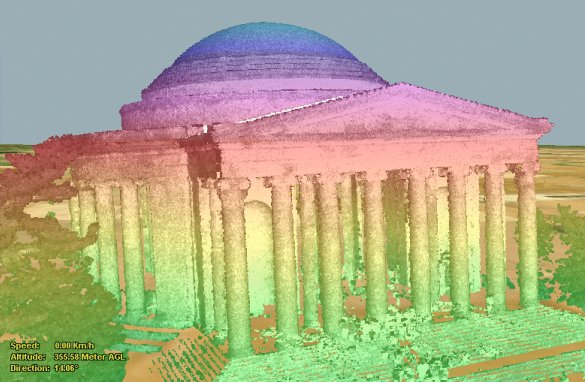
Example of a Point Cloud Model Object
Loading a point cloud model from SkylineGlobe Server
You can load point cloud models that are published to SkylineGlobe Server. For information on loading layers from SGS, see "Loading SkylineGlobe Layers" in the "Working with SkylineGlobe Server" chapter.
To load a point cloud model from a SkylineGlobe Server:
1. On the Layers tab, in the Point Cloud group, click the arrow next to Point Cloud, and select SkylineGlobe Server. The SkylineGlobe Layers dialog is displayed.
2. If you aren’t already logged in to the required SkylineGlobe Server, the Login to SkylineGlobe Server dialog is first displayed so you can log in to the server. See "Logging In to a SkylineGlobe Server" in the "Working with SkylineGlobe Server" chapter for information.
3. Search for the required layer. See "Searching for SkylineGlobe Layers" in the "Working with SkylineGlobe Server" chapter.
4. Select the layer you want to load, and click Load Layer.
5. After the layer has been placed on the terrain, you can change its properties using its property sheet. See "Setting and Editing Point Cloud Properties" in this chapter for further information.