TEZ Creator tool
The TEZ Creator simplifies the process of distributing and installing add-on TerraExplorer tools or grid shift files, customizing TerraExplorer’s layout, packaging data for distribution, or automating post-install configurations to suit the needs of an install location. Using this tool, you can package custom tools, licenses, start pages, ribbon configurations, options settings, and data libraries into a TEZ zip file for easy distribution to TerraExplorer users. A straightforward wizard with a series of well-defined steps guides you through the process.
TEZ files can be manually installed on the user’s computer, or auto-installed by placing the TEZ in the installation folder. See "Installing a TEZ File" in this chapter for more information.
To use the Make TEZ tool:
1. On the Tools tab, in the Create group, click Make TEZ. The TEZ Creator dialog is displayed.
TEZ Creator
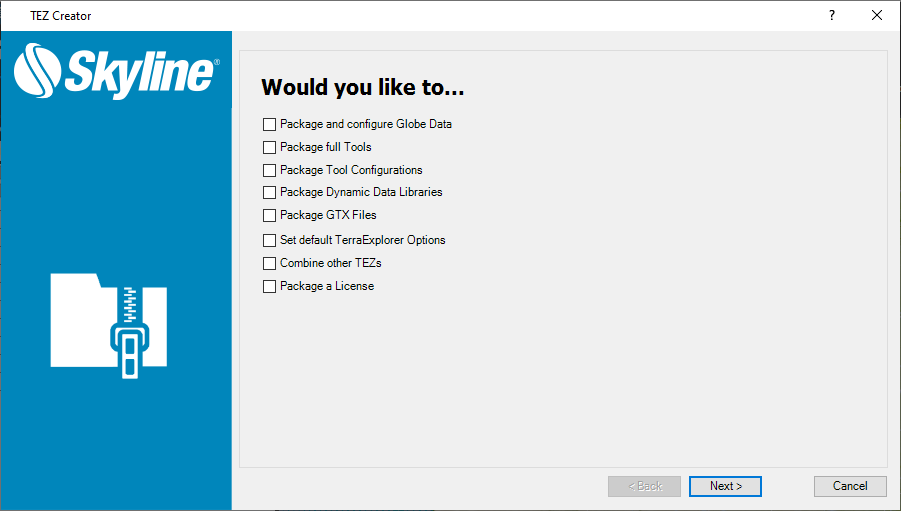
2. Select the elements to package into a TEZ file. Then click Next, and enter the required information in the respective dialogs that are displayed:
§ Package and Configure Globe Data – Package a FLY file that automatically opens when TerraExplorer is started or that is added as a link to the Start page or Project Tree.
§ Package Full Tools – Package custom tools. These tools will be added to the Tools tab of the TerraExplorer ribbon.
§ Package Tool Configurations – Reserved
§ Package Dynamic Data Libraries – Reserved
§ Package GTX (Grid Shift) Files – Package grid shift files (TIFF, GSB, GTX) to enable their installation without manually copying the files into a specific folder.
§ Set Default TerraExplorer Options – Select default options for screen overlay, units, cache size, etc.
§ Combine Other TEZs – Package multiple TEZs containing any of the components listed in the other options here into a master TEZ. When this master TEZ is launched, it will apply all the add-ons of each of the TEZs it contains.
§ Package a License – Package licenses to enable easy installation of TerraExplorer.
3. After entering the information for the various add-ons selected for inclusion in the TEZ, the Select Certificate for Signing dialog is displayed. Signing your TEZ enables files to be verified on installation, to ensure there was no tampering. This step is strongly recommended as a means of adding security. Select a certificate and then click Next. The certificate fields are automatically populated. The Create TEZ dialog is displayed.

4. In the File Path field, browse to the directory in which to create the TEZ file, and type a name for the file. You can also enter file information: title, description, creator, and version.
5. Click Create.
Package and configure globe data
This option customizes the FLY file that automatically opens when TerraExplorer is started or that is added as a link to the Start page or Project Tree.
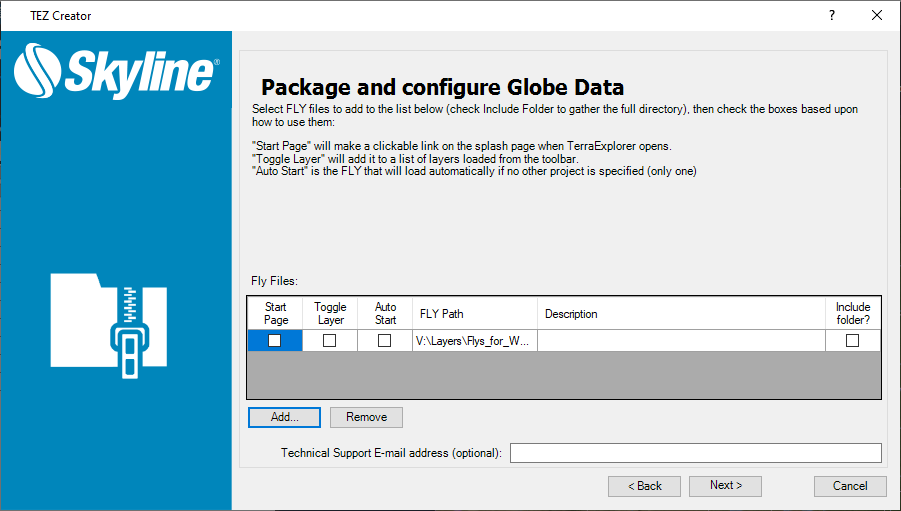
Do the following:
1. Click Add, and browse to the FLY file that you want to automatically open when TerraExplorer is started or that you want added to the TerraExplorer Start page or Project Tree.
2. Select any of the following:
§ Start Page – Adds the FLY file as a link to the Start page whenever TerraExplorer is opened.
§ Toggle Layer – Adds the FLY file to the Project Tree of any project opened in TerraExplorer.
Note: Selecting both "Start Page" and "Toggle Layer" creates two distinct copies of the FLY file.
§ Auto Start – Sets TerraExplorer to open the FLY file you selected any time you start TerraExplorer.
§ Include Folder – Copies the full contents of the selected FLY’s directory. This can be used to include all the data in a TerraExplorer published kit.
Note: Selecting this option can significantly increase the size of the TEZ file.
3. If you want to include a Technical Support E-mail address on the Start page, enter an email address.
Package full tools
This option adds custom tools to TerraExplorer, which can be accessed from the TerraExplorer ribbon.
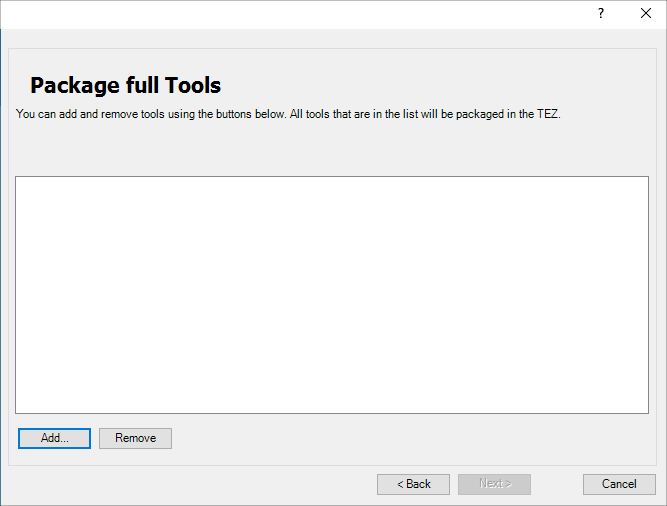
Do the following:
1. Click Add and browse to a tool’s tool.xml file. Repeat for each of the tools you want to package.
2. Click Next.
Package GTX (grid shift) files
Packaging grid shift (TIFF, GSB, GTX) files allows for their easy distribution and enables a grid shift file to be installed without manually copying the file into a specific folder. As with other TEZs, they can also be installed without administrator rights.
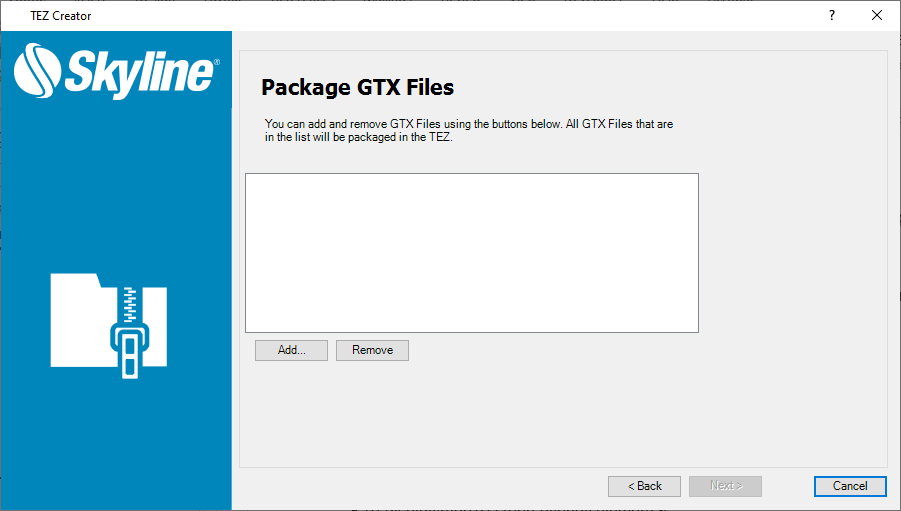
Package Grid Shift Files as TEZ
To package a grid shift file as a TEZ file:
1. Click Add and browse to one or more grid shift files. See "Adding Grid Shift Files" in the "Basic Concepts" chapter for more information about grid shift files.
2. Click Next. You can skip the installation wizard's next step: Select Certificate for Signing, and click Next again. The Create TEZ dialog is displayed.
Set default TerraExplorer options
Set default options for screen overlay, units, cache size, etc.
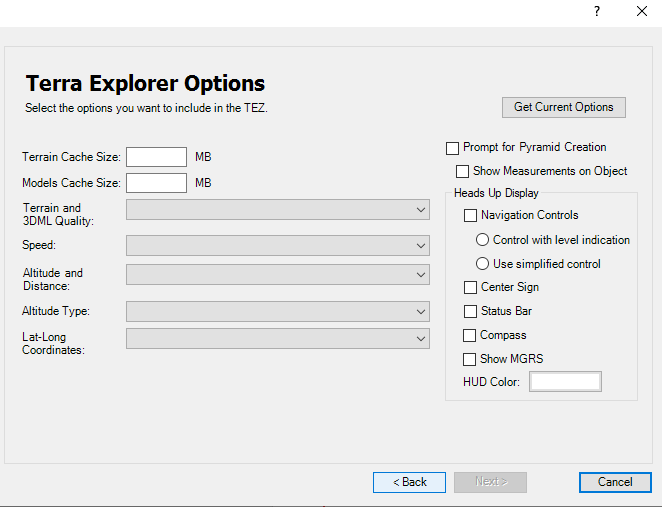
Do the following:
1. Set the default options/values that you want to set. See the "Using TerraExplorer Options" chapter for information about these options.
2. If you want to set the default values to the current project’s values, click Get Current Options.
3. Click Next.
Combine other TEZs
Package multiple TEZs containing any of the elements listed above into a master TEZ. When this master TEZ is installed, it installs all the individual TEZs that are packaged inside it.

Do the following:
1. Click Add and browse to a TEZ file. Use CTRL-click or SHIFT-click to multi-select files. Repeat for each of the TEZs you want to package.
Note: If you are packaging multiple TEZs containing different default FLY projects, the combined TEZ will have the settings and content of the last TEZ in the list.
2. Click Next.
Package licenses
Packaging licenses allows for easy distribution of licenses and enables a license to be installed without manually loading it in the License Manager or copying the license file into the installation folder. See "Installing a TEZ File" in this chapter for more information. As with other TEZs, they can also be installed without administrator rights.
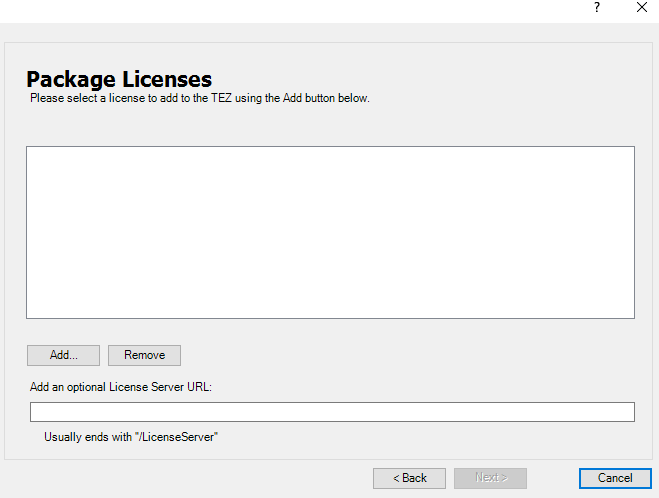
Do the following:
1. Click Add and browse to a license file. Repeat for each of the licenses you want to package.
2. If you are packaging a SkylineCloud floating license, enter the server’s URL. See "Floating License" in the "Getting Started" chapter.
Note: If you are using a self-hosted Skyline Floating License Server (SFLS), enter its URL. See the SFLS User Guide for more information.
3. Click Next.
4. In the Create TEZ dialog, in the File Path field, browse to the directory in which to create the TEZ file, and type the following name for the file: setup.tez.
Installing a TEZ file
After installing a TEZ file, all its add-ons/configurations are installed and applied to any TerraExplorer opened on the same device. A TEZ file can be manually or automatically installed.
Note: You can uninstall a TEZ file’s add-ons from the Options menu. See "Add-ons" in the "Using TerraExplorer Options" chapter for information.
To auto-install a TEZ file:
1. Save your TEZ file with the name setup.tez.
2. Place the TEZ file next to the setup.exe file, before installing TerraExplorer.
To manually install a TEZ file:
Note: TerraExplorer should be closed when the TEZ file is being installed.
1. Double-click the TEZ file. The TEZ Installer is displayed.
2. Click Yes.