Working with groups
The Project Tree contains all project elements, organized in a hierarchy of groups. You can add any number of groups, either in the root area or folder, or under another group.
Creating new groups
To create a new group under the root:
1. Right-click in the root area of the Project Tree, and then from the shortcut menu, select Create Group.
or
On the Home tab, in the Add group, click the arrow next to Project Tree and select Create Group from the dropdown menu.
2. Type the name of the new group and press ENTER.
To create a new group under an existing group:
1. Right-click the parent group, and then from the shortcut menu, select Create Group.
2. Type the name of the new group and press ENTER.
or
1. Select the parent group.
2. On the Home tab, in the Add group, click Project Tree. From the dropdown menu, select Create Group.
3. Type the name of the new group and press ENTER.
Locking groups
A locked group is a folder always shown in collapsed mode; it cannot be expanded by the TerraExplorer Viewer user. This feature is used to combine a number of objects into one virtual entity.
To lock a group:
§ Right-click the parent group, and then from the shortcut menu, select Lock Group.
To unlock a group:
§ Right-click the parent group, and then from the shortcut menu, select Unlock Group.
Setting group properties
You can assign properties to a group, including the group’s name, activation action, timespan, and location. Most of the properties apply only when the group is locked and determine the group’s look and behavior. You can also set a Project Tree group as a radio group. All items in the group are then mutually exclusive, i.e., only one item can be selected at any time.
To set the group’s properties:
1. Right-click the parent group, and then from the shortcut menu, select Properties. The Multi-Edit property sheet is displayed.
2. Click the Group tab and set the following parameters:
|
Parameter |
Activity |
|
General |
|
|
Name |
Type the description or name of the group. This text appears in the Project Tree as the name of the group. |
|
Activation Action |
Select the action to perform when selecting the locked group from the Project Tree. |
|
Status |
Select the group’s status - locked or unlocked |
|
Radio Group |
Sets the Project Tree group as a radio group, whose items are mutually exclusive, i.e., only one item can be selected at any time. Select Yes to create a radio group. |
|
Message |
The message associated with the object. The number displayed is the number of the message. To create a new message, or update an existing message, open the Create Message dialog by clicking in this field and selecting Edit. See "Using the Create Message Dialog" in the "Working with Objects" chapter for more information. The message property applies only when the group is locked. |
|
Location |
|
|
Altitude Method |
Sets the altitude method to be used for the specified location: § Select Relative to Terrain to place the location point at a specified altitude above the ground. § Select Absolute to place the location point at a specified altitude above the terrain database vertical datum base ellipsoid. |
|
Altitude |
Enter the altitude above the ground for the specified location. |
|
X |
Enter the X-coordinate of the location of interest. |
|
Y |
Enter the Y-coordinate of the location of interest. |
|
MGRS |
The coordinates of the group in Military Grid Reference System (MGRS) coordinates. This field is only available if Show MGRS Coordinates was selected in the Options dialog. See "View" in the "Using TerraExplorer Options" chapter for more information. |
|
Direction |
Enter the horizontal angle of the camera when viewing the location. |
|
Tilt |
Enter the vertical angle of the camera when viewing the location. |
|
Viewing Distance |
Enter the distance between the camera and the specified location. This property also affects the radius of the flight patterns. |
|
Set Viewpoint |
Click this button to capture the current camera position and set as the camera parameters for this location. |
|
Jump To Viewpoint |
Click this button to make the 3D Window reflect the changes made to the location’s fields. |
|
Timespan |
|
|
Start Time |
Click Edit and select the date and time when the group should first become visible. |
|
End Time |
Click Edit and select the date and time when the group should stop being visible. |
Organizing items in groups
You can move items and groups in the Project Tree into new groups or out of groups into the root folder.
To reorganize the Project Tree:
1. Select a single or multiple items. See "Selecting Items from the Project Tree" in this chapter for information.
2. If you want to move an item into a new group, click and drag it onto the group folder.
3. If you wish to move an item out of a group, drag it to any part of the root folder. When an object is dragged to the root folder a blue line appears on the left side of the Project Tree.
Converting groups to layers
Groups can be saved to the following file formats:
§ TerraExplorer FLY project
§ Esri shapefile
§ OGC KML/KMZ file
To save a group as a layer:
1. In the Project Tree, right-click the required group and select Save As Layer(s) from the shortcut menu. The Save As dialog opens.
2. Browse to the required directory in which you want to save the layer file, and type a file name.
3. Click Save.
Note: If you select this option from a group, you recursively save this group and all its sub-groups. If you select this option from the root, you save all the groups in the Project Tree.
4. If saving a group as a shapefile, the Export dialog is displayed. Enter the required parameters and click Export. See "Export to Shapefile Dialog" in this chapter for information.
Export to Shapefile dialog
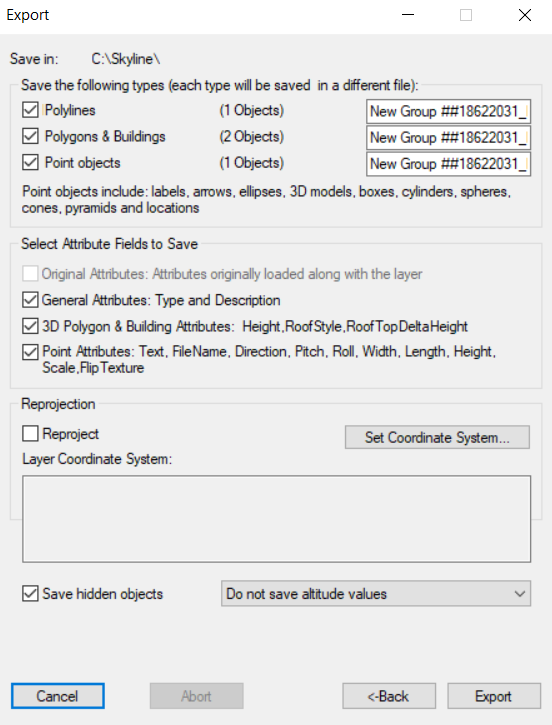
Export Dialog
To use the Export to Shapefile dialog:
1. Enter the required parameters:
|
Parameter |
Description |
|
Save in |
Displays the path of the shapefile(s) to be saved. |
|
Geometry Types |
The elements are divided into three types: § Polylines (including arcs) § Polygons (including circles, rectangles, regular polygons and 3D polygons) and buildings. § Points objects: text and image labels, 2D and 3D arrows, ellipses, 3D models, boxes, cylinders, spheres, cones, pyramids and locations. Select the check box next each one of the types you want to save. Note: Even if you save more than one group, all elements of the same type are saved in one shapefile. |
|
Select Attribute Fields to Save Add attributes fields information to the shapefile (*.dbf file). |
|
|
Original attributes |
Save any attribute fields that were originally loaded with the layer. |
|
General Attributes: |
§ TE_TYPE: The type of the element (Rectangle, Circle, Label, etc.) § TE_DESC: The description in the Project Tree |
|
3D Polygon & Building Attributes |
§ TE_HEIGHT: The height of the 3D Polygon. § TE_ROOF_ST: The style of the roof. 0 for flat, 1 for angular. § TE_ROOF_DE: The delta height between rooftop and roof base. |
|
Point Attributes |
§ TE_TEXT: The text of a text label. § TE_FNAME: The name of an image label file or a 3D model file. § TE_YAW: The direction of the element. § TE_PITCH: The pitch of the element. § TE_ROLL: The roll of the element. § TE_WIDTH: The width of the element. § TE_LENGTH: The length of the element. § TE_HEIGHT: The height of the element. § TE_SCALE: The scale of the object, if applicable. § TE_FRAME: The name of the image label frame file. |
|
Reprojection |
|
|
Reproject |
Select the Reproject check box to save the shapefile with a coordinate system different from the coordinate system of the terrain. Click the Set Coordinate System button to open the Coordinate System dialog and specify the coordinate system of the layer. See "Coordinate System Dialog" in the "Basic Concepts" chapter for information. |
|
Save Hidden Objects |
Select the check box to save all the elements, hidden or not. |
|
Saving the Elements Altitude |
Select from one of the following options: § Save altitude values relative to terrain: Save the elements in a 3D shapefile, altitude values are relative to terrain. § Save altitude values absolute: Save the elements in a 3D shapefile, altitude values are absolute. § Do not save altitude values: Save the elements in a 2D shapefile. |
2. Click Export.