Free navigation
Navigating using the mouse
The mouse is the main tool for controlling free flight in the 3D World. With the mouse on the 3D Window, you can interactively pan and zoom in and out, fly around points of interest on the terrain, and control the direction and tilt angle of the view.
Navigating in the Drag Mode
The default navigation mode using the mouse is the drag mode  . In this mode, the mouse controls the movement of the terrain.
To navigate in the drag mode:
1. Click and hold the mouse button on a location in the terrain.
2. Drag the mouse  to the sides forward, and backward. The terrain location on which you clicked is dragged along with the cursor.
3. Change the following drag mode flight parameters using your mouse as described below:
|
Parameter |
Description |
|
West - East - North - South |
Drag forward, backward, and to the sides of the 3D Window while pressing the mouse button. The terrain location on which you clicked is dragged along with the cursor. |
|
Altitude |
Rotate the wheel button and press CTRL to change altitude. |
|
Zoom |
Rotate the wheel button to zoom in or out. In Options, you can select between two zoom modes: § Zoom to cursor – Zoom to mouse cursor location. § Zoom to center – Zoom to center of screen (regardless of location of cursor). You can also double-click on the terrain to zoom in to the selected point. |
|
Terrain Tilt Angle |
While pressing CTRL or the wheel button, drag the mouse along a vertical axis of the 3D Window. The terrain tilts around the terrain center point in the direction of the drag. |
|
Terrain Rotation |
While pressing CTRL or the wheel button, drag the mouse along a horizontal axis of the 3D Window. The terrain turns around the terrain center point in the direction of the drag. |
Two additional mouse navigation modes are available: Slide mode  and Turn and tilt mode
  . You can set the preferred navigation mode in the TerraExplorer options. See "Navigation" in the "Using TerraExplorer Options" chapter for further information.
From the ribbon’s Navigation tab, you can switch between Drag (default) and Slide modes. The Turn and Tilt mode is not available from the ribbon.
Navigating in the slide mode
The slide mode slides the terrain, instead of dragging it.
To navigate in the slide mode:
1. In the Options menu, Navigation tab, select the Slide – Navigation Mode. See "Navigation" in the "Using TerraExplorer Options" chapter for more information.
2. Click and hold the mouse button on a location in the terrain.
3. Drag the mouse  to slide forward, backward and to the sides.
Your altitude and tilt angle determine the speed of the slide. The closer you are to the ground the slower the movement is. When looking to the horizon, the forward and backward movement is accelerated to allow easier navigation in the world.
4. Change the following slide mode flight parameters, by using your mouse as described below:
|
Parameter |
Description |
|
West-East-North-South |
Slide up, down, and to the sides of the terrain in the direction of the cursor. |
|
Altitude |
Rotate the wheel button and press CTRL to change the altitude. |
|
Zoom |
Rotate the wheel button to zoom in or out, in relation to the center point. You can also double-click on the terrain to zoom in to the selected point. |
|
Speed |
To increase flight speed, drag the cursor farther away from the 3D Window center in the direction of your terrain destination. To decrease flight speed, drag the cursor closer to the 3D Window center while staying in the direction of your terrain destination. |
|
Turn and Tilt |
Press CTRL or press the wheel button while flying to switch to turn and tilt movements while in the slide mode. See "Navigating in the Turn and Tilt Mode" in this chapter for further information. |
Navigating in the turn and tilt mode
In Turn and Tilt mode, the mouse controls tilt and flight direction.
To navigate in the turn and tilt mode:
1. In the Options menu, Navigation tab, select the Turn and Tilt – Navigation Mode. See "Navigation" in the "Using TerraExplorer Options" chapter for more information.
2. Click on the 3D Window to change the flight direction and tilt.
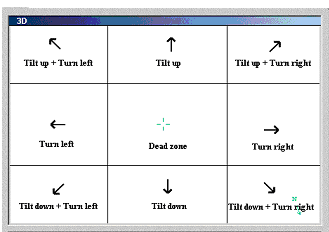
The inner area of the 3D Window is a "dead zone". Clicking in this area does not affect the direction or tilt angles. The outer area is divided into eight zones (See illustration below). The further the mouse is from the center point the faster the direction or tilt change.
3. Click and drag the mouse  to other areas and even outside the 3D Window to change the mouse operations.
4. Change the following turn and tilt mode flight parameters, using your mouse as described below:
|
Parameter |
Method |
|
Tilt angle and turning direction |
While pressing the mouse button, drag the pointer to the following 3D Window zones to perform the following: |
|
Altitude |
Rotate the wheel button and press CTRL to change altitude. |
|
Zoom |
Rotate the wheel button to zoom in or out, in relation to the center point. You can also double-click on the terrain to zoom in to the selected point. |
|
Speed |
To increase the tilt and turning speed drag the cursor farther away from the 3D Window center in the direction of your tilting and turning. To decrease the tilt and turning speed, drag the cursor closer to the 3D Window center while staying in the direction of your tilting and turning. |
|
Slide |
Press CTRL or the wheel button while flying to switch to slide movements while in the turn and tilt mode. See "Navigating in the Slide Mode" in this chapter for further information. |
Navigating using on-screen navigation controls
The on-screen navigation panel displayed in the upper-right of the 3D Window provides basic controls for navigating through the 3D World. There are two viewing options for these controls: a smaller, simplified control panel that provides only a north indicator and zoom controls, and an advanced panel that also includes controls for rotating, panning, and adjusting tilt.
The type of navigation controls is selected in the Screen Overlay tab of the Options menu. See "Screen Overlay" in the "Using TerraExplorer Options" chapter for information.
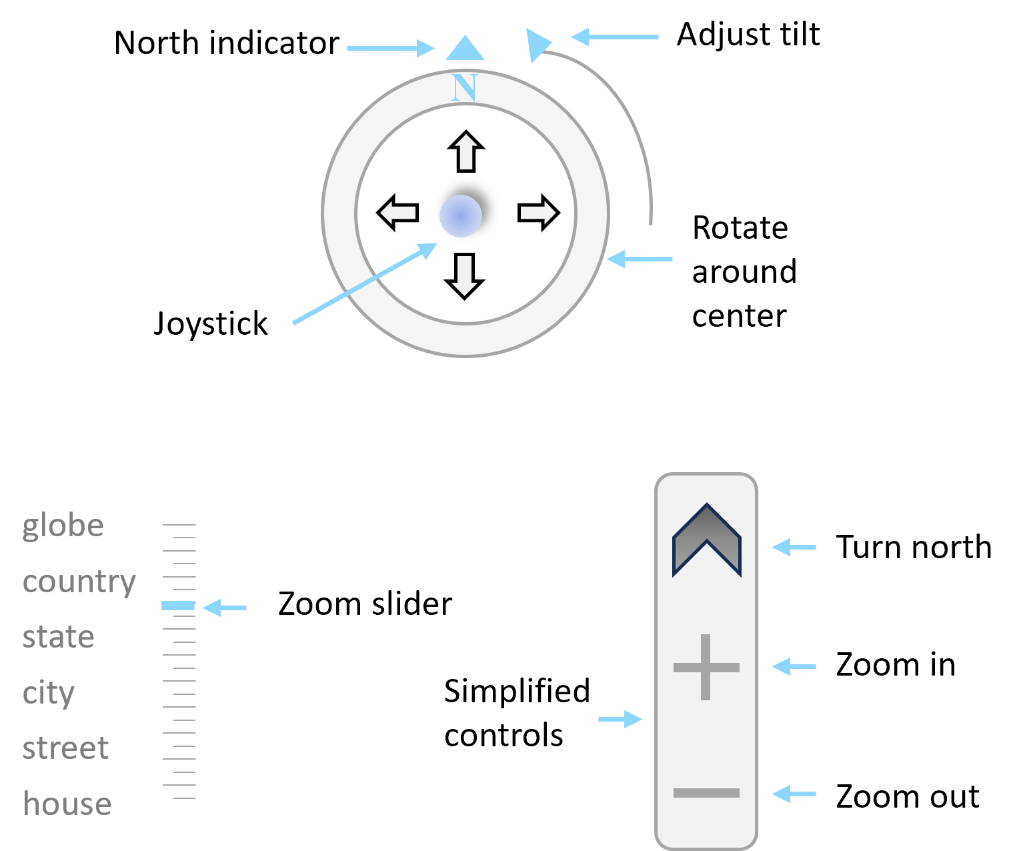
Advanced Navigation Control and Simplified Navigation Control
To navigate in the 3D Window using the advanced navigation controls:
|
Navigation Control |
Description |
|
Adjust Tilt |
Move the Tilt slider to adjust the tilt. |
|
North Indicator |
Click the N indicator in the compass ring to face north. |
|
Compass Ring |
Click and turn the compass ring to change the 3D view direction. |
|
Joystick |
The virtual joystick enables you to navigate freely in the 3D World in an intuitive manner, similar to real-life flying. With the virtual joystick, you can fly backward, forward and sideways. You can also perform the same action by using the up/down and left/right arrows around the joystick. |
|
Zoom Slider |
Click and drag the elevation slider to zoom in and out. You can also click the globe, country, state, city and street levels. |
To navigate in the 3D Window using the simplified navigation control:
|
Navigation Control |
Description |
|
|
Turn to face north. |
|
|
Zoom in. |
|
|
Zoom out. |
Jump to location panel
Using the Jump to Location panel, you can jump to a location using its longitude, latitude, altitude, direction, and MGRS values.
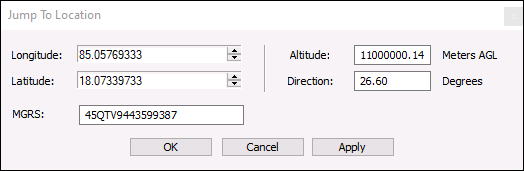
Jump to Location
To use the Jump to Location panel:
1. Click on the coordinates section of the Status Bar to display the panel, and enter the required values.
Note: The Status Bar must be showing in order to open the Jump to Location panel. See "Using Screen Overlay" and "Status Bar" in the "Basic Concepts" chapter for more information.
|
Field |
Description |
|
Longitude |
Enter the new location’s East-West values. |
|
Latitude |
Enter the new location’s North-South values. |
|
Altitude |
Enter the required altitude value. Note: The altitude is limited to the minimum value defined in the Altitude settings in TerraExplorer Settings. See "Navigation" in the "Setting the Project" chapter for more information. |
|
Direction |
Enter the required direction angles. |
|
MGRS |
The required location’s Military Grid Reference System (MGRS) coordinates. This field is only available if Show MGRS Coordinates was selected in the Options dialog. See "View" in the "Using TerraExplorer Options" chapter for more information. |
Note: The Jump to Location Panel displays the altitude and location values in the system’s units. See "View" in the "Using TerraExplorer Options" chapter for further information on how to change the display units.
2. Click OK.
Navigating using ribbon controls
To navigate using ribbon controls:
§ On the Navigation tab, click the required command:
|
Navigation Menu Command |
Activity |
|
Zoom |
Zooms in or out from the center of the view to a distance according to the following presets in the sub-menu: House, Street, City, State, Country, Globe. |
|
North |
Turn the viewpoint in the 3D Window to face north. |
|
Rotate |
Flies in a circle pattern around the terrain coordinate at the center of the 3D Window. |
|
Follow |
Click and select a navigation pattern. If an object is selected, you can also select a predefined view angle. |
Navigating using the keyboard
The keyboard can also be used to navigate in the 3D World, either alone or together with other control devices, such as the mouse and joystick. Keyboard commands can be issued even while performing a pattern flight around a location or object, or even while playing a presentation.
TerraExplorer supports two keyboard navigation layouts:
§ Traditional mapping - Legacy keyboard layout used in previous versions.
§ WASD mapping – Gaming style layout.
The keyboard mapping mode is set in TerraExplorer Options. See "Navigation" in "Using TerraExplorer Options" for more information.
|
Task |
Keyboard Command |
|
|
Traditional Mapping |
WASD Mapping |
|
|
Forward |
||
|
§ Pan forward while key is pressed |
N/A |
W (+Shift=faster) |
|
§ Increase forward speed and maintain even when key is released |
A |
+ (Plus key) |
|
Backward |
|
|
|
§ Pan backward while key is pressed |
N/A |
S (+Shift=faster) |
|
§ Increase backward speed and maintain even when key is released |
Z |
- (Minus key) |
|
Pan Left |
Q (+Shift=faster) |
A (+Shift=faster) |
|
Pan Right |
W (+Shift=faster) |
D (+Shift=faster) |
|
Pan Up |
S (+Shift=faster) |
E (+Shift=faster) |
|
Pan Down |
X (+Shift=faster) |
Q (+Shift=faster) |
|
Pitch Up |
Up Arrow |
|
|
Pitch Down |
Down Arrow |
|
|
Turn Left |
Left Arrow |
|
|
Turn Right |
Right Arrow |
|
|
North |
Home |
|
|
South |
End |
|
|
Pitch 0 |
Page Up |
|
|
Pitch -90 |
Page Down |
|
|
Slide Left (free flight only) |
Q (+Shift=faster) |
|
|
Slide Right (free flight only) |
W (+Shift=faster) |
|
|
Zoom Out (when performing a flight pattern) |
Q (+Shift=faster) |
|
|
Zoom In (when performing a flight pattern) |
W (+Shift=faster) |
|
Navigating using the joystick
In addition to the other navigation modes, TerraExplorer Pro supports a game device (joystick) as a unique navigation mode.
Using a joystick, you can simulate a more realistic airplane movement in the 3D World. In the same way as a real airplane behaves, you can use a joystick to roll to the sides, change direction and tilt up and down to change the altitude.
Note: The joystick movements always affect the tilt and direction angles even when the mouse and keyboard are set to affect the viewpoint angles. TerraExplorer Pro supports different types of joysticks. From a regular 2-axis 2-buttons to a complex Point of View (POV) control. If the connected joystick does not support all the features necessary to perform a free-flight you can use it together with other flight controls such as the keyboard, the mouse and the Navigation Controls. TerraExplorer also supports use of 3D navigation devices, including 3DConnexion SpaceNavigator™, SpaceExplorer™, SpaceTraveler™ and SpacePilot™, which enable you to navigate with greater ease, speed and precision.
Note: Joystick configuration may vary between computers. Please refer to the joystick or game controllers settings under the Windows Control Panel dialog for further information on joystick configuration on your computer.
|
Joystick Configuration |
Description |
|
Flight Tilt |
Moving the joystick downwards and upwards affects the flight's tilt angle and results in an altitude change. § Move the stick forwards to change the flight angle downwards. § Move the stick backwards to change the flight angle upwards. § Move the joystick forward or backward to adjust your orientation and altitude |
|
Flight Roll |
Moving the joystick to the left and right affects the flight’s roll angle and direction. § Move the stick left to roll to the left. § Move the stick right to roll to the right. |
|
Speed |
The flight speed is controlled from the joystick’s main buttons. § Press Button 1 to increase the speed (until you reach maximum speed). § Press Button 2 to reduce the speed (until you reach minimum speed). The joystick’s speed is defined in the Navigation tab of the Project Settings dialog. See "Navigation" in the "Setting the Project" chapter for further information. |
If your joystick has a Point of View (POV) button, additional controls are available:
|
Control |
Activity |
|
POV Tilt |
By moving the POV button upward or downward, you can set the viewpoint's angle distinct from the flight's own tilt: § Move the POV stick up to angle the view upwards. § Move the POV stick down to angle the view downwards. |
|
POV Direction |
By moving the POV button left or right, you can orient the viewpoint independently from the flight's direction: § Move the POV stick to the left to angle the view to the left. § Move the POV stick to the right to angle the view to the right. |
Touch screen navigation
Using touch gestures
TerraExplorer Pro supports several gestures for 3D Window navigation:
§ One finger drag - Move the terrain
§ Two finger drag - Rotate the terrain
§ Two finger pinch - Zoom in/out
§ Double tap - Fly in
§ Long tap - Open shortcut menu
Navigation controls
Simplified navigation controls offer basic controls while conserving screen real estate:
§  - Turn to face north.
§  - Zoom in.
§  - Zoom out.
See "Navigating Using On-Screen Navigation Controls" in this chapter for more information.