Using the Item List
You can search for and select items, e.g., photos, LiDARs, and tiles, and perform many other commands using the Item List. All selected items are selected both in the list (a check is displayed in the Selection column and their row is highlighted) and in the 3D Window. Different commands are available in the various lists.
|
|
Selection Point – Select all list items that intersect with the point you draw. This option is only available for photos and LiDAR. |
|
|
Selection Polygon – Select all list items that intersect with the polygon you draw. |
|
|
Selection Rectangle – Select all list items that intersect with the rectangle you draw. |
|
|
Show Original Photos in Selected Point – Display all photos that intersect with a selected point based on original photo positions. This option is only available for photos. See "Displaying Camera Symbols" in the "Preparing the Project" chapter. |
|
|
Show Calculated Photos in Selected Point – Display all photos that intersect with a selected point based on aerotriangulation calculations. This option is only available for photos. See "Displaying Camera Symbols" in the "Preparing the Project" chapter. |
|
|
Show All Photos – Display camera symbols for all photos. This option is only available for photos. See "Displaying Camera Symbols" in the "Preparing the Project" chapter. |
|
|
Load Photo File – Load one or more photo files to the selected collection. This option is only available for photos. |
|
|
Select All – Select all list items. |
|
|
Clear Selection – Clear all selected list items. |
|
|
Clear Columns Filter – Clear any active filter that was applied. See "Filtering Data" in this chapter for information. |
|
|
Manual Retouch – Open Manual Retouch tool. This option is only available for manual retouch polygons. See "Marking a Mesh Layer for Retouching" in the "Reviewing Your Build" chapter for information. |
|
|
Import – Import manual retouch or water polygon layer. This option is only available for manual retouch and water polygon layers. See "Importing Water Body Polygons" and "Exporting and Importing a Retouch Layer" in the "Reviewing Your Build" chapter for more information. |
|
|
Export – Export manual retouch or water polygon layer. This option is only available for manual retouch polygon and water polygon layers. See "Exporting Water Body Polygons" and "Exporting and Importing a Retouch Layer" in the "Reviewing Your Build" chapter for more information. |
|
|
Filter by Reconstruction Area – Select all tiles in the current reconstruction area. This option is only available for reconstruction tiles. See "Setting the Reconstruction Area" in the "Preparing the Project" chapter for information on defining the area of the project on which PhotoMesh should perform the reconstruction steps of the build process. |
|
|
Draw Water Body Polygon – Create a new water body. This option is only available for water polygons. See "Creating Water Body Polygons" in the "Reviewing Your Build" chapter. |
|
|
Draw Leveled Polygon – Create a new leveled water body. This option is only available for water polygons. See "Creating Water Body Polygons" in the "Reviewing Your Build" chapter. |
|
|
Edit Water Body – Edit a water body. This option is only available for water polygons. See "Editing a Water Body Polygon" in the "Reviewing Your Build" chapter. |
|
|
Jump to Object – Jump to the object or layer. This option is only available for objects and layers. |
|
|
Open Object’s Properties – Open the object or layer’s properties sheet. This option is only available for objects and layers. |
|
|
Open in TerraExplorer – Open the build outputs in TerraExplorer. This option is only available for build outputs. |
|
|
Open Project’s Output Folder – Open the folder to access any of the project’s outputs. This option is only available for build outputs. |
|
|
Expand Only Current Build’s Outputs – Expand only the outputs generated in the current build. All other builds’ output information will be collapsed. This option is only available for build outputs. |
|
|
Hide All Layers – Hide all build output layers. This option is only available for build outputs. |
|
|
Open Control Point Editor – Open the selected control point in the Control Point Editor. |
|
|
Display Rays – Display in the 3D Window only the photos that were sampled for the selected control point and project rays from each control point back to the photos it is marked in. This option is only available for control points. |
|
|
Add Reference Project – Add a project that will be used as a reference, to adjust the geographic location photos in your project. |
|
|
Toggle Tile Base – Toggle the display of the tile bases of tiles created as adaptive 3D boxes. This option is only available for reconstruction tiles. |
|
|
Flatten Terrain –Flatten terrain to height of five meters below lowest tile. This option is only available for aerotriangulation and reconstruction tiles. |
|
|
Hide Terrain –Hide the terrain texture in the area of the project (the terrain appears as a black image). This option is only available for aerotriangulation and reconstruction tiles. Note: You can hide the entire terrain texture from the View tab. See "Hide Terrain" in the "Basic Concepts" chapter for more information. |
To select items using an item list:
1. If you want to search for items according to geographic location, use any of the selection buttons.
2. If you want to search for items whose property information contains a specific string (e.g., Name, Altitude or X/Y value), in the list’s search field, type a search term, and press ENTER. The specified text is highlighted wherever it appears in the list. You can use the Previous ![]() and Next
and Next ![]() buttons to jump in the list from one search result to the next.
buttons to jump in the list from one search result to the next.
Filtering Data
To filter data:
1. Point to the column by which you want to filter, and click the Filter icon ![]() . The Filter dialog is displayed.
. The Filter dialog is displayed.
Numeric/Text Filters
2. Do any of the following:
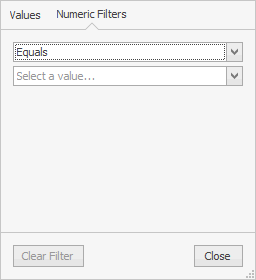
§ To select a numeric/text filter, select the Numeric Filters/Text Filters tab. A filter is comprised of the (already) selected property, an operator, and a property value. Each property type has its corresponding operators. Select an operator from a list of operators, and a property value.
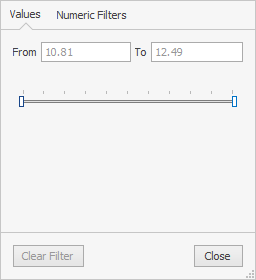
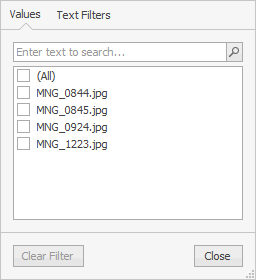
§ To filter by values, select the Values tab. For numeric values, enter the From/To values of the data you want to view. For text values, select the check boxes of the data you want to view. All other data will be filtered, i.e., temporarily hidden.
§ If you want to clear the filter, click Clear Filter.
3. Click Close. The applied filter(s) are listed at the top of the panel, e.g., ![]()
4. If you want to clear all filters that were applied, click Clear Columns Filter ![]() .
.
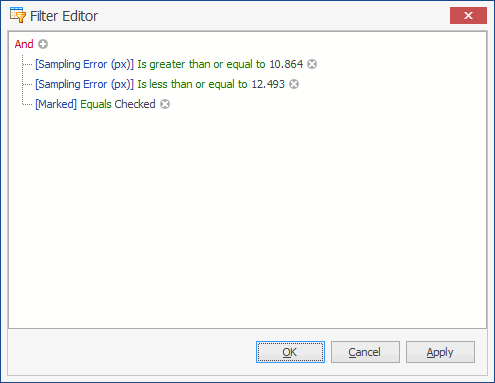
Filter Editor
You can use the Filter Editor to add and remove conditions. A search expression can consist of more the one condition. In this case, you need to insert a connector between the conditions to specify their relations. In addition to AND, you can use the OR, NOT and [] connectors to define the relations between conditions.
To access additional sorting commands, right-click any column header. Select any of the following commands:
|
Command |
Description |
|
Sort Ascending |
Sort all data in the table by this column in ascending order. |
|
Sort Descending |
Sort all data in the table by this column in ascending order. |
|
Group by This Column |
Group the data by this column. Note: If you want to clear the grouping, right click above the column headers, and select Clear Grouping. |
|
Show Group by Box |
Display boxes, above the photo table, indicating how the data is grouped in the table. Note: If you want to clear the Group by boxes, right click above the column headers, and select Hide Group by Box. |
|
Hide This Column |
Hide the selected column |
|
Column Chooser |
Customize which columns show in the table. Drag and drop columns to and from the Customization dialog. |
|
Best Fit |
Adjust the selected column’s width for the best fit for its contents. |
|
Best Fit (all columns) |
Adjust the all the table’s column widths for the overall best fit. |
|
Filter Editor |
Open the Filter Editor to edit the table filter. |
|
Show Auto Filter Row |
Display a row with a filter option for each of the columns. |